


Battle of Bazentin Ridge - Picture
More about World War 1
|
|


Battle of Bazentin Ridge
Date
14 July 1916
Location
Somme, Picardy, France
Result
Tactical British victory
Date: 14 July 1916
Location: Somme, Picardy, France
Result: Tactical British victory
Belligerents:
: United Kingdom
South Africa
Commanders and leaders:
: Henry Rawlinson
Strength:
: 5 divisions
Casualties and losses:
: 9,000 dead, wounded, or missing
Main battles in small caps and other engagements below:
Albert - Bazentin Ridge - Delville Wood - Pozix¨res Ridge - Guillemont - Ginchy - Flers-Courcelette - Morval - Thiepval Ridge - Transloy Ridges - Ancre Heights - Ancre
Montauban - Mametz - Fricourt - Contalmaison - la Boiselle - Gommecourt - Longueval - Trx´nes Wood - Ovillers - Fromelles - High Wood - Mouquet Farm - Martinpuich - Combles- Lesboeufs - Gueudecourt - Eaucourt l'Abbaye - le Sars - Butte de Warlencourt- Schwaben - Stuff Redoubts - Regina Trench - Beaumont Hamel
The Battle of Bazentin Ridge, launched by the British Fourth Army at dawn on 14 July 1916, marked the start of the second phase of the Battle of the Somme. Dismissed beforehand by one French commander as "an attack organized for amateurs by amateurs", it turned out to be "hugely successful" for the British, in complete contrast to the disaster of the first day on the Somme. However, like the first day, the British failed to exploit their advantage in the wake of the victory and as German resistance stiffened, a period of bloody attrition commenced.
Prelude
In the aftermath of 1 July, the first day of the battle of the Somme, the plans of General Douglas Haig were in disarray. North of the Albert-Bapaume road the attack had failed completely while south of the road, alongside the French XX Corps, the objectives of Montauban and Mametz had been captured. Therefore Haig decided to concentrate his future operations in the south. The Fourth Army of Lieutenant-General Henry Rawlinson, which had been responsible for the entire British sector on 1 July, handed over the northern sector to the Reserve Army of Lieutenant-General Hubert Gough.
While the British had breached the first line of German defences north of the Somme River, they were now faced with a complete second line of defences which extended along the ridge of high ground from near Thiepval in the north to the villages of Guillemont and Ginchy in the south. Where the British had advanced at Mametz and Montauban, the second position ran along the Bazentin Ridge on which lay the villages of Bazentin le Petit, Bazentin le Grand and Longueval. Adjacent to Longueval was Delville Wood. These villages became the objectives for the renewed British offensive.
Preliminary operations
In the fortnight before the battle, the Fourth Army carried out a series of preliminary operations to prepare their start line for the assault on the ridge. This involved capturing a series of first-day objectives that remained untaken and demonstrated the appalling price that was to be paid for indecision and hesitation of the senior British commanders.
On 3 July the 9th (Scottish) Division, the reserve of XIII Corps on 1 July, occupied Bernafay Wood east of Montauban while the 19th (Western) Division took La Boisselle on the second attempt. An attack by the 12th (Eastern) Division on Ovillers, north of the Albert-Bapaume road, was a failure. The following day the 9th Division occupied Caterpillar Wood to the west of Montauban. The progress of XV Corps at Mametz Wood was not so easy. The Germans had abandoned the wood on the first day but had reoccupied it on 4 July when the British made their first efforts to take it.
On 7 July a concerted set of attacks were made against Ovillers, Contalmaison and Mametz Wood. The 12th and 25th Divisions made minor progress at Ovillers but the attacks of the 17th (Northern) Division on Contalmaison and the 38th (Welsh) Division were failures. The Welsh tried again on 10 July and seized Mametz Wood on the second attempt while the 23rd Division took Contalmaison.
From 3 July to 13 July, the Fourth Army carried out 46 "actions" in preparation for the next push, resulting in 25,000 casualties. Rawlinson and Haig have been widely criticised for this piecemeal approach to the battle, often causing more severe attrition of the British ranks than the German. However, with the capture of Contalmaison and Mametz Wood, the Fourth Army was now in position to attack Bazentin Ridge.
Planning
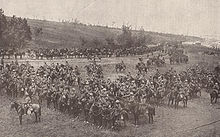
Picture - Indian cavalry from the Deccan Horse during the Battle of Bazentin Ridge. Note the lances held by most of the cavalrymen, which were actually employed during a cavalry charge on the evening of 14 July.
The plan for 14 July, conceived by General Rawlinson and XIII Corps commander, Lieutenant General Walter Congreve, bore little resemblance to the failed plan of 1 July. The attack would be carried out by two corps; XV Corps would attack on the left against Bazentin le Petit and Bazentin le Grand while XIII Corps would attack on the right against Longueval. Each corps would attack at dawn, 3.25 a.m., with two divisions each. The assaulting battalions would make a night advance then move out into no man's land, which was up to 1,200 yards (1100 m) wide, and lie close to the German barbed wire, ready to rush the German trenches when the barrage lifted.
The attack would be preceded by a hurricane artillery bombardment lasting only 5 minutes. Artillery preparation actually began three days earlier, on 11 July, but it was not as heavy as on 1 July and so did not signal so obviously the British intentions to attack. Emphasis was placed on counter-battery fire to eliminate the German guns. Critically, Rawlinson had 950 guns and howitzers, two thirds the artillery strength available on 1 July, but was attacking on about one quarter of the 1 July frontage, only 6,000 yards (5.5 km) compared to 22,000 yards (20 km). Also the depth of the planned advance was less so the German second position was subjected to a saturation of shells; 660 lb to every yard (330 kg/m) of German trench.
General Haig expressed doubts about the plan, believing it to be overly complex and that a night march by inexperienced New Army troops would result in confusion and disarray before the attack even began. Haig proposed an alternate plan, involving attacking from Mametz Wood, where the lines were closest, and then "rolling up" the German flank towards Longueval. However, Rawlinson's plan prevailed though Haig required that XIII Corps' reserve division, the 18th (Eastern) Division, would clear Trx´nes Wood on the extreme right flank.
Dawn attack
The section of the German second position from Bazentin le Petit to Longueval was held by the German 3rd Guard Division. At 3.20 a.m. the British artillery opened their intense bombardment on the German front-line trenches. At 3.25 a.m., when the bombardment lifted to the second-line reserve trenches, the infantry rushed in. The bombardment fell on the reserve trenches for a further two minutes before lifting again. The first wave of British infantry, made up of bombing parties, was to push straight on to the reserve trenches, leaving the following waves to mop up the front-line. Surprise was not complete and in places the German defenders met the advancing infantry with rifle and machine gun fire but elsewhere the garrisons were caught in their dugouts. As on 1 July, the quality of the wire-cutting was variable; sometimes it posed no obstacle, elsewhere the attacking waves got held up and cut to pieces.
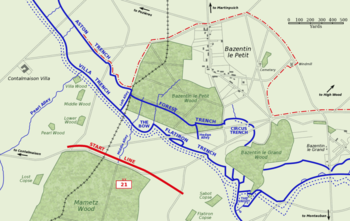
Picture - Map of the German second position facing the British 21st Division near Bazentin le Petit, 14 July 1916. The division's start line is in red. The area captured by 9 a.m. is shown by the dashed red line.
At the left, the 21st Division attacked from Mametz Wood, crossing no man's land into Bazentin le Petit Wood. On their right was the 7th Division which, having been faced with over 1,000 yards (900 m) of no man's land to cross, had crept its assaulting battalions within 100 yards (90 m) of the German wire when the bombardment lifted. The 7th Division were faced with a complex of German trenches - Flatiron Trench, Marlboro Trench and The Snout - beyond which lay Bazentin le Grand Wood, but they reached all their objectives. By mid-morning these two XV Corps divisions had captured the village of Bazentin le Petit.
On the right, attacking between Bazentin le Grand and Longueval were the two XIII Corps divisions, left to right, the 3rd Division and the 9th (Scottish) Division. The 9th Division, which also contained the South African Infantry Brigade (in reserve near Carnoy), took Longueval and reached the fringe of Delville Wood which flanked the village but were unable to take the German redoubt at Waterlot Farm.
In the centre, things did not go well for the 3rd Division attacking from Montauban towards Bazentin le Grand. The German wire was uncut and the defenders alert. The German defensive barrage laid down in no man's land missed the assaulting battalions but caught the supporting waves. Typical of the division's fortunes was the 7th Battalion, King's Shropshire Light Infantry (8th Brigade) which lost eight officers and 200 other ranks killed.
Meanwhile the 18th (Eastern) Division, attacking from Bernafay Wood east of Montauban, had successfully captured Trx´nes Wood.
High Wood
While progress was slow on the right and the struggle for Longueval continued, XV Corps had control of the Bazentin villages by 9 a.m. and the prospect of a breakthrough loomed. From the Bazentin ridge, the British could look north-east across a shallow valley towards High Wood, beyond which lay the incomplete German third position. There was no sign of the enemy and thick stands of grain indicated terrain only lightly damaged by shellfire, promising good going for cavalry.
Before advancing, the generals decided to reconnoitre; Brigadier-General Potter of the 9th Brigade (3rd Division) and Major-General Watts, commander of the 7th Division, eventually walked almost to the edge of High Wood without a shot being fired. The wood, so it appeared, was empty. However, a request to XV Corps to allow the 7th Division's reserve brigade to take possession of High Wood was rejected. Instead, the cavalry would be used.
The 2nd Indian Cavalry Division had been held in readiness to exploit the breakthrough but it had encamped at Morlancourt, four miles (6 km) south of Albert and would have to negotiate the churned battlefield over which the British had been advancing for the past fortnight. The division was ordered forward at 7.40 a.m. but by midday had only reached Carnoy, close behind the old British front-line. At 12.15 p.m., Fourth Army HQ ordered the 7th Division to advance but the order was immediately countermanded because Longueval had not been cleared and German guns could enfilade the approaches across the valley to High Wood.
Finally, a 7 p.m. in the evening, the cavalry arrived. Two regiments, the 7th Dragoon Guards and the 20th Deccan Horse, passed between Bazentin le Grand and Longueval and charged with their lances against High Wood. Unfortunately, the opportunity for an easy victory at High Wood had passed and the Germans, having regrouped after the shock of the morning, had begun filtering back into the wood. The cavalry were met with artillery and machine gun fire. In the words of 2nd Lieutenant F.W. Beadle, a forward observation officer for the artillery who witnessed the charge:
It was an incredible sight, an unbelievable sight, they galloped up with their lances and with pennants flying, up the slope to High Wood and straight into it. ... They simply galloped on through all that and horses and men were dropping on the ground, with no hope against the machine guns, because the Germans up on the ridge were firing down into the valley where the soldiers were. It was an absolute rout. A magnificent sight. Tragic.
Nevertheless, the cavalry regiments reached High Wood, killed a number of Germans and took 32 prisoners. They held on through the night of July 14-15 but no reinforcements were forthcoming - the rest of the 2nd Indian Cavalry Division had been ordered to retire to their bivouacs. The following morning the Dragoon Guards and Deccan Horse withdrew.
Meanwhile, the 33rd Division - XV Corps' reserve - had begun moving forward via Fricourt at 2 p.m. and would reach the Bazentin ridge as the cavalry went in. The division had orders to pass through the 21st Division on the next day and continue the advance. The situation that night was confused with senior commanders believing High Wood had been captured. The 100th Brigade of the 33rd Division was ordered to 'consolidate' but while attempting to dig trenches in the southern tip of the wood, it became all too apparent to the brigade's commander that High Wood had not been captured.
Yet, on 15 July, the 100th Brigade was told to form up across the valley, facing north with High Wood on their right flank, and advance towards Martinpuich. Protests to division were ignored and the attack went ahead at 9 a.m. after half an hour of preliminary bombardment. Enfiladed by German machine guns in the wood, the attack got nowhere. One company of the 16th Battalion, King's Royal Rifle Corps (the Church Lads Brigade Pals battalion), had been given the task of 'clearing' the wood in support of the advance but of the 200 who went in, only 67 came out.
Aftermath
The failure to seize the opportunities of the morning of 14 July proved costly for the Fourth Army. It would take two months of bloody attrition before High Wood was finally captured. Following the loss of the Bazentin ridge, the Germans built a "switch trench", known as the Switch Line, to connect their second position near Pozix¨res with their third position under construction on the next ridge. The Switch Line ran through the northern tip of High Wood and one could not be captured without the other and so it was not until the next major offensive, the Battle of Flers-Courcelette on 15 September, that High Wood and the Switch Line fell.
A similar situation developed at Delville Wood which would change hands a number of times over the following month. Having breached the German second position, attention now turned to the flanks. On the right, after Delville Wood was taken, the villages of Guillemont and Ginchy had to be captured in order to bring the French forces into line. On the left, the German strongpoint of Pozix¨res protected the second position north of the Albert-Bapaume road.
The dawn attack of 14 July suggested that the British had discovered the formula for successful battles in trench warfare however subsequent fighting demonstrated that the lessons had not been learnt. The next large Fourth Army attack came on the night of 22 July - 23 July, involving six divisions, but ended in complete failure. Attacks were uncoordinated, artillery preparation was inadequate and the Germans, who had learnt lessons, had adopted a more flexible system of defense, moving away from concentrating defenders in a front-line trench.
Citations
Bibliography
Sheffield, Gary (2003). The Somme. Cassell. ISBN 0-304-36649-8.
Battle of the Somme: order of battle
More aircraft.
Source: WikiPedia