


Battle of Ctesiphon - Picture
More about World War 1
|
|


Battle of Ctesiphon
Date
22 November 1915 - 25 November 1915
Location
Ctesiphon, present-day Iraq
Result
tactically inconclusive, strategic Ottoman victory
Date: 22 November 1915 - 25 November 1915
Location: Ctesiphon, present-day Iraq
Result: tactically inconclusive, strategic Ottoman victory
Belligerents:
: British Empire
British India
Commanders and leaders:
: Charles Townshend
Strength:
: 11,000 troops,
2 warships
Casualties and losses:
: 4,600
British India
The Battle of Ctesiphon (Turkish: Selman-ı Pak Muharebesi) was fought in November 1915 by the British Empire and British India, against the Ottoman Empire, within the Mesopotamian Campaign of World War I.
Indian Expeditionary Force D, mostly made up of Indian units and under the command of Gen. Sir John Nixon, had met with success in Mesopotamia since landing at Al Faw upon the Ottoman Empire's Declaration of War on November 5, 1914.
One of the primary reasons for initiating the campaign in Mesopotamia was to defend the oil refinery at Abadan at the mouth of the Shatt al-Arab. Adopting a forward defence policy, the British army under General Townshend fought off a series of small Ottoman forces. Then after a year of a string of defeats, the Ottoman forces were able to halt the British advance in two days of hard fighting at Ctesiphon.
Battleground
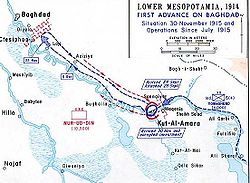
Ctesiphon lies on the left bank of the Tigris River in the barren Iraqi desert, about 380 miles (610 km) upstream from Basra, 40 miles (64 km) north of Kut al-Amara, and 16 miles (26 km) south-east of Baghdad. It is a good defensive position located in a 6-mile-long (9.7 km) loop of the Tigris river. At the town there is a ruined palace, the remains of a Parthian capital.
Picture - Advance and retreat from Ctesiphon, 1915.
The Ottoman forces had formed a well-camouflaged and formidable line of trenches crossing the river. There were two lines of trenches, there was also a 20-foot-high (6.1 m) ancient wall 3 miles (4.8 km) south of the main line used for observation by the Ottoman forces.
The Ottoman forces consisted of approximately 18,000 men and 52 guns. The overall commander of the Ottoman army in Mesopotamia was Khalil Pasha. The commander in the field for the previous nine months was Colonel Nureddin also called Nur-ud Din Pasha, but the Ottoman army was as of October under the command of Baron von der Goltz, a well known German general, military historian and, for 12 years, a modernizer of the Ottoman army. Baron von der Goltz was old but he was an expert on military matters and had a deep understanding of the strengths and weaknesses of the Ottoman army. General Goltz was still making his way to Mesopotamia and it was Nureddin who was in charge at the battle and the British believed he was still the commander. This may have been a factor in the course of events as the British - with considerable justification based on previous experience - thought poorly of Nureddin's skills as a general.
Nureddin had four divisions. The 35th and 38th Divisions were predominantly Arab. The 38th Divisions' prewar garrison had been Basra, and the 35th's was Mosul. Nureddin also had the 45th and 51st Divisions, newly raised divisions, which were predominantly Turkish. They were made up of a mixture of active and reserve soldiers. He had about 18,000 total infantry.
The British force consisted of the 6th (Poona) Division, at a strength of around 11,000 men. Some British troops had been left behind to garrison the recently captured town and river junction of Kut.
The British advance past Kut was slow, partly due to the bad weather and wet ground and partly due to General Townshend's reluctance to advance further. But the Commander-in-Chief of British forces in the region, General Nixon, ordered Townshend to take Baghdad. So, he commenced his march up the Tigris river.
British attack plan
Townshend's plan of attack was to separate his force into four columns. Three infantry columns, designated columns A, B, and C, were scheduled for a frontal attack on different points of the Ottoman lines. The other column, referred to as the flying column, was made up of a mix of cavalry and infantry, and was supposed to swing around the left flank of the Ottoman lines. The attack was to be supported by two river boats, a gunboat and HMS Firefly.
Ottoman defense plan
Colonel Nureddin had over 55 days to prepare his defenses, and his forces prepared them well. He deployed his forces in an L shaped formation. The 38th Division occupied the long part of the L. The new and fresh 45th Division held most vulnerable part of the line, the small leg of the L on the left, with one regiment up in the front line trenches and two in reserve. There were 12 strong points along the first trench line, and a complete second line of trenches to fall back into. In general reserve was the veteran 51st Division. The 35th was across the river. The Ottoman artillery was centrally located where it could support his left flank or the central part of his line. The artillery was ordered to fire first on the British gunboats, and then shift fire to support the Ottoman reserves.
Movements and the clash
Townshend, intending to copy his success at Battle of Es Sinn, ordered a night march in the closing hours of November 21, 1915, with the aim of attacking at dawn on the November 22, The attack happened on schedule but due to poor ground conditions on the west bank the British ended up attacking the much stronger east bank positions.
The advance was supposed to be supported by river gunboats, however two things prevented the gun boats from becoming a factor in the battle. First, the Ottoman guns on the west bank rained fire upon them. Secondly, the Tigris was extensively mined and several river obstructions made navigation difficult.
At the beginning of the battle, C-Column, the one closest to the river bank came under heavy small arms and artillery fire and failed to reach the first trench line. A-Column, in the middle, was also halted short of the trench line.
On the right, B-Column (mainly Punjabis and Gurkhas) reached the first line of trenches, forced the Ottoman forces to retreat and pursued the retreating enemy towards the second line of trenches. Colonel Nureddin committed the reserve regiments of the 45th Division and brought the unengaged 35th Division from the other side of the river to reinforce his lines, and the British-Indian forces were stopped.
Townshend then ordered C-Column to fall back, and try and exploit the breakthrough. This movement was rather complicated and the task was made difficult by Ottoman forces firing into their flank. Meanwhile the flying column bogged down in inconclusive fighting against Turkish and Arab Cavalry. Here again Nureddin committed his reserves, in this case the 51st Division, to great effect, halting Townshend's flanking attack.
By the end of the day the 6th (Poona) Division had captured the first line of trenches, but the British sustained heavy casualties. The Ottoman forces had also taken heavy casualties but held their position.
Second day
On the second day, Townshend again attempted to break through, with a supporting flank attack. The Ottoman forces again stopped it. They then counter-attacked the British positions with all available forces. The fight was hard, but the British line held. Both armies had taken heavy casualties and all troops had endured two days of intense combat and were exhausted. The Ottoman forces had lost 6,188 killed and wounded. The 51st Division lost 12%, the 35th Division lost 25%, and the 45th Division, which bore the brunt of the British attacks, lost 65% of its strength.
Day three
On November 24, both generals ordered a withdrawal. On the British side, General Townshend concluded he needed to retreat because his losses had been too great to continue the effort to take Baghdad. Colonel Nureddin also concluded he had to retreat due to the heavy losses. When he realized the British were retreating, he turned his army around and sent it in pursuit of the British-Indian forces.
Aftermath
The 6th (Poona) Division had sustained a 40% casualty rate, losing about 4,600 troops. They were exhausted from the heavy fighting of the past two days and had an effective strength of about 8,500. Townshend decided a retreat back towards Kut was necessary to rebuild the strength of his army.
The Ottoman Army had sustained casualties of 6,188, but they had short supply lines and were able to get reinforcements from Baghdad and the northern provinces. Colonel Nureddin, learning that the British were also retreating, turned his army around and pursued the British. The Ottoman forces under the commande of Nureddin followed the British to Kut.
Ctesiphon and its aftermath revealed a key British weakness in this campaign: an inadequate supply line. The British troops were under-supplied, and their medical corps was understaffed, considering the number of troops and rate of casualties (both from battle and disease). In the later campaign which led to the capture of Baghdad by General Maude, logistics were much better dealt with.
The battle also demonstrated that the Ottoman Army could fight well on its own. Colonel Nureddin had taken an army that had been beaten a number of times, put it in a carefully prepared defensive position, and held off the British and Indian forces. He also did this without any German advisors.
The Battle of Ctesiphon - Downloaded from The Long, Long Trail: The Story of the British Army in the Great War of 1914-1918. Retrieved August 16, 2005.
Bruce, A. (n.d.). 22-25 November 1915 - The Battle of Ctesiphon. [Electronic Version] An Illustrated Companion to the First World War.
The Battle of Ctesiphon, 1915 - from The First World War. Retrieved August 16, 2005.
Millar, Ronald W. (1970). Death of an Army: The Siege of Kut, 1915- 1916. London: Houghton Mifflin.
The Battle of Kut - first hand account of an earlier battle published in an English illustrated magazine in 1916.
Erickson, Edward J. Ottoman Army Effectiveness in World War I: a comparative study. New York: Routledge, 2007.
Erickson, Edward J. Ordered to Die: A history of the Ottoman Army in the First World War Westport, CT, USA: Greenwood Press 2001.
More aircraft.
Source: WikiPedia