


Battle of Dogger Bank - Picture
More about World War 1
|
|
Battle of Dogger Bank
Date
24 January 1915
Location
Dogger Bank, North Sea
Result
British tactical victory
Date: 24 January 1915
Location: Dogger Bank, North Sea
Result: British tactical victory
Belligerents:
: United Kingdom
Commanders and leaders:
: David Beatty
Strength:
: 5 battlecruisers
7 light cruisers
35 destroyers
Casualties and losses:
: 1 battlecruiser out of action
1 destroyer out of action
15 killed
32 wounded
The Battle of Dogger Bank was a naval battle fought near the Dogger Bank in the North Sea on 24 January 1915, during the First World War, between squadrons of the British Grand Fleet and the German High Seas Fleet.
Decoded radio intercepts had given the British advance knowledge that a German raiding squadron was heading for Dogger Bank, so they dispatched their own naval forces to intercept it. The British found the Germans at the expected time and place; surprised, the smaller and slower German squadron fled for home. During a stern chase lasting several hours, the British slowly caught up with the Germans and engaged them with long-range gunfire. The British disabled the rear German ship, but the Germans put the British flagship out of action with heavy damage. Due to a signalling mixup, the remaining British ships broke off pursuit of the fleeing enemy force to sink the one disabled German vessel. By the time this had been done, the German squadron had escaped; all the remaining German vessels returned safely to harbour, though some had heavy damage requiring extended repairs.
The British flagship made it back to port but was out of action for several months. Since the British lost no ships and suffered few casualties, while the Germans lost a ship and most of its crew, the action was considered a British victory. Both Britain and Germany soon replaced commanders who were thought to have shown poor judgement, and both navies made some changes to equipment and procedures in response to problems identified during the battle.
The rival squadrons
Britain
1st Battlecruiser Squadron: HMS Lion, Tiger and Princess Royal.
2nd Battlecruiser Squadron: HMS New Zealand and Indomitable.
1st Light Cruiser Squadron: HMS Southampton, Birmingham, Lowestoft, and Nottingham.
Harwich Force: three light cruisers (HMS Aurora, Arethusa, Undaunted) and 35 destroyers.
Germany
1st Scouting Group: SMS Seydlitz, Moltke, Derfflinger and Blx¼cher.
2nd Scouting Group: SMS Kolberg, Stralsund, Rostock, and Graudenz.
Two flotillas of 18 torpedo boats combined.
Background
With the German battle fleet effectively bottled up by Admiral Beatty's success at Heligoland Bight, Admiral Friedrich von Ingenohl-Commander-in-Chief of the German fleet-decided to launch a raid on Scarborough, Hartlepool and Whitby on the British east coast with Admiral Franz von Hipper's battlecruiser squadron-comprising three battlecruisers and one large armoured cruiser-supported by light cruisers and destroyers. Hipper opened fire at 08:00 on 16 December 1914, eventually killing 108 civilians and wounding 525. Public and political opinion was outraged that German warships could sail so close to the British coast, shelling coastal towns with apparent impunity; British naval forces had failed to prevent the attacks, and also failed to intercept Hipper's raiding squadron afterwards. (Though the British fleet was at sea hunting Hipper after the raid, the Germans escaped in stormy weather, aided by low visibility and British communication problems.)
Buoyed by the success of the raid, Admiral Hipper resolved to repeat the exercise by attacking the British fishing fleet on the Dogger Bank-midway between Germany and Britain-the following month. But through intercepted German radio traffic decoded by Room 40 of British Naval Intelligence, the British learned of Hipper's planned sortie on 23 January 1915. Acting Vice Admiral Beatty set sail from Rosyth with five battlecruisers-supported by four light cruisers-to attempt to trap Hipper's force. Joined by additional cruisers and destroyers from Harwich, Beatty headed south, encountering Hipper's screening vessels at the Dogger Bank at 07:05 on 24 January. The day was clear and visibility was unusually good.
Battle
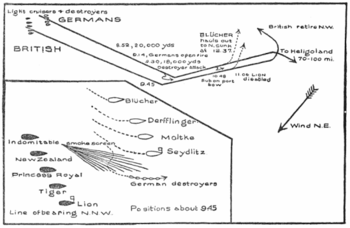
Picture - Positions in the battle
Sighting the smoke from a large approaching force, Hipper headed southeast by 07:35 to escape, but Beatty's ships were faster than the German squadron, which was held back by the slower armoured cruiser SMS Blx¼cher and by Hipper's coal-fired torpedo boats. By 08:00, Hipper's battlecruisers were sighted from Beatty's flagship, HMS Lion. The older battlecruisers of the British 2nd Battlecruiser Squadron lagged somewhat behind the 1st Battlecruiser Squadron. Chasing the Germans from a position astern and to starboard of Hipper's force, the British ships gradually caught up-some reaching speeds of 27 kn (31 mph; 50 km/h)-and closed to gun range. Beatty chose to approach from this direction because the prevailing wind then blew the British ships' smoke clear, allowing them a good view of the enemy, while Hipper's gunners were partially blinded by funnel and gun smoke blowing in the direction of their targets. Lion opened fire at 08:52 at a range of 20,000 yd (18,000 m). Other British ships opened as they came within range, while the Germans were unable to reply until 09:11 because of the shorter range of their guns. No warships had ever before engaged at such long ranges or at such high speeds, and gunnery challenges for both sides were therefore unprecedented. Nevertheless, after a few salvos the British shells had straddled Blx¼cher.
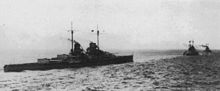
Picture - German battlecruisers (L - R) Derfflinger, Moltke and Seydlitz enroute to Dogger Bank.
The British fire was concentrated on two of the German ships, Hipper's flagship battlecruiser SMS Seydlitz at the head of the line and Blx¼cher at the rear. With five British ships to the German four, Beatty intended that his two rear ships, HMS New Zealand and Indomitable, should engage Blx¼cher, while his leading three engaged their opposite numbers. But Captain H.B. Pelly of the newly commissioned battlecruiser HMS Tiger assumed that two ships should concentrate on the leading German ship and engaged Seydlitz, leaving SMS Moltke unmolested to fire at Lion. Worse, Tiger's fire was ineffective, as she mistook Lion's shell splashes for her own (when her shots were actually falling 3,000 yd (2,700 m) beyond Seydlitz).
At 09:43, Seydlitz was hit by a 13.5 in (340 mm) shell from Lion, which penetrated her after turret barbette and caused an ammunition fire in the working chamber. This fire spread rapidly through one compartment after another, igniting ready propellant charges all the way to the magazines, and knocked out both rear turrets with the loss of 165 men. Only the prompt action of the executive officer in flooding the magazines saved Seydlitz from a massive magazine explosion that would have destroyed the ship. (Supposedly, the sailor Wilhelm Heidkamp saved the ship, when he desperately opened the glowing valves although he burnt his hands and his lungs. He never recovered from his severe injuries and died a few years later. The Kriegsmarine named a destroyer after him.)
The British ships were relatively unscathed until 10:18, when SMS Derfflinger hit Lion with several 12 in (300 mm) shells, damaging her engines and causing flooding so that Lion began to lag behind. At 10:41, Lion narrowly escaped a disaster similar to what had happened on Seydlitz, when a German shell hit the forward turret and ignited a small ammunition fire which, fortunately for the British, was extinguished before it caused catastrophe. A few minutes later, taking on water and listing to port, Lion had to stop her port engine and reduce speed to 15 kn (17 mph; 28 km/h), and was soon out of action, having been hit 14 times.
Meanwhile, at 10:30, SMS Blx¼cher was hit by a shell from HMS Princess Royal, which caused an ammunition fire and boiler room damage. As a result, Blx¼cher had to reduce speed to 17 kn (20 mph; 31 km/h), and fell further and further behind the rest of the German force. Beatty ordered Indomitable, his slowest ship, to intercept Blx¼cher.
Now Hipper, running low on ammunition, made the difficult decision to leave the disabled Blx¼cher to her fate and steam for home, in order to save his remaining damaged ships. Nevertheless, the annihilation of the German squadron still appeared likely to the pursuing British until 10:54, when Beatty-believing he saw a submarineâs periscope on Lion's starboard bow-ordered a sharp, 90° turn to port to avoid a submarine trap. (It is possible that the "periscope" was actually a surfacing, run-out torpedo which had been launched 15 minutes earlier by the German destroyer V5). At 11:02, realizing that so sharp a turn would open the range too much, Beatty ordered "Course NE" to limit the turn to 45°, and then added "Engage the enemyâs rear", in an attempt to clarify his intention that his other ships, which had now left Lion far behind, should pursue Hipper's main force. With Lion's electric generators now out of commission, Beatty could only signal using flag hoists, and both these signals were flown at the same time.
But the combination of the signal of "Course NE"-which happened to be the direction of Blx¼cher-and the signal to engage the rear was misunderstood by Beattyâs second-in-command-Rear-Admiral Gordon Moore on New Zealand-as an order for all the battlecruisers to finish off the cripple. Therefore, the remaining British battlecruisers broke off the pursuit of the fleeing German squadron and rounded on Blx¼cher. Most of the British light cruisers and destroyers also attacked Blx¼cher. Beatty tried to correct this obvious misunderstanding by using Nelson's famous order from Trafalgar "Engage the enemy more closely", but this order was not in the signal book, so he chose âKeep nearer to the enemyâ as the closest equivalent. But by the time this signal was hoisted, Moore's ships were too far away to read Beatty's flags, and the correction was not received.
Despite the overwhelming odds, Blx¼cher fought stubbornly to the end. Blx¼cher managed to put the British destroyer Meteor out of action and scored two hits on the British battlecruisers with her 8.2 in (210 mm) guns, but was pounded into a burning wreck by approximately 50 British shells. Finally, struck by two torpedoes from the light cruiser HMS Arethusa, Blx¼cher capsized and sank at 12:13 with the loss of 792 men. British efforts to rescue survivors in the water were interrupted by the arrival of the German zeppelin L-5, and by a German seaplane which attacked with small bombs. No damage was done, but the British ships-which were sitting targets while stopped in the water for rescue-put on speed and withdrew to avoid further aerial attack.
By this time, Hipper had escaped; his ships were now too far away for the British to catch them again. Beatty had lost control of the battle, and he perceived that the opportunity of an overwhelming victory had been lost; the Admiralty, believing incorrectly that Derfflinger had been badly damaged, would soon reach the same conclusion. However, in light of what happened later at Jutland, where the British battlecruisers were shown to be highly vulnerable to ammunition fires and magazine explosions following hits on gun turrets, it is possible that if Moore's three fast battlecruisers had pursued Hipper's remaining three (leaving the slower Indomitable behind as Beatty intended), the British might actually have been at a disadvantage and might have got the worst of it. Blx¼cher demonstrated the ability of the German ships to absorb great punishment; all of Hipper's remaining ships were larger, faster, more modern, more heavily armed, and far better armoured than Blx¼cher and only Seydlitz had suffered any serious damage. Setting aside the one-sided action in which the already-disabled Blx¼cher was sunk, the Germans out-hit the British by over three to one, registering a total of 22 heavy-caliber hits-16 on Lion and six on Tiger-against the British total of just seven hits.
Aftermath
Lion had to be towed back to port by Indomitable at 10 kn (12 mph; 19 km/h), a long and dangerous voyage in which both battlecruisers were exposed to potential submarine attacks. Therefore, an enormous screen of over fifty ships was assigned to guard Lion and Indomitable as they crept home. Both reached port safely. The disabled Meteor was also towed home. Lion was out of action for four months, Lord Fisher having decreed that her damage be repaired on the Tyne without going into dry dock, making for an extremely difficult and time-consuming job. All the surviving German ships reached port, though Seydlitz was heavily damaged and had to go into drydock for repairs.
Although the Germans initially believed that Tiger had been sunk because of a large fire that had been seen on her decks, it was soon clear that the battle was a serious reverse. Kaiser Wilhelm issued an order that all further risks to surface vessels were to be avoided. Admiral von Ingenohl, commander of the High Seas Fleet, was replaced by Admiral Hugo von Pohl. The Germans took the lessons of the battle to heart, particularly the damage to Seydlitz, which revealed flaws in the protection of her magazines and dangerous ammunition-handling procedures. Some of these issues were corrected in Germanyâs battleships and battlecruisers in time for the Battle of Jutland the following summer. Although the Germans realized that the appearance of the British squadron at dawn was too remarkable to be mere coincidence, they concluded that an enemy agent near their base in the Jade Bay was responsible, and did not suspect that their wireless codes had been compromised.
Although the battle was not greatly consequential in itself, it boosted British morale. But while the Germans learned their lessons, the British did not. The unfortunate Rear-Admiral Moore was quietly replaced, but Beattyâs flag lieutenant-responsible for hoisting Beatty's two commands on one flag hoist, thereby allowing them to be read as one-remained. Signalling on board Lion would again be poor in the first hours of Jutland, with serious consequences for the British. Nor did the battlecruisers learn their lesson about fire distribution, as similar targeting errors were made at Jutland.
Bennett, Geoffrey (1968). Naval Battles of the First World War. London.
Campbell, John (1998). Jutland: An Analysis of the Fighting. Lyons Press. ISBN 1-55821-759-2.
Corbett, Sir Julian S. (1922). Naval Operations, Volume II. Official History of the War. London.
Goldrick, James (1984). The King's Ships Were At Sea: The War in the North Sea August 1914-February 1916. Annapolis, MD: Naval Institute Press. ISBN 0-87021-334-2.
Gordon, Andrew. The Rules of the Game - Jutland and British Naval Command. ISBN 0-7195-5542-6.
Marder, Arthur J. (1965). Volume II. From the Dreadnought to Scapa Flow. Oxford University Press.
Massie, Robert K. (2003). Castles of Steel: Britain, Germany, and the Winning of the Great War at Sea. Random House. ISBN 0-345-40878-0.
Roskill, Stephen W. (1980). Admiral of the Fleet Earl Beatty, the last naval hero:an intimate biography. London: William Collins Sons & Co Ltd. ISBN 0 00 216278-4.
German official history of WW1 naval war. Der Krieg in der Nordsee.
More aircraft.
Source: WikiPedia