


Battle of Dujaila - Picture
More about World War 1
|
|


Battle of Dujaila
Date
8 March 1916
Location
South of Kut, present-day Iraq
Result
Ottoman victory
Date: 8 March 1916
Location: South of Kut, present-day Iraq
Result: Ottoman victory
Belligerents:
: British Empire
Commanders and leaders:
: Fenton Aylmer
Strength:
: 18,891 infantry, 1,268 Cavalry, and 68 artillery pieces
Casualties and losses:
: 3,500 casualties
The Battle of Dujaila (Turkish: Sx¢bis Muharebesi) was fought on 8 March 1916, between British and Ottoman forces during the First World War. The Ottoman forces, led by Colmar Freiherr von der Goltz were besieging Kut, when the Anglo-Indian relief force, led by Lieutenant-General Fenton Aylmer, attempted to relieve the city. The attempt failed, and Aylmer lost 4,000 men.
Background
Throughout most of 1915, the Anglo-Indian expedition, designated Indian Expeditionary Force D, had advanced up both the Tigris and Euphrates rivers. Originally dispatched to capture the Shatt al Arab and Basra, to protect the British oilfields in Iran, Force "D"'s mission in Mesopotamia expanded gradually as local commanders saw a chance for victories which would burnish the British Empire's prestige in the Muslim world. At the battles of Qurna, Nasiriyeh, and Es Sinn, Force "D" defeated elements of the Ottoman Sixth Army. After the Battle of Es Sinn, the Anglo-Indian force controlled the Tigris and Euphrates rivers through much of what is now southern Iraq. Sensing that Baghdad was within their grasp, the commander of Force "D", supported by the Commander in Chief, India, in Simla, argued for permission to launch a final offensive to capture it. The situation looked promising. The nearest Ottoman reserves, according to British intelligence, were 400 miles distant in the Caucasus or 250 miles away at Aleppo in Syria. All that blocked the way to Baghdad were two demoralized, defeated divisions.
In London, the India Office was staunchly opposed to a further advance. Secretary of State for India, Austen Chamberlain was concerned that even if Baghdad could be captured, it would only be lost again because no other troops were available to reinforce Force "D". Eventually, the question of a further advance was taken up by Asquith's War Cabinet. Despite warnings from the Imperial General Staff, the decision to advance was given.
During the second half of 1915, Force "D" had only one division, the 6th (Poona) Division under Major-General Charles V.F. Townshend, available for offensive operations. Eventually, the question of a further advance was taken up by Asquith's War Cabinet. Despite warnings from the Imperial General Staff, the decision to advance was given. Although tactically successful at the Battle of Ctesiphon, it proved to be a Pyrrhic victory. The Poona Division retreated to Kut.
The Ottoman Sixth Army, reinforced, pursued and laid siege to the town after attempts to storm the Anglo-Indian positions failed. Failing to take the town by storm, the Ottoman Sixth Army had adopted a passive siege, preferring to starve the Kut defenders into submission. The survival of the garrison became dependent on its food supply. Originally, forecast to be exhausted by the middle of February 1916, additional food stocks had been discovered in the town at the end of January 1916, which would extend the defender's rations until the middle of April 1916.
With the Poona Division under siege, the high commands in London and Simla began scrambling to put together a relief force. Lieutenant-General Fenton Aylmer was appointed to command the relief expedition, designated as the Tigris Corps. Originally intended to be made up of the 3rd (Lahore) Division and 7th (Meerut) Division as well as replacements intended for the besieged Poona Division. The Tigris Corps' first drive to relieve Townshend and the Kut garrison ground to a halt at the Battle of Hanna on 21 January 1916.
Prelude
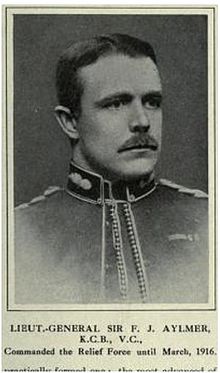
Picture - Lieutenant General Sir Fenton John Aylmer, 13th Baronet of Donadea VC KCB, commander of the Tigris Corps in March 1916
Following the setbacks at the Hanna on 21 January 1916, Lieutenant-General Aylmer's Tigris Corps spent the month of February refitting and collecting reinforcements. Despite the pause, the Tigris Corps was still unable to be brought back up to full strength. The 13th (Western) Division had been dispatched as reinforcements from Egypt where it was being brought back to strength following its evacuation from Gallipoli. However, by the end of February, only the 13th Division's first battalions had reached the theatre, and only two of those had been transported up river by end of February.
The British position at Kut was becoming more desperate. Food stocks were estimated to last only until the middle of April, even with the discovery of an additional store of grain in late January. Additionally, there was the concern that time was running out in another way: the weather. Based on the known weather patterns of the region, the latest that the Anglo-Indian Tigris Corps could expect favourable weather to hold was the middle of March. After that, the spring thaw would be in full swing. Combined with the coming rainy season, it would turn the areas along the banks of the Tigris into a flooded quagmire.
Many of battalions of the Tigris Corps remained understrength at the end of March 1916. The problem was particularly acute with the British battalions and the British officers of the Indian Army units. To deal with this, survivors of several units were amalgamated into battalions which approached full strength. Furthermore, replacement drafts meant for units besieged in Kut were formed into provisional units. These provisional units included the Highland Battalion (survivors of 1st Black Watch and 1st Seaforth Highlanders), Dorsets (replacement drafts for 2nd Norfolk and 2nd Dorset regiments in Kut), Composite Dogra Battalion (37th Dogras and 41st Dogras) and the Composite Territorials (remnants of 1/4 Hampshire and 1/5 Buffs (Royal East Kent Regiment)).
In 1916, there were virtually no paved roads in Mesopotamia between Baghdad and Basra. No rail road had been constructed to connect to the cities. Beyond the port of Basra, transport options were limited to animal power, along unpaved tracks near the river, or river craft. Both required adequate water to operate effectively. Although the Tigris was broad, during much of the year it was so shallow that many ships could not navigate it. Going out further from the track along the Tigris, there were marshlands which would flood, especially during the Spring thaw. This left the river as the primary means of long distance transport. Despite the fact that the river was the primary means of transporting men and supplies in theater, the British had insufficient river craft to adequately meet the Tigris Corps' supply needs.
Given the strength of the Ottoman defences at the Hanna, the Anglo-Indian forces needed to find a way around them. On the left bank of the Tigris, this would mean swinging wide around the Ottoman defenses and marching at least 30 miles through the desert. Then, relying on the Shatt al Hai for their communications, the force would break through the Ottoman lines and link up with the Kut garrison. The other option was to continue along Tigris River, but switching to the right bank. However, this would mean having to break through the Ottoman defenses at Dujaila.
Unwilling to leave the Tigris, which provided the British forces with an easy line of communication to Basra, Lieutenant-General Aylmer made the decision to attempt an advance along the right bank. Like the left bank, the terrain was mostly featureless and devoid of cover. The Ottoman units, with their German advisers, had become adept at camouflaging their positions, making it hard for the British and Indian units to fix them properly. What was known was that Ottomans were in the process of constructing a redoubt at Dujaila. Since there was no way to cover a move across the river and through the Dujaila position, Aylmer and his staff put together a plan that called for a night assault by the majority of his force while a detachment would remain behind on the left bank as a diversion.
However, prior to putting the plan into effect, Aylmer had to get approval of the new commander of I.E.F. D, Lieutenant-General Sir Percy Lake. After the Battle of the Hanna, General Lake had begun to lose faith in Aylmer's abilities as commander of the Tigris Corps. In order to exert greater control over the coming battle, he had replaced Aylmer's chief of staff with his own man, Major-General George Gorringe.
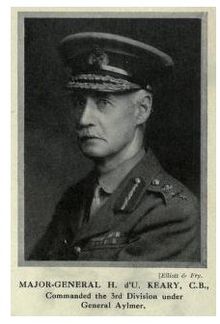
Picture - Major-General Henry D'Urban Keary, GOC 3rd (Lahore) Division
Not only did Lake lack faith in Aylmer's abilities, Aylmer himself had lost confidence in the abilities of his subordinates. Of his two divisional commanders, Major-General Henry D'Urban Kearny, GOC 3rd (Lahore) Division, and Major-General Sir George Younghusband, GOC 7th (Meerut) Division, neither were detailed to the principal commander for the planned operation. Major-General D'Urban Keary would be assigned to command one of the three columns, the other two being commanded by Major-General George Kemball, one of his brigade commanders. Aylmer made his decision claiming that Kemball was a more energetic commander. Major-General Younghusband, who had been the chief proponent of a desert march to outflank the Ottoman lines entirely, was assigned to command the diversion force on the left bank.
Like the British, the Ottoman Sixth Army was also stretched to the limit of logistical support. The lack of any sort of industrial infrastructure (i.e. paved road capable of military transport or railways) made it exceedingly difficult for the Sixth Army to be rapidly reinforced. What the Ottoman army did have going in its favor was time. They had recognized that for the time, they were at the extent of their supply line from Baghdad.
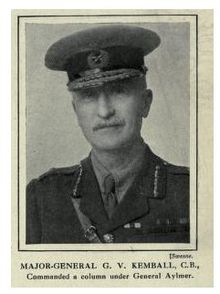
Picture - Major General George V. Kemball
The Ottomans, who had become adept at trench warfare during their victory at Gallipoli, had put their experience to good use. The Ottoman Sixth Army had invested Townshendâs position with an elaborate trench network since December 1915. Downriver, the Field Marshal von der Goltz and his senior Ottoman commander, Khalil Pasha, erected a series of well sited defensive positions at the Hanna and the Sanniyat on the left bank of the river and the Dujaila along the right bank. Because Townshend had adopted a passive defensive stance, even more so since losing his ability to cross the river with the destruction of the pontoon bridge from Kut to the Woolpress village, Von Der Goltz had been able to shift more and more of his troops south. In all, the Ottoman Sixth Army could muster approximately 25,000 men, 1,200 cavalry, and 80 artillery pieces. With Townshend's passivity, Field Marshal Von Der Goltz was able to move the bulk of his forces south, leaving only about 2,000 men to maintain the siege itself. On the left bank, the 52nd, 38th, and part of 35th Ottoman Divisions continued to occupy the Hanna line. 8,500 men, 1,500 cavalry and 32 artillery pieces of the 2nd and 35th Ottoman Divisions defended the right bank of the Tigris at the Dujaila position.
Realizing that the British might try to break the siege by advancing on the right bank, the Ottoman commander ordered the construction of the Dujaila redoubt. Aylmer later testified he chose to attack on the right bank because although the redoubt was sited atop the Dujaila depression, construction had only begun a few days after the Hanna battle in January 1916. By the time of the assault, the Ottomans had significantly improved the position, complete with a glacés estimated to be 25 feet high in some places.
Battle
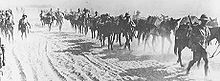
Picture - British infantry advancing through Mesopotamia near the Tigris river in 1916.
Aylmer's plan split his force into three columns (A, B, and C). Columns A and B were grouped together and placed under the command of Major-General Kemball. Column C, under the command of Major-General Kearny, would be the reserve force. On the night of 7 March 1916, the entire force began crossing the river in preparation for the night march to the Dujualia redoubt. Lacking any real terrain features to help with the night time navigation, each column would have navigate by compass, checking their progress by counting steps, bicycle tachometers, and walking sticks.
In the darkness, things started to go wrong. Columns A and B became separated, losing contact with each other, slowing the advance as they tried to find each other in the dark. The artillery became lost and was almost an hour and a half late reaching their assigned positions.
Despite the two hour delay, the assault elements of Column A and B were in position just before dawn on 8 March 1916. The lead elements of 26th Punjabis (part of 36th Indian Infantry Brigade attached to Column A) pushed forward, entering the Dujalia position to find them occupied only by a few unsuspecting soldiers. The news was reported back to Kemball that surprise had been achieved.
However, despite achieving total surprise, Kemball ordered his units to wait until the pre-planned H-Hour for the assault. He even ordered the Punjabis to withdraw from the Ottoman positions. Three hours would pass before Kemball would allow the 36th Brigade to attack the Dujalia redoubt.
By the time Kemball allowed the attack to go in, all hope of surprise had been lost. As the artillery began its preparatory bombardment, Von Der Goltz began ferrying over the 52nd Division from his reserve on the left bank to reinforce the divisions which were now fully alert and manning the trenches. By the end of the battle, nearly 8,000 men were ferried across the river and brought into fighting positions, effectively doubling the strength of the Ottoman garrison on the right bank.
Although some of Aylmer's assault force was in position, some of it was still struggling to sort itself out from the night march as the barrage began. One unit which did reach its start position on time, the 37th Indian Infantry Brigade, was accompanied by Kearny, Aylmer and Gorringe. Despite finding that there a gap in the lines, the Corps and Column commander, as well as the Corps Chief of Staff, held the 37th Brigade back, ordering it to wait and follow the plan's timetable. The infantry assault, originally planned for 7:15 a.m. did not go in till later.
The artillery, which should have started their bombardment earlier, did not get into action until almost 7 a.m. Paradoxically, once the barrage started, all hope of surprise was lost. Through the day, the Anglo-Indian battalions assaulted the Ottoman positions, only to be pinned down and driven back by machine gun and artillery fire.
Despite the missed opportunities, the fresh reinforcements, and the strong defensive entrenchments, by late afternoon, the British once again were on the verge of a breakthrough. 59th Scinde Rifles (Frontier Force) and 1st Manchester Regiment of the 8th Indian Infantry Brigade succeeded in capturing the first two lines of trenches of the Dujalia Redoubt. However, with no reserves left to exploit the success, the two battalions could do nothing more than hang on to their gains. Slowly but surely, the Ottoman battalions counter attacked with bayonets and grenades, which were in short supply on the British side, forcing the Manchester's and Rifles to retreat in the early evening. Of the 2,301 men of the 8th Brigade present, 1,174 were casualties by the end of the day.
In all, the Tigris Corps suffered almost 4,000 casualties. Through the night, the British forces fell back to a rendezvous position approximately 8,000 yards from the Dujalia position. When no counter-attack materialized from the Dujalia, Aylmer ordered his troops back across the river, ending the battle.
Aftermath
The failure at Dujalia sealed Aylmer's fate. On 12 March 1916, he was relieved of command by Lake after the War Office received the report of the defeat. In his place, Gorringe would be elevated to command of the Tigris Corps.
After the defeat, the annual floods began. Melted snow off the Zagros Mountains began the annual re-supply of the rivers. The flooding the Mesopotamian plain began turning it into a sea of mud, flooded nullahs and mud islands. The morale of the Tigris Corps began to drop. When word of the defeat at Dujalia was announced to 6th (Poona) Division, Indian Muslim soldiers, already conflicted about fighting their coreligionists, began to desert.
For the rest of March, the Tigris Corps would await reinforcements, including the all British 13th (Western) Division. Once they were reinforced and concentrated, they would attempt once more to break the siege before Townshend's garrison ran out of food.
Barker, A.J. (1967). The Bastard War: The Mesopotamian Campaign of 1914-1918. New York: Dial Press.
Candler, Edmund (1919). The Long Road To Baghdad. Cassell and Company.
Cato, Conrad (1917). The Navy in Mesopotamia 1914 to 1917. Constable and Company.
Dane, Edmund (1919). British Campaigns In The Nearer East, 1914-1918. Hodder and Stoughton.
Davis, Paul K. (1994). Ends and Means: The British Mesopotamian Campaign and Commission. Farleigh Dickinson University Press. ISBN 083863530X.
Erickson, Edward J. (2001). Ordered to Die: A History of the Ottoman Army in the First World War. Greenwood Publishing Group. ISBN 9780313315169.
Keegan, John (2000). The First World War. Vintage Canada and colophon.
Lee, J. Fitzgerald (1927). The "D" Force (Mesopotamia) In The Great War. Wm. May & Co., Ltd..
Moberly, Brig.-Gen. F.J. (1923). History of the Great War Based on Official Documents: The Campaign in Mesopotamia 1914-1918. His Majesty's Stationery Office. ISBN 0898392683.
Sandes, Major E.W.C. (1920). In Kut and Captivity With the Sixth Indian Division. John Murray.
Townshend, Major General Charles Vere Ferrers (1920). My Campaign. James A. McCann Company.
Wilson, Lieutenant-Colonel Sir Arthur T. (1969). Loyalties: Mesopotamia 1914-1917. Greenwood Press, Publishers.
More aircraft.
Source: WikiPedia