


Battle of Gully Ravine - Picture
More about World War 1
|
|
Battle of Gully Ravine
Date
28 June - 5 July 1915
Location
Helles, Gallipoli, Ottoman Empire
Result
British victory
Date: 28 June - 5 July 1915
Location: Helles, Gallipoli, Ottoman Empire
Result: British victory
Belligerents:
: United Kingdom
British India
Commanders and leaders:
: Aylmer Hunter-Weston
Strength:
: 20,000
Casualties and losses:
: 3,800
The Battle of Gully Ravine (ZıÄındere) was a World War I battle fought at Cape Helles on the Gallipoli peninsula. By June 1915 all thoughts the Allies had of a swift decisive victory over the Ottoman Empire had vanished. The preceding Third Battle of Krithia and the attack at Gully Ravine had limited objectives and had much in common with the trench warfare prevailing on the Western Front. Unlike previous Allied attacks at Helles, the Gully Ravine action was largely successful at achieving its objectives though at a typically high cost in casualties.
Prelude
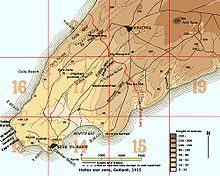
Picture - Map showing land features and redoubts
The third battle of Krithia on 4 June had made some progress in the centre of the line at Helles but had failed on the left flank (west) along Gully Spur and Gully Ravine and on the right flank (east) where the French contingent were confronted by a number of strong Ottoman redoubts on Kereves Spur. As a prelude to a new offensive the commander at Helles, Lieutenant General Aylmer Hunter-Weston ordered separate limited attacks to advance the flanks.
(1. Kerevizdere Battle)On 21 June the French, with overwhelming artillery support, attacked two redoubts controlling the crest of Kereves Spur (Kervizdere). Over 40,000 shells fell on the Ottoman 2nd Division defending this area. They succeeded in capturing Haricot Redoubt but the second objective, the Quadrilateral, was not captured until 30 June. Captain Kemal Bey commanding the troops from the line of fire was wounded and died the next day. The French suffered 2,500 casualties but the Ottomans on the receiving end of the bombardment suffered 6,000. Remnants of the Ottoman 2nd Division were pulled back to the Asian side after this battle. This minor gain was cause of much celebration for allies who were at that point very anxious for any good news. General Gourard received congratulatory telegrams from London and Paris, Lord Kitchener, Admiral Robeck, and General Hamilton. Colonel Girdon was awarded with Légion d'honneur
On 28 June a similar attack was planned for the left flank along Gully Spur, Gully Ravine and neighbouring Fir Tree Spur. The terrain around Gully Ravine (Turkish: SıÄındere) was closer to the wild and rough terrain at Anzac Cove than to the ground elsewhere at Helles. The plan was for the British 29th Division and the 29th Indian Brigade to attack along Gully Spur and the ravine while one newly arrived brigade on loan to the 29th Division, the 156th Brigade from the British 52nd (Lowland) Division, would attack along Fir Tree Spur.
The battle
After two days of heavy bombardment, battle began at 10.45 am on 28 June with a preliminary raid to capture the Boomerang Redoubt on Gully Spur. The general advance commenced shortly afterwards. The artillery fire on Gully Spur was overwhelming and the 2/10th Battalion of the Gurkha Rifles and the 2nd Battalion of the Royal Fusiliers advanced rapidly a distance of half a mile to a point named "Fusilier Bluff" which was to become the northern-most Allied position at Helles.
In the ravine the 1st Battalion of The Border Regiment did not advance as far as those troops on the spur since Ottomans there were somewhat sheltered from the deadly bombardment from the sea. Their final position was fortified with rocks and boulders and became known as "Border Barricade".
On the right of the advance, along Fir Tree Spur, the battle did not go so well for the British. The inexperienced soldiers of the 156th Brigade lacked artillery support and were massacred by Ottoman machine guns and bayonet attacks. Despite the opposition, they were ordered to press the attack and so the support and reserve lines were sent forward but made no progress. By the time the attack was halted the Brigade was at half strength, having suffered 1,400 casualties of which 800 had been killed. Some battalions were so depleted they had to be merged into composite formations. When the rest of the 52nd Division landed, the commander, Major General Granville Egerton, was enraged at the manner in which his 156th Brigade had been sacrificed.
The Counter-Attacks
Ottoman commanders were very concerned about this advance near the Western coast of Gallipoli which threatened to encircle their right wing. Gully Ravine became the scene of vicious and bloody fighting as the Ottomans commenced a series of counter-attacks on the night of 1/2 July. Two soldiers of the 1st Battalion, the Royal Inniskilling Fusiliers, Captain Gerald O'Sullivan and Corporal James Somers, were awarded the Victoria Cross for recapturing a trench taken by the Ottomans during a counter-attack.
Faik PaÅa, known for his bravery and aggressiveness was put in charge of the right wing of the Otto limanne at SıÄındere.
The Ottomans, with plentiful manpower in reserve but lacking any significant artillery and machine guns, made incessant counter-attacks culminating with the strongest on 5 July but all were repulsed. Still, the control of the strategic hills overlooking Sıgındere and Kerevizdere were denied to the Allies by massive Ottoman bayonet attacks. The Ottoman casualties for the period between 28 June and 5 July are estimated at between 14,000 and 16,000, four times the British losses. Where possible the Ottoman dead were burned but a truce to bury them was refused. The British believed the dead bodies were an effective barrier and that Ottoman soldiers were unwilling to attack across them. This was one of the few truly unvalorous and unmagnanimous acts committed by Allies which infuriated the Ottoman greatly.
In the face of immense losses, Faik PaÅa had stopped first the counter attack on the morning of 30 June. In spite of strong and direct urging from Liman PaÅa (Otto Liman von Sanders) and pressure to continue the counter-attack, he wanted to rest his badly decimated troops for a day. Hesitation of Faik PaÅa unnerved Weber PaÅa who was in command of the front there. He contemplated pulling back behind the ever strategic Alx§Ä± Tepe as a last resort. This would have given over complete victory to the Allies. He had to be strongly dissuaded by Liman PaÅa.
Finally, the Ottoman 1st Division led by Lieutenant Colonel (Kaymakam) Cafer Tayyar Bey commenced another counterattack at 18:00 on 2 July. Again, though they reached within 30m of the British trenches, the losses were unbearable. Men were melting away in front of rows of machine guns. Attack continued whole night. Eventually Faik PaÅa ordered them to dig in and take defensive posture. Liman PaÅa immediately released him and assigned Mehmet Ali PaÅa in his place. As soon as the 3. Division which had just crossed the Narrows and arrived at the lines around midnight, Mehmet Ali PaÅa ordered them to attack 3:45 am. Liman PaÅa agreed to delay the attack for 24 hours only after a Major Eggert on the staff of Mehmet Ali PaÅa personally appealed to him.
Meanwhile the Allies had observed the preparation for the attack from the air and made their own preparations. On 5 July the last major attack of this battle commenced but met with a very strong wall of fire the Allies put up. The dead were mounting again in front of the British trenches. Mehmet Ali PaÅa staff were of the opinion that the Allied advance was already halted and there was no need for these heavy losses. Mehmet Ali PaÅa, in fear of a reaction from Liman PaÅa, who was in turn initimidated by Enver PaÅa hesitated. Again, Major Eggert intervened and Liman PaÅa yielded. Finally the slaughter was stopped. This was the bloodiest episode in the entire campaign.
After the counter-attacks ceased, the front line stabilised and remained largely static for the rest of the Gallipoli campaign although both sides engaged in a vigorous mining war around the ravine.
Achi Baba Nullah (2. Kerevizdere Battle)
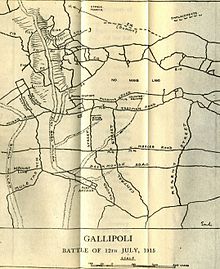
Picture - Area of the attack of 12 July
Hunter-Weston had one final fling at Helles. Once the two remaining brigades of the 52nd Division had landed (the 155th and 157th Brigades) he planned a new attack for 12 July in the centre of the line east of the Krithia Road and along Achi Baba Nullah (also known as Kanlı Dere and Bloody Valley) where the Royal Naval Division had spent most of its time at Helles and suffered so badly during the third battle of Krithia. It was expected that due to heavy Ottoman losses in the previous battle, morale would be low.
The plan was for one brigade to attack in the morning and the other to attack in the afternoon so that the full weight of artillery support could be lent to each brigade. The 155th Brigade would attack at 7.35 am and the 157th at 4.50 pm. Bombardment began at 4:30 am, from land, sea and air. 14 Allied planes participated in softening up the Ottoman defenses, one of the first such combined actions in military history.
Both attacks began well with the capture of the first Ottoman trench but descended into chaos and confusion as, in a repeat of the April and May Helles battles, the troops advanced too far, lost contact and came under artillery and machine gun fire. The next morning confusion and panic resulted in a disorderly retreat which was eventually halted but Hunter-Weston ordered the advance to resume and sent the battered Royal Naval Division in again. They suffered a further 600 casualties on this occasion but the line was stabilised.
By the end of the battle, one third of the 52nd Division had become casualties. General Egerton was temporarily dismissed from his command of the division for protesting at the treatment of his troops.
Aftermath
In late June General Hunter-Weston departed his command of the British VIII Corps, suffering some indeterminate ailment. This marked the end of Helles as the main front at Gallipoli. The British attempted no more major offensives there for the remainder of the campaign. Weber PaÅa, having lost Liman PaÅa's confidence was sent back to Germany. The fighting now concentrated along the Sari Bair range and at a new landing at Suvla. In support of this new offensive in August, a diversionary attack was made at Helles which resulted in heavy fighting around Krithia Vineyard. Helles was finally evacuated on 8 January 1916.
Chambers, Stephen J.,Gully Ravine - Gallipoli Pen & Sword Books Ltd (2003)
More aircraft.
Source: WikiPedia