


Battle of Jerusalem - Picture
More about World War 1
|
|
Battle of Jerusalem
Date
17 November-30 December 1917
Location
On the coast of the Mediterranean Sea north of Jaffa, into the Judean Hills and around Jerusalem
Result
British Empire victory
Date: 17 November-30 December 1917
Location: On the coast of the Mediterranean Sea north of Jaffa, into the Judean Hills and around Jerusalem
Result: British Empire victory
Belligerents:
: British Empire
United Kingdom
Australia
British India
New Zealand
Commanders and leaders:
: Edmund Allenby
Henry Chauvel
Philip Chetwode
Edward Bulfin
Strength:
: Egyptian Expeditionary Force
Casualties and losses:
: 18,000
(for entire campaign)
United Kingdom
Australia
British India
New Zealand
Suez - Romani - Magdhaba - Rafa - 1st Gaza - 2nd Gaza - El Buggar - Beersheba - 3rd Gaza - Mughar Ridge - Jerusalem - Abu Tellul - Arara - Megiddo
The Battle of Jerusalem (officially referred to by the British as the "Jerusalem Operations") developed from 17 November with fighting continuing till 30 December 1917 during the Sinai and Palestine Campaign of World War I. Before the capture of Jerusalem was secured, two battles were recognised by the British as being fought in the Judean Hills to the north and east of the Hebron-Junction Station line. These were the Battle of Nebi Samwil from 17 to 24 November and the Defence of Jerusalem from 26 to 30 December 1917. They also recognised within the Jerusalem Operations, the Battle of Jaffa from 21 to 22 December 1917 fought between the Tul Keram-Junction Station-Jaffa railway and the sea, as a subsidiary battle.
This series of battles was successfully fought by the British Empire's XX Corps, XXI Corps, and the Desert Mounted Corps against stiff opposition from the Ottoman 7th Army in the Judean Hills and the 8th Army north of Jaffa on the Mediterranean coast. The loss of Jaffa and Jerusalem, together with the loss of 50 miles (80 km) of territory during the Egyptian Expeditionary Force's advance from Gaza, constituted a grave setback for the Ottoman Army and the Ottoman Empire.
As a result of these victories, British Empire forces captured Jerusalem and established a new strategically strong fortified line. This line ran from well to the north of Jaffa on the maritime plain, across the Judean Hills to Bireh north of Jerusalem, and continued eastwards of the Mount of Olives. With the capture of the road from Beersheba to Jerusalem via Hebron and Bethlehem, together with substantial Ottoman territory south of Jerusalem, the city was secured.
On December 11, General Edmund Allenby entered the Old City on foot through the Jaffa Gate. David Lloyd George described the capture as "a Christmas present for the British people."
Prelude
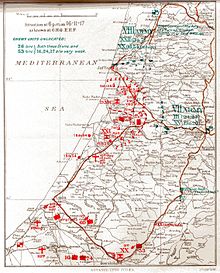
Picture - Situation at 18:00 on 16 November 1917 as known to GHQ EEF
British General Edmund Allenby, Commander-in-Chief of the Egyptian Expeditionary Force, had won a decisive victory against the German General Erich von Falkenhayn, commander of Ottoman forces in Palestine, at the Battle of Mughar Ridge. The British Empire victory forced von Falkenhayn to withdraw his 7th and 8th Armies and move his headquarters from Jerusalem northwards to Nablus on 14 November. As the Ottoman 7th Army's III Corps reached Jerusalem via the Hebron road after its defeat at Beersheba, it was ordered to develop defences around the city of Jerusalem. This corps held the city while the 7th Army's XX Corps retreated from Junction Station into the Judean Hills towards Jerusalem. As they retired the XX Corps left strong rearguards to stop or slow the British advance. Time was needed to construct defences and for reorganisation of the depleted and disorganised 7th Army. When they arrived in the city the XX Corps took over responsibility for Jerusalem's defences, while the III Corps continued to move northwards from Jerusalem along the Nablus road.
The British War Cabinet had telegraphed Allenby, cautioning him not to commit his army to any operations that might not be sustainable in the long term, if the strength of British forces in the area could not be maintained. Their concerns were possibly linked to a peace proposal published on 8 November by the new Russian Bolshevik government between Russia and Germany. The document, scheduled to be signed on 3 March 1918, would constitute a separate peace treaty and result in the withdrawal of all Russian troops from the war. All German forces on the eastern front formerly involved in fighting against Britain and France's ally Russia, could then turn their attention to fighting British Empire and French Empire forces elsewhere.
Picture - German soldiers in Jerusalem
Allenby was aware of lack of accurate maps and the history of previous campaigns in the Judean Hills and clear warnings given against hasty or lightly supported assaults on the strong western ramparts of the region. His front-line forces had been fighting and advancing for an extended period during operations conducted many miles from base and were tired and depleted. Now 35 miles (56 km) from the railhead at Deir el Belah, Allenby's troops did not have a line of defensive entrenchments behind which they could stop a concerted push by these two Ottoman armies. Such a counterattack could well see them driven back to Gaza and Beersheba.
But Allenby reviewed the threat of counterattack and his supply situation and decided a force large enough to attack into the Judean Hills and another separate force to operate on the maritime plain could be maintained far from base. He boldly decided to quickly attack the Ottoman 7th Army (commanded by Fevzi Pasha) in the Judean Hills with the hope of capturing Jerusalem. This would keep the pressure on the Ottoman Army in the hope of denying them time to complete their reorganisation, dig deep trenches or worst of all, counterattack.
British Empire supply lines
The planned advance into the Judean Hills would rely heavily on the ability of the lines of communication to keep the front line troops supplied with food, water and ammunition. At considerable distances from railhead and base, the Egyptian Expeditionary Force was now operating at the extreme limits of their lines of communication, so the advance paused on 17 November. This pause was to enable supplies to be brought forward by supply columns under corps control which had been sent back to railhead for rations and supplies.
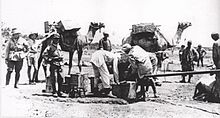
Picture - Filling fantasies and loading them onto camels near Jaffa
Transporting supplies forward from railhead was a slow but continuous 24-hour-a-day business, because the Ottoman Army had destroyed as much of their lines of communication as they could during their retreat. Only motor lorries of the British Army Service Corps (ASC) Motor Transport companies and camels of the Egyptian Camel Transport Corps could use the single, narrow, poorly-metalled road from Gaza to Junction Station. And between Gaza and Beit Hanun the road was unsealed and deep in sand making it extremely difficult for lorries to proceed, even with a light load of one ton. Supplies were also shipped by sea and landed at Wadi Sukereir, and later at Jaffa. Lack of infrastructure at Jaffa meant all supplies brought via this route had to be unloaded from ships into surf boats, which were then had to be unloaded on the beaches. Such operations were heavily dependent on the weather, so the amount of supplies transported by sea was limited. But feeding an army dependent on horses was a huge task; the marching ration of a horse was 9.5 pounds (4.3 kg) of grain a day, without any hay or other bulk food. Even this small ration, when multiplied by the 25,000 horses in Desert Mounted Corps, worked out at over 100 tons of grain a day. One hundred lorries would be needed for the horses as well as transportation for rations required by the troops in the front line. Supplies were also needed for all those working in supporting and ancillary roles in the engineering sections, veterinary sections, field ambulances, labour corps, transport and supply sections.
All available lorries and camels were organised in convoys moving north from railhead along the Gaza to Junction Station road from Dier el Belah to El Mejdel and then on to Julius, where the 26 and 27 DUS (Depot Unit of Supply) set up advanced supply dumps to serve the Anzac and Australian Mounted Division (commanded by Major General H. W. Hodgson). From these dumps the Transport Sections of 5 Coy (New Zealand Army Service Corps) and 32nd, 33rd, and 34th (Australian Army Service Corps) served the Anzac Mounted Division and 35th, 36th, and 37th Coys served the Australian Mounted Division. These companies of horse- and mule-drawn wagons could operate to serve their brigades during brigade operations and when required could form into divisional trains during divisional operations. A forward lorry-head was established at Ramleh, where the lorry loads were dumped and the Transport Companies distributed the supplies to all the forward units. Members of the Egyptian Labour Corps (as second drivers) worked alongside the Australian Army Service Corps transporting, loading, and unloading the General Service and Limber wagons of supplies ordered by the brigades. The huge endeavour was administered by the supply sections in a similar fashion to the divisional ammunition columns which also worked to supply ammunition to the fighting units in a similarly gruelling, continuous operation.
Advance by Desert Mounted Corps continues
On 15 November the commander of Desert Mounted Corps, Lieutenant General Sir Henry George Chauvel, issued orders for the Yeomanry Mounted Division (commanded by Major General G. de S. Barrow) and the Anzac Mounted Division to continue the advance on Ramleh and Latron (also known as Lydda) about 5 miles (8.0 km) from Junction Station. On the same day the Yeomanry Mounted Division reached the Jerusalem road after a cavalry charge by the 6th Mounted Brigade (commanded by Brigadier General C. A. C. Godwin) at Abu Shusheh. This charge has been described as even more daring than that at Mughar Ridge, owing to the rocky nature of the ground over which the horsemen attacked. The New Zealand Mounted Rifles Brigade (commanded by Brigadier General W. Meldrum) secured the left flank of the Egyptian Expeditionary Force by occupying Jaffa on 16 November. This city was captured as a result of the victory at Ayun Kara two days earlier, which forced the Ottoman 8th Army to withdraw over the Nahr el Auja, which enters the sea 4 miles (6.4 km) north-north-east of Jaffa. The 8th Army's withdrawal placed them to the north of the Ottoman 7th Army and opening up that army's right flank to attack. As a result, the 7th Army was forced to move further away from the coastal sector into the Judean Hills. Here, in front of Jerusalem, Ottoman infantry units created a defensive screen.
Infantry join the advance
Despite continued pressure by the Egyptian Expeditionary Force, the two opposing forces were now operating in terrain which favoured defence. In addition to rearguards left by the 7th Ottoman Army's XX Corps as it retired into the hills, the 7th Army had managed to establish a line of mainly single trenches running south and southwest on a series of heights up to 4 miles (6.4 km) from Jerusalem, supported by well-sited redoubts. Aerial reconnaissance on 17 November found the road north from Jerusalem to Nablus crowded with refugees.

Picture - The 4th Light Horse Regiment entering mountain passes near Latron
On 18 November, while Allenby was at the British XXI Corps headquarters at El Kastine, the decision was made to closely follow the Ottoman 7th Army into the Judean Hills. This was in the hope of ensuring the Ottoman army had little time to regroup or construct defences which might prove impregnable.
Allenby's plan was to avoid fighting in or near Jerusalem but to cut all road access to the city and force the Ottoman Army to evacuate Jerusalem. He ordered the 52nd (Lowland) Infantry Division (commanded by Major General J. Hill) and the 75th Infantry Division (commanded by Major General P. C. Palin), the Yeomanry Mounted, and Australian Mounted Divisions to begin the advance. They were to move eastwards from Latron which had been captured on 16 November in the same direction as the Jaffa to Jerusalem road. The 75th Infantry Division was to move up the main road despite several demolitions being carried out by the retiring Ottomans on this good metalled road running east to west through Amwas. On the left and to the north of 75th Infantry Division, the 52nd (Lowland) Infantry Division was to make its way up minor roads or tracks from Ludd (also called Lydda) towards Jerusalem. And further north on the left of the 52nd Infantry Division, the Yeomanry Mounted Division (commanded by Major General G. de S. Barrow) was to move north and north east. Their aim was to cut the Ottoman 7th Army's lines of communication at Bireh, 8 miles (13 km) north of Jerusalem on the Jerusalem to Nablus road.
The Yeomanry Mounted Division's 6th, 8th, and 22nd Yeomanry Brigades, with 20th Brigade, Royal Horse Artillery (13 pounders) were to move northwards via the old Roman road from Ludd to Ramallah through Berfilya and Beit Ur el Tahta towards Bireh. While the 53rd (Welsh) Infantry Division (commanded by Major General S. F. Mott) was to advance northwards along the Beersheba to Jerusalem road to take Hebron and Bethlehem before moving eastwards to secure the road from Jerusalem to Jericho.
The 75th Infantry Division with the Australian and Yeomanry Mounted Divisions began their entry into the Judean Hills on 18 November.
[A]ll the armies that have sought to take Jerusalem have passed this way, save only that of Joshua. Philistine and Hittite, Babylonian and Assyrian, Egyptian and Roman and Greek, Frankish Knights of the Cross, all have passed this way, and all have watered the hill of Amwas with their blood.
To capture and secure the heights on either side of the main Jaffa to Jerusalem road at Amwas so the 75th Infantry Division could advance up the road was the first objective. Moving up the railway line in the Wadi Surar on the right of the 75th Infantry Division was the Anzac Mounted Division's 2nd Light Horse Brigade which was temporarily attached to the Australian Mounted Division. The 9th Light Horse Regiment (2nd Light Horse Brigade) carried out a turning movement up the Wadi es Selman north of Amwas to reach the village of Yalo 2 miles (3.2 km) to the east. After this successful operation the Australian Mounted Division withdrew to rest camp at the mouth of the Nahr Sukereir. Taking over the advance on the morning of 19 November the 75th Infantry Division found Amwas evacuated, but the advance guard of the Yeomanry Mounted Division's 8th Mounted Brigade, the 3rd County of London Yeomanry Regiment had great difficulties; struggling to within 2 miles (3.2 km) of Beit Ur el Tahta that night, while the 22nd Mounted Brigade reached Shilta.
Advance into the Judean Hills
75th Infantry Division
Just 2 miles (3.2 km) after the main road to Jerusalem entered the hills, it ran through the celebrated and easily-defensible pass of Bab el-Wad. On 19 November the 75th Infantry Division moved up this road; their 232nd Infantry Brigade had left Abu Shushe at 07:30 to occupy the deserted town of Amwas and by 11:00 the 58th Vaughan's Rifles (Indian Frontier Force) of 234th Infantry Brigade had fought their way up to reach the heights of Bab el Wad.
After Bab el Wad, the road wound to Jerusalem through deep, narrow valleys, over steep spurs, and around the shoulders of rocky hills. Although there were other ways through the hills, they were a tangle of unmapped, rough and rocky hill tracks and pathways-often little more than donkey tracks-which made movement by infantry, dismounted cavalry, and artillery very difficult. The rough tracks meandered through narrow valleys and over distorted piles of razor-backed ridges, which were broken by groups of cone-shaped hills and successive shelves of rock jutting out from every hillside at intervals of a few yards. It was virtually impossible for advances to the north or south of the main road to be supported by artillery. In heavy rain and cold, wet and muddy conditions, it was found to be impossible to deploy the 75th Infantry Division's guns off the road. These guns had been brought forward by teams of up to 8 horses to a gun the day before.
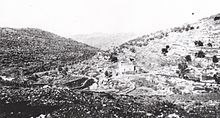
Picture - Typical Judean Hills landscape in 1917
All military activities were made even more difficult by the wintery conditions; the ground was slippery and dense black clouds brought early darkness which cut visibility. No advance was possible after 17:00, by which time the foremost piquet was within half a mile of the village of Saris. The forward units of the 75th Infantry Division had advanced 10 miles (16 km) since morning. They bivouacked astride the road, under fire from Ottoman snipers.
During the evening of 19 November, a thunderstorm followed by a drenching downpour broke over the opposing armies. In a few hours every wadi in the foothills and on the plain was in flood. The black soil plain, hard and firm during summer, became in these winter conditions sticky and heavy for marching and almost impassable for wheeled vehicles. The temperature, which had been hot during the day and pleasant at night, dropped rapidly to become piercingly cold. The infantrymen had been marching light in their summer uniform of twill shorts and tunics. With only one blanket (and/or a Greatcoat), this gear gave little protection from the driving rain and bitter chill.
In these terrible conditions the Ottoman forces encountered on the road were the rearguards which von Falkenhayn had ordered XX Corps to establish as it retired back to defend Jerusalem. Established on commanding ridges, these rearguards were made up of small groups dug in on the hills. Each of these successive positions were attacked by Indian and Gurkha troops who outmanoeuvred the defenders.
Positions of Ottoman Armies
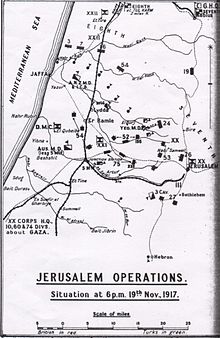
Picture - Jerusalem Operations. Situation at 18:00 19 November 1917
In addition to the Nahr Sukrerir line stretching to Beit Jibrin together with Summeil and El Tineh (where the Battle of Mughar Ridge was fought), the positions of the Egyptian Expeditionary Force and the Ottoman armies on the evening of 19 November 1917 are shown on this sketch map.
With its headquarters at Nablus, the 7th Ottoman Army was deployed to defend Jerusalem; its left flank covered by the III Corps' 3rd Cavalry Division. The 27th Infantry Division was astride the Hebron to Jerusalem road. XX Corps' 53rd Infantry Division held a line in front of Nebi Samweil, with 26th Infantry Division in reserve. Defending Bireh on the Jerusalem to Nablus road was the 24th Infantry Division, with the 19th Infantry Division on the road halfway between Bireh and Nablus. Also shown is the Ottoman 8th Army, with its headquarters at Tul Karm, and its XXII Corps deployed on the Nahr el Auja. Stretching from the coast the 3rd, 7th, and 16th Infantry Divisions were virtually in line with the 54th Infantry Division further inland.
Attempts to cut the Nablus Road
The leading brigade of 52nd (Lowland) Division, which had reached Beit Likia on 19 November by moving along a track north of the main road, was held up towards Kuryet el Enab by a very determined and formidable Ottoman rearguard armed with machine guns at Kustal and Beit Dukka. The Ottoman positions were strongly defended and the 52nd (Lowland) Division could not advance until a mist rolled down just before dark on 21 November, temporarily blinding the defenders on the ridge and giving the 75th Infantry Division the opportunity to rapidly deploy, climb the ridge, and defeat the Ottoman force with bayonets. That night, the troops ate their iron rations (carried by the men as emergency rations), and some found shelter from the miserable conditions in a big monastery and sanatorium. The night was cold with heavy rain, and those without shelter suffered severely. No supplies arrived till noon the following day owing to congestion on the narrow tracks.
The 52nd (Lowland) Infantry Division moved into position coming up in between the 75th Infantry Division on its right and the Yeomanry Mounted Division on its left. The Yeomanry Mounted Division, advancing towards Beit Ur el Foka and Bireh on the Nablus road 10 miles (16 km) north of Jerusalem was to converge with the 75th Infantry Division at Bireh and cut the Nablus to Jerusalem road. Although resistance at Saris appeared to be weakening, by 11:00 progress continued to be slow. Saris was eventually won during the afternoon of 21 November.
Operating in the hills to the north of the infantry divisions, the Yeomanry Mounted Division continued to struggle to advance. They moved across the roughest and bleakest areas of the Judean Hills toward Beit Ur el Tahta in a single-file column nearly 6 miles (9.7 km) long. At 11:30 on 21 November the leading regiment, the Dorset Yeomanry descended from the hills on which Beit Ur el Foqa stands and found Ottoman units holding the western rim of the Zeitun Ridge above them. This ridge, to the west of Bireh, was held by 3,000 Ottoman troops (the whole of the 3rd Ottoman Cavalry Division and half of the 24th Infantry Division) with several artillery batteries. Although the dismounted Yeomanry were able to briefly take the ridge, they were soon forced off. Heavy rainfall and cold weather severely tested both men and animals while they made several unsuccessful attempts to force their way up the steep, rocky sides of the ridge. But early in the afternoon more Ottoman reinforcements arrived from the north and counterattacked strongly. They forced the Yeomanry Mounted Division back into the deep ravine on the west side of the ridge. That night the Berkshire Yeomanry lay out on the ridge facing Ottoman units at close quarters in torrential rain, their horses in the deep valley below. The situation soon became serious and orders were given for all three brigades to break off and retire to Beit Ur el Foqa and a successful withdrawal was carried out after dark. No aerial support was possible, probably due to the weather, until No. 1 Squadron carried out aerial bombing on Bireh village on 22 and 24 November.
21-24 November: Battle of Nebi Samwil
Although the Battle of Nebi Samuel has officially been identified by the British as beginning on November 17 and finishing on 24 November 1917 battle was not joined until some days later, and to begin with by regiments, battalions, and brigades.
Picture - The summit of Nebi Samwil
As the 75th Infantry Division continued its advance towards Bireh on 21 November, the division turned north east, cutting across the front of the 52nd (Lowland) Infantry Division. Their progress, however was blocked at Biddu by the height of Nebi Samweil, which dominated Jerusalem and its defences. This hill, the traditional site of the tomb of the Prophet Samuel, was taken late in the evening by the 234th Infantry Brigade (75th Infantry Division) after fierce fighting. The 52nd (Lowland) Infantry Division had taken the more difficult line, while the 75th Infantry Division was directed to the south western approaches. Several counterattacks by Ottoman forces during the following days failed. In close fighting, Ottoman soldiers strongly counter attacked, reaching the gates of the mosque before Ghurkas fought them off. Fevzi's 7th Army had fought Allenby's two infantry divisions to a standstill.
The attacks by three British divisions had been held by three Ottoman divisions; the British suffered well over 2,000 casualties. There are no estimates of Ottoman casualties. A sketch map showing the positions of the armies on 28 November (see 'Ottoman counterattacks 1800 28 November 1917' map below) indicates the area about Nebi Samwil was still closely contested ground by the British 60th Infantry Division and the Ottoman 53rd Infantry Division and the vital road link from Jerusalem to Nablus was still in Ottoman hands.
On 24 November Allenby ordered the relief of the three divisions of the Egyptian Expeditionary Force's XXI Corps and Desert Mounted Corps. In order to move huge formations a pause was unavoidable and so the attack was discontinued, but Marshal von Falkenhayn and his Ottoman Army took notice of the temporary cessation of hostilities.
24 November - First attack across the Nahr el Auja
The advance by two infantry and one mounted division into the Judean Hills towards Jerusalem was suspended in the area of Nebi Samwil on 24 November. The 54th (East Anglian) Infantry Division and the Anzac Mounted Division began their attack across the Nahr el Auja on the Mediterranean coast to the north of Jaffa on the same day. The river was defended by the 3rd and 7th Infantry Divisions of the Ottoman 8th Army on the northern bank. The New Zealand Mounted Rifles Brigade, which had been on garrison duty in the occupied city of Jaffa since 16 November, was ordered to advance across the river and establish bridgeheads. (They were the only brigade available, as the remainder of the Anzac Mounted Division was in the Judean foothills further east or resting.) A bridgehead was established across the bridge on the main road near Khirbet Hadrah (also referred to as Khirbet Hadra) and another at Sheik Muanis, near the mouth of the river. These operations aimed to gain territory and discourage the Ottoman 8th Army from transferring troops into the Judean Hills to reinforce the 7th Army. After successful actions by the New Zealand Mounted Brigade, two battalions of the 54th Infantry Division held these two small bridgeheads on the northern bank before being attacked by overwhelming forces on 25 November. The 3rd and 7th Infantry Divisions of the Ottoman 8th Army drove in the bridgeheads and restored the tactical situation.
Deep and fast-flowing, the el Auja river could not be crossed except at known and well-established places, so at 01:00 on 24 November the Canterbury Mounted Rifles Regiment crossed at the ford on the beach. They moved at a gallop and quickly seized the hills which overlooked the ford, capturing the village of Sheikh Muannis, but the Ottoman cavalry garrison escaped. The Wellington Mounted Rifles Regiment came up to the Canterbury Regiment and then advanced eastwards to Khurbet Hadrah, which commanded the bridge on the main road. They captured 29 prisoners, one machine gun, and one British Lewis gun. Two infantry companies of Essex Regiment (161st Brigade, 54th Infantry Division) crossed the Hadrah bridge and occupied Khurbet Hadrah. The 4th and 11th Squadrons of the Auckland Regiment, with 2nd Squadron of the Wellington Regiment, were placed at the bridge and in the village of Sheikh Muannis in front of the infantry posts. The Canterbury Mounted Rifles Regiment's 1st Squadron took up a post on the sea beach; each of these squadrons had two machine guns to strengthen them.
At 02:45 on 25 November an Ottoman cavalry patrol near Khurbet Hadrah was chased off by a troop of 3rd Squadron Auckland Mounted Rifles Regiment. Within an hour, the Ottoman 3rd and 7th Infantry Divisions launched a heavy attack on the squadron, which withdrew to a prearranged line. Just 30 minutes later another withdrawal was forced. At about 08:00 the units of the 54th Infantry Division at Khurbet Hadrah were ordered back across the river. It was an extremely difficult operation as the bridge was now being swept by enemy fire and continuously shelled by artillery. Some individuals succeeded in crossing the bridge; some swam the river but some drowned. Once the infantry were clear, the 3rd Squadron followed them across the bridge. The 11th (North Auckland) Squadron gallantly covered them with two Vickers guns at great cost, continuing to hold the bridge until 11:00, when the Auckland Mounted Rifles Regiment withdrew.
While the fighting for the bridge was occurring, the 2nd Squadron (Wellington Mounted Rifle Regiment) at Sheikh Muannis held off without any artillery support a determined attack by about 2,000 Ottoman soldiers covered by accurate artillery fire. As their horses had been sent back down the river to the ford on the beach, the squadrons of the New Zealand Mounted Rifles Brigade attempted to reinforce the Khurbet Hadrah position, but arrived just as the evacuation was taking place. They took up a position south of the bridge. It was only after the Khurbet Hadrah village and bridge posts had been evacuated that the Somerset battery was able to come into action, assisted by guns of the 161st Brigade. This support came too late, and the infantry at Sheikh Muannis were also ordered to retire. They were supported by the Somerset battery, which continued firing from a position 1,400 yards (1.3 km) south, on the southern side of the river, until after the Ottoman Army had reoccupied the village. Meanwhile two troops of 10th Squadron retired slowly towards the ford on the beach, with the 2nd Squadron and the infantry crossing the river by means of a boat and over the weir head at the mill. The Ottoman attack was now concentrated on the Canterbury Mounted Rifles Regiment. The 1st Squadron held off the enemy until the regiment and the troops from Sheikh Muannis had crossed the ford; then the squadron fell back, covered by fire from machine guns. Casualties from this operation were 11 killed, 45 wounded, and three missing. From 25 November until 1 December the New Zealand Mounted Rifles Brigade remained in support of the 54th Infantry Division, which held the outpost line. At the beginning of December, the brigade was withdrawn to a rest camp near Sarona a few miles north of Jaffa until 5 January, when it relieved the Imperial Camel Corps Brigade in the foothills of the Judean Hills.
About this time the Ottoman Eighth Army's fighting commander, von Kressenstein, was relieved of his duties. He had been in the Sinai and Palestine since 27 September 1914, attacking the British Empire at the Suez Canal in 1915, at Katia, and at Romani, before being attacked at Magdhaba, Rafa, and Gaza. He was replaced by Brigadier General Cevat Bey. On hearing the news, Allenby wrote to his wife on 28 November 1917: "I fancy that there is little love lost now between Turk and Boche."
Ottoman counterattacks late November to early December
Falkenhayn immediately launched a series of attacks against Allenby's lines. (The Ottoman forces had fortified various places in a ring around Jerusalem, including the hilltop of Deir Yassin.)
During the advance from Beersheba, Allenby maintained Chetwode's XX Corps as a reserve of fresh troops resting in the rear, where they were easily supplied and refitted. They had enjoyed 10 days rest before being ordered to take over responsibility for operations in the Judean Hills. The XX Corps would take over the front line and keep pressure on the defending Ottoman 7th Army. The 60th (London) Infantry Division (commanded by Major General J. S. M. Shea) arrived at Latron on 23 November from Huj and on 28 November relieved the seriously weakened 52nd (Lowland) and 75th Infantry Divisions without much of a reduction in fighting ability. On the same day, the 74th (Yeomanry) Infantry Division (commanded by Major General E. S. Girdwood) arrived at Latron from Karm, followed two days later by the 10th (Irish) Infantry Division (commanded by Major General J. R. Longley), also from Karm. The 53rd (Welsh) Infantry Division, with the Corps Cavalry Regiment and a heavy battery attached, remained in the Hebron road north of Beersheba, coming under direct orders from General Headquarters (GHQ); they became Mott's Detachment.
The Ottoman Army sought to benefit from the weakened state of the attackers and the destabilisation of the British line during these troop reinforcements and withdrawals by launching a series of infantry attacks employing shock tactics during the week beginning 27 November. Counterattacks, launched by the Ottoman 16th Division on the plain and by the 19th Division in the hills, were made on Nebi Samweil on the Zeitun plateau, in the 5-mile (8.0 km) gap between the British forces on the maritime plain and those in the Judean Hills, and on the maritime plain.
Counterattacks in the maritime plain
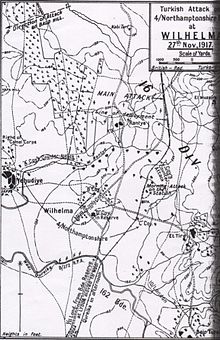
Picture - Turkish Attack on 4/Northamptonshire Reg. at Wilhelma 27 November 1917
At 17:00 on 27 November the Ottoman Army's 16th Infantry Division launched a counterattacked at Wilhelma on the maritime plain. They reached to within 400 yards (370 m) of the 4th Northamptonshire Battalion, which was deployed in and around Wilhelma. They also advanced against the 10th (London) Battalion south east at Deir Tuweif, against the 5th Bedfordshire Battalion at Beit Nebala, and against the Imperial Camel Corps Brigade at Bald Hill. At Wilhelma, the Ottoman force prepared to make a bayonet attack, but machine gun and Lewis gun fire with B/272 held them off. The British successfully counterattacked on both flanks, forcing the Ottoman troops to withdraw to Rantye. On the left of the Imperial Camel Corps Brigade south west of Bald Hill, units of the Ottoman 16th Infantry Division renewed the attack during the night of 28 November. They drove in the right outposts of the 2nd Light Horse Brigade's front line and entrenched themselves in this forward position. But at dawn on 29 November the Ottoman soldiers found themselves in an untenable position - overlooked by one Australian post and enfiladed by others on either flank. Unable to advance or retreat, three officers and 147 troops with four machine guns surrendered to the 7th Light Horse Regiment.
Counterattacks on British Empire lines of communication
Further inland, another serious attack was made on the British lines of communication from Ramleh by the Ottoman 16th Infantry Division on the plain and the 19th Infantry Division in the hills. The aim of this counterattack was the destruction of two British Empire divisions in the hills by cutting the British lines of communication and supply.

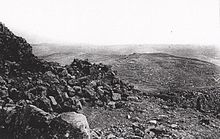
Picture - Raising water from a well in the hills west of Jerusalem in December 1917
This attack was made by exploiting a 5-mile (8.0 km) gap in the British front line between the thinly-spread Yeomanry Mounted Division's left at Beit Ur el Tahta and the right of the equally thinly-spread 54th Infantry Division at Shilta. The Ottoman 19th Infantry Division found the gap on 27 November and attacked the exposed supply line, defeating a section of the Yeomanry Mounted Division's Ammunition Column and overwhelming a post on the right of the 54th Infantry Division. The 7th Mounted Brigade was ordered forward into the gap in the line. They were attacked by the fresh Ottoman 19th Infantry Division at dawn on 28 November, but blocked a further attack by other Ottoman units.
After some desperate fighting in close action, pressure eased somewhat and some lost ground was recovered, but the Ottoman force began to outflank the mounted brigade to the west. The 5th Norfolks were driven out of Shilta, but the 155th Brigade of 52nd (Lowland) Infantry Division, in the process of being relieved, returned to the front, closed the gap, and pushed the Ottoman soldiers back out of the lines of communication.
Counterattacks on the Yeomanry Mounted Division
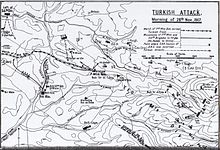
Picture - Detail of Ottoman counterattack on morning of 28 November 1917
Counterattacks began on 27 November, when the Yeomanry Mounted Division's most advanced post at Zeitun on the western end of the Beitunia Ridge was attacked by a much larger force. They held off the Ottoman attackers until 28 November, when the division was forced to withdraw from their advanced posts, including Sheik Abu ex Zeitun and Beit Ur el Foqa.
The Australian Mounted Division (less the 5th Mounted Brigade) had been resting at Mejdel from 19 to 27 November when they were ordered to return to the Judean Hills. The 4th Light Horse Brigade's march to Berfilya was diverted straight on to Beit Ur el Tahta. South of Beit Ur el Tahta, the 4th Light Horse Brigade covered a dangerous position, as there was no contact between the 8th and 6th Mounted Brigades. The 5th Mounted Brigade was ordered to rejoin its division, leaving the 10th Light Horse Regiment under orders of the 60th (London) Infantry Division. The 3rd Light Horse Brigade marched on to Berfilya 2 miles (3.2 km) west of el Burj. The horses of these brigades were taken to the rear by a quarter of the men. Each man had four horses to look after day and night. As these "led horses" were prime targets for aerial bombing, it was both solid and dangerous work.
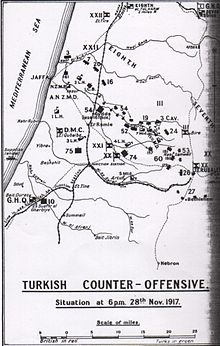
Picture - Ottoman counterattacks 1800 28 November 1917
The pressure had been too great for the advance posts of the much-reduced Yeomanry Mounted Division, which fell back down the Wadi Zeit. The pursuing Ottoman force was suddenly blocked by the 11th Light Horse Regiment of 4th Light Horse Brigade. The 4th Light Horse Brigade had moved by the same route as the 7th Mounted Brigade, but near El Burj they found the road blocked by fire. Brigadier General Grant, reporting to Barrow, ordered the brigade south of Beit Ur el Tahta to support the 6th Mounted Brigade. The 11th Light Horse Regiment was pushed forward with two machine guns to hold Wadi Zeit south west of Beit Ur el Foqa.
On 30 November Major J.G. Rees of the 25th Welch Fusiliers had only 60 men to hold Beit Ur el Foqa when the post was almost surrounded. They managed to break out the same way they had entered the position, and succeeded in joining the support company of the 10th Shropshire covering Et Tire and facing Signal Hill, which became the focus of the next Ottoman attack. At 14:30 they attacked with 400 soldiers, driving the detachment from Signal Hill. This move made Et Tire untenable and forced the 10th Shropshire to fall back to its original line.
The Yeomanry Mounted Division was relieved by the 74th (Yeomanry) Infantry Division. Two brigades of infantry being substituted for four brigades of cavalry resulted in a sixfold increase in the number of rifles. With additional reinforcements from the dismounted Australian Mounted Division, there were sufficient troops to hold all the Ottoman counterattacks.
On 4 December Allenby wrote: I want to get Bire[h], before I consolidate; as it covers all the roads, and commands everything. ... If I get Bire[h] and the hills covering the mouth of the Auja river N. of Jaffa I shall be in a good strong position; for offence or defence. I must anyhow consolidate there, and wait till my railway is developed. I am running short of officers and some of my strengths are getting low ... I have no reserve units.
These operations were supported on 28 November by a combined force of the British and Australian Nos. 1 and 111 Squadrons, which attacked the Tul Keram aerodrome with aerial bombing. This attack was repeated the following morning and evening after German planes bombed the Julis aerodrome and hit No. 113 Squadron's orderly room.
Counterattack on 1 December at Beit Ur el Tahta
Picture - Hong Kong mountain gun battery in action near Beit Ur el Tahta
At about 01:00 on 1 December a battalion of the Ottoman 19th Division, armed with hand grenades, launched attacks at Beit Ur el Tahta against the 157th Brigade, and north east of El Burj against the 3rd Light Horse Brigade. After two attempts at Beit Ur el Tahta, they succeeded in driving a severely weakened company of the 5th Highland Light Infantry (52nd (Lowland) Mounted Division) off 200 yards (180 m) of the ridge in front of the village, but by 04:30 they had reoccupied the position. The 8th Light Horse Regiment north east of El Burj withstood four separate onslaughts with stick bombs (hand grenades). A squadron of the Gloucester Hussars (5th Mounted Brigade) attached to the 3rd Light Horse Brigade was rushed up to fill gaps in the line, and the Hong Kong Battery came into action. They were reinforced by the 4th Royal Scots Fusiliers with a small group of bombers from Beit Sira, which arrived just as Ottoman soldiers launched a new assault. The British bombing party attacked the Ottoman bombers and after a fierce engagement forced them back. The Ottomans continued desperately to attack. Another company of the 4th Scots Fusiliers came up. Combined with the steady fire of the dismounted 3rd Light Horse Brigade, the shower of bombs from the Fusiliers forced the Ottoman soldiers to fall back and dig in. At dawn they surrendered.
In these engagements it is claimed that a whole Ottoman battalion was captured or killed. Over 100 Ottoman soldiers were killed. Among the 172 prisoners were many wounded, while the British losses were under 60. It had been a crucial battle; if El Burj had been captured the British would have lost the use of the road leading up from Berfilya, and the Beit Nuba-Beit Sira valley would have become untenable. The left flank of the infantry's main advance on Jerusalem would have been exposed, which would have and weakened the pressure towards the Nablus road.
Counterattack on 1 December at Nebi Samwil
Further attacks on Nebi Samwill on 1 December were repulsed, with the Ottoman 7th Army suffering heavy losses.
Fall of Jerusalem
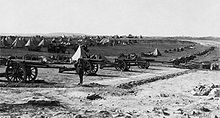
Picture - The camp of the 94th Heavy Battery on Mt Scopus after they helped capture the city
By 1 December the fighting was almost finished. The Ottoman Army had not won any ground as a result of their counterattacks, and the advancing British troops were successfully replacing their tired comrades and were well entrenched close to Jerusalem. On 2 December the relief of the XXI Corps by the XX Corps was finally completed when the 10th (Irish) Infantry Division relieved the 52nd (Lowland) Infantry Division, which withdrew to rest. In early December each side adjusted and improved their lines, leaving insecure places, and the British were able to increase the number of soldiers in their line to create a powerful concentration. During the next four days the 10th Irish and 74th Yeomanry Divisions extended their positions, while those held by the 60th (London) Division were shortened; the result was a powerful concentration along the line. By 3 December the Ottoman Army had abandoned their attacks. The 16th Devonshire Battalion, 229th Brigade, 74th (Yeomanry) Infantry Division recaptured Beit Ur el Foqa on 3 December. The attack was launched from the head of the Wadi Zeit at 01:00, and by 03:30 the village had been captured, along with 17 prisoners and three machine guns. However, the position was impossible to hold, as it was overlooked by Ottoman positions on higher ground. Bombing and hand-to-hand fighting continued all morning, and the battalion withdrew, suffering 300 casualties. Fighting in the Judean Hills ceased.
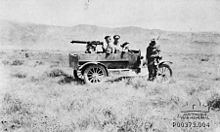
Picture - Model T Ford Utility with Vickers .303 machine gun mounted on a tripod
On 4 December the 53rd (Welsh) Infantry Division (known as Mott's Detachment) was still south of Hebron. On that day it began to march up the Hebron road towards Bethlehem after two Australian Light Armoured cars reported there were no Ottoman units in Hebron. They reached the Dilbe valley that night. This infantry division was to have advanced northwards in time to cover the right flank of the 60th (London) Infantry Division and cut the road from Jerusalem to Jericho, but the 53rd (Welsh) Infantry Division was unable to get into position; the 60th was forced to cease its advance due to its exposed right flank. Under direct orders of GHQ, Mott's Detachment remained south of Bethlehem in the Hebron road on 7 December. The next morning a road junction which the detachment had to negotiate came under accurate shell fire from an Ottoman battery near Bethlehem. Unable to advance or retaliate, the detachment waited. At around noon, Chetwode, the Corps' commander, ordered the detachment to get moving. Mott finally attacked his main objective at Beit Jala at 16:00, but the Ottoman Army had already retired.
Picture - 53rd Infantry Division occupied Bethlehem on night of 9 December; 4th Sussex Regiment is marching through the town
During almost continuous rain on 8 December, the Holy City ceased to be protected by Muslims. Chetwode (commander of XX Corps), who had relieved Bulfin (commander of XXI Corps) on 8 December, launched the final advance, taking the heights to the west of Jerusalem. The Ottoman 7th Army retreated during the evening and the city surrendered the following day.
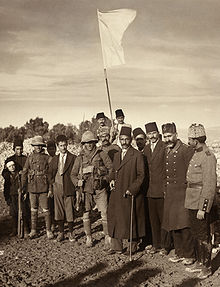
Picture - The surrender of Jerusalem to the British, 9 December 1917
The mayor of Jerusalem, Hussein Salim al-Husseini, attempted to deliver the Ottoman Governor's letter surrendering the city to Sergeants James Sedgewick and Frederick Hurcomb of 2/19th Battalion, London Regiment, just outside Jerusalem's western limits on the morning of 9 December 1917. The two sergeants, who were scouting ahead of Allenby's main force, refused to take the letter. It was eventually accepted by Brigadier General C.F. Watson, commanding the 180th Infantry Brigade.
Jerusalem was almost encircled by the Egyptian Expeditionary Force, although Ottoman Army units briefly held the Mount of Olives on 9 December. They were overwhelmed by the 60th (London) Infantry Division the following afternoon.
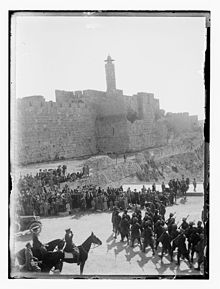
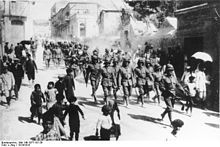
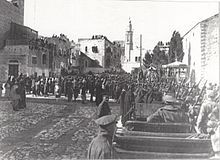
Picture - British troops on parade at Jaffa Gate in December 1917 after the capture and occupation of Palestine
The fall of the city and the failure of Falkenhayn's initial attacks greatly lowered Ottoman morale.
Military operations resumed a fortnight later with the final attack on Jerusalem.
Text of Surrender
"Due to the severity of the siege of the city and the suffering that this peaceful country has endured from your heavy guns; and for fear that these deadly bombs will hit the holy places, we are forced to hand over to you the city through Hussein al-Husseini, the mayor of Jerusalem, hoping that you will protect Jerusalem the way we have protected it for more than five hundred years." The decree was signed by Izzat, the Mutasarrif of Jerusalem.
Aftermath
On 11 December, two days after the official surrender and exactly six weeks after the attack on Beersheba, Allenby, the commander of the Egyptian Expeditionary Force, made his formal entry into Jerusalem on foot through the Jaffa gate. In a letter written to his wife that day, Allenby said: "The Turks are driven 3 or 4 miles down the Jericho road, to the East; and some 6 or 8 Miles to the North. Today we occupied Bethany."
Allenby was the first Christian to control Jerusalem in centuries. In order to show respect for what was considered to be a holy place, he came on foot instead of by horse or vehicle.
Among the mounted units to accompany Allenby on his formal entrance into Jerusalem were the 10th Light Horse Regiment and a New Zealand Mounted Rifles Brigade representative troop commanded by 2nd Lieutenant C.J. Harris, Canterbury Regiment. The New Zealand troop was made up of one sergeant and 10 men from the Auckland Regiment, nine men from the Canterbury Regiment, and nine men from the Wellington Regiment, with three men from the Machine Gun Squadron and one from the Signal Troop - a total of one officer and 33 other ranks.
Eleven Ottoman infantry divisions had been forced to retire, suffering 28,443 casualties; some 12,000 prisoners were captured, 100 guns, and scores of machine guns were also captured. Now the Ottoman Army needed to deploy troops from other theatres to make up for these significant losses. On 15 December the Ottoman 2nd Caucasian Cavalry Division arrived in Palestine and became the reserve of the XXII Corps before taking part in the counterattacks of 27 December. The 1st Infantry Division arrived from the Caucasus and moved to Nablus in reserve. With the focus of the Ottoman Empire firmly on the Levant, the British recapture of Baghdad was secure. This ensured the viability of the continued British offensive in Mesopotamia.
During the fighting advance from Beersheba to Jerusalem, the total British Empire casualties were 18,000, with the Ottoman suffering 25,000 casualties. During the Battle of Jerusalem from 25 November to 10 December, British casualties were 1,667. In the same period 1,800 prisoners were taken.
The British Empire had received the Christmas present the Prime Minister had wanted, along with the moral prestige of effecting a Christian occupation of Jerusalem. It was a huge blow to the Ottoman Empire, which had suffered the loss of yet another Muslim Holy Place (having already lost Mecca and Baghdad).
Yesterday, morning, I reconnoitred our line, N. and E. slight fighting was in progress; and a few prisoners were coming in - fine, fighting Turks; well set up and well fed ... Later, I went to the railway station; where we are trying to repair and reconstruct what the Turks have damaged. Then Bols and I went to Bethlehem ... .
Just prior to the fall of Jerusalem, the British War Office had been very worried about Allenby's extended advance and warned of a possible retirement back to Gaza - Beersheba if the war on the Western Front dictated the transfer of troops from the Levant. However, this attitude changed immediately after Jerusalem was captured. The War Office then wanted to know how Allenby might exploit his success with the addition of a division from Mesopotamia.
Allenby's great strategic success since the victory at Beersheba brought pressure to quickly finish the war in the Middle East. The War Cabinet instructed Robertson to telegraph Allenby on 18 December 1917 with a project based on alternative policies -
(a) To complete the conquest of the whole of Palestine between Dan and Beersheba and hold the country for the remainder of the war
(b) To continue the advance through Palestine and Syria to the vicinity of Aleppo so as to cause permanent interruption of railway communication with Mesopotamia
Robertson requested that Allenby should send his "views as soon as possible as to the execution of these policies" and the length of time needed for the operations.
Allenby replied on 20 December 1917: "*(a) ... I calculate I might be able by June or July to place force of my present strength north of Nazareth-Haifa line, assuming enemy cannot oppose me with more than about 60,000 fighting strength and provided there are no special difficulties met with in railway construction.
(b) To advance further towards Aleppo would mean to move against Damascus and Beirut. On that front enemy is served by broad-gauge railway with good lateral communications and apparently ideal ground for defence. Broad-gauge railway would put him on level with me as regards numbers that could be maintained. I should require 16 or 18 divisions besides my mounted corps to ensure success against Damascus-Beirut line if strongly held, but this is probably more than my railway could support. My estimate is made on the supposition enemy will make use of his broad-gauge railway to its full capacity. I would point out that Aleppo is 350 miles distant and my single line of railway advances about half a mile a day. Railhead of my double line is at Bir el Mazar, but the doubling of railway has had to be stopped during my present advance. For my immediate plans see my telegram No. E.A. 598 14th December, and I think it advisable before advancing much further north to clear Turkish forces on Medina railway." Allenby had reported on 14 December that the rainy season would stop a renewal of operations for at least two months.
At this time the 12th Light Horse Regiment was in the Judean Hills on the front line near Kuddis, where the enemy disposition was static and quiet, but observant. From 12 December the regiment was working to extend a sangar and enjoyed fresh meat, bread, vegetables, and rum. On 17 December bivouac sheets and blankets arrived. The weather continued cold and showery, but the good rations and extra blankets and bivouac shelters lifted morale.
Second attack across the Nahr el Auja - Battle of Jaffa
Allenby wished to establish a defensive line running from Jaffa to Jerusalem, which could be held with reasonable security once his right flank was secured by the Dead Sea. In order to consolidate a strong British Empire line, it was necessary to push the 3rd and 7th Infantry Divisions of the Ottoman 8th Army back away from the Nahr el Auja on the Mediterranean coast. This engagement was officially referred to by the British as a subsidiary battle during the Jerusalem Operations.
On 7 December the XXI Corps began moving its units into position on the coastal plain: 75th Infantry Division on the right, 54th Infantry Division in the centre, and 52nd Infantry Division on the coast. The 162nd Infantry Brigade relieved the New Zealand Mounted Rifles Brigade in the front line on 11 December and moved back to bivouac near Ayun Kara. Preparations were complicated by the low and swampy southern banks, the sodden state of the ground, and the swollen river; rain had fallen on 19 and 20 December. Between Mulebbis and the sea, the river is between 40-50 feet (12-15 m) wide and 10-12 feet (3.0-3.7 m) deep except for the ford at the mouth. To the north two spurs run down to the river from a series of sandy ridges. These overlooked the damaged stone bridge at Hadrah to the east and the village of Sh. Muannis near Jerisheh to the west, where a mill dam bridged the stream. The Ottoman 8th Army held commanding positions on both these spurs in addition to a post opposite the ford. Their line extended east of Hadrah, crossed to the south bank of the Auja river, and included Bald Hill and Mulebbis.
All three brigades of the 52nd (Lowland) Infantry Division managed to cross the River Auja about 4 miles (6.4 km) north of Jaffa on the night of 20-21 December. By morning they had secured the Ottoman defensive line, completely surprising the defenders; not a shot was fired.
Temporary bridges were built so the artillery could cross the river. On 23 December the 52nd and 54th Infantry Divisions continued their advance up the coast for a further 5 miles (8.0 km), capturing key Ottoman defensive positions. Supported by British warships, the left of the advance reached Arsuf 8 miles (13 km) north of Jaffa. Three hundred prisoners were captured and many Ottomans were killed with bayonets, while the British infantry suffered 100 casualties.
The 52nd (Lowland) Infantry Division's campaign in Egypt and Palestine, which had begun in 1916 at Romani, ended at Arsuf; they were shortly to leave for France.
Defence of Jerusalem
Officially recognised by the British as one of three battles which made up the "Jerusalem Operations", along with the Battle of Nebi Samwil and the subsidiary Battle of Jaffa, this engagement occurred between 26 and 30 December 1917. The XX Corps' 10th (Irish), 60th (London), and 74th Infantry Divisions, with support from the 53rd Infantry Division fought the 7th Ottoman Army's III Corps' 24th 26th, 53rd Infantry Divisions, according to Falls' Sketch Map 21.
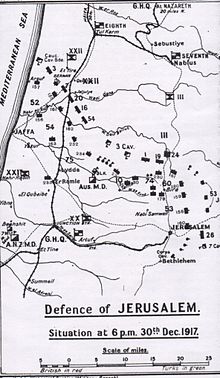
Picture - Falls' Sketch Map 21: Defence of Jerusalem. Situation on 30 December 1917 at 1800
After the evacuation of Jerusalem by the Ottoman 7th Army, the British XX Corps held a line which ran across the Jerusalem to Jericho and Jerusalem to Nablus roads 4 miles (6.4 km) north and east of the city. This line continued to the west through the hills to Beit Ur el Foka and Suffa. Jerusalem was still within range of Ottoman artillery, and with the opposing sides in such close proximity there was still the risk of counterattack. An offensive to push the Ottoman Army further away was planned for 24 December 1917, but was delayed due to bad weather. The plan had been for the 60th (London) Infantry Division to advance northwards astride the Jerusalem to Nablus road with the 74th Infantry Division advancing eastwards from Beit Ur el Foka to converge on the Bireh-Ramalla ridge.
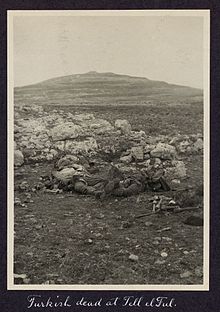
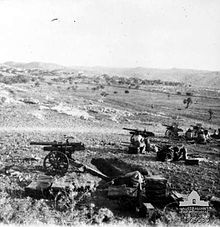
Picture - Dead Ottoman soldiers at Tel el Ful
The British were therefore prepared for battle when an Ottoman Army counterattack was launched at 01:30 on 27 December, which fell on 179th Brigade (60th (London) Infantry Division) on the Nablus road. The Ottoman force's initial objectives were a line of villages, including Nebi Samweil 1 mile (1.6 km) in front of their starting positions. They were focused towards Tell el Ful, a hill east of the Nablus road about 3 miles (4.8 km) north of Jerusalem defended by the 60th (London) Infantry Division. This Ottoman attack on Tell el Ful, which continued for two days, initially drove the British outposts back and captured several important places. However, it was ultimately unsuccessful.
During the morning of 27 December the British 10th and 74th Infantry Divisions made an attack on a 6 miles (9.7 km) front, advancing about 4,000 yards (3,700 m). Chetwode commander of XX Corps ordered the 10th (Irish) Infantry Division to attack towards Ramallah beginning on the morning of 28 December. A general British advance on a 12-mile (19 km) front moved their front line 6 miles (9.7 km) on the right and 3 miles (4.8 km) on the left.
The 60th (London) Infantry Division took El Jib, Er Ram, and Rafat; the 53rd (Welsh) Infantry Division covered their left. The 74th Infantry Division captured Beitunia and the 10th (Irish) Infantry Division pushed to the east of Ain Arik. With enemy machine guns hard to locate amongst the boulders, the fighting was severe and stubborn. On 29 November the 60th and 74th Infantry Divisions were joined by the 53rd (Welsh) Infantry Division. They pushed the whole line along the Nablus road to beyond Ramallah and Bireh by 30 December. Final objectives were gained and the line along the whole front secured.
Summation of campaign
This newly-established British strategically strong defensive line remained in place until mid September 1918. It stretched across from the Mediterranean coast in the west to north and east of Jerusalem. It was extended during the middle of February 1918 when Jericho in the Jordan Valley was captured and the eastern end of the line was secured on the Dead Sea. The Ottoman Army lost over 1,000 casualties and 750 prisoners; the British captured 24 machine guns and three automatic rifles.
The enormous territorial gains of the Palestine offensive contrasted with the British Expeditionary Force's offensive on the Western Front at the Cambrai. Fought in Flanders from 20 to 30 November, it ended with heavy losses and no gains. The French army was still recovering from a serious mutiny, the Italians were defeated at the Battle of Caporetto, and Russia was out of the war following the Bolshevik Revolution. Allenby's advance, by comparison, helped secure Baghdad and the oilfields at Basra in Mesopotamia, encouraged the Arab Revolt, and inflicted irreplaceable losses on the Ottoman Army.
This campaign was the first military defeat for a Central Power which led to a substantial loss of territory. It was also the first defeat of an entrenched army of experienced and successful troops who were supported by artillery, machine guns, and aircraft by an army which had to approach over open ground. This was a "Western Front"-style of battle against trenches, artillery, redoubts, and other fortifications.
Sporadic fighting continued in the hills surrounding Jerusalem. The Ottoman forces were reinforced by the Yıldırım Army Group, which originally had been formed to recover Baghdad from British forces in Mesopotamia. These forces had arrived on the field piecemeal but by now they were fully on the field. On Christmas Day, Falkenhayn launched another counter assault, which was repulsed with heavy losses.
The fall of Jerusalem offered the Allied nations much relief from these setbacks. Campaigns in Mesopotamia were cancelled to send reinforcements to Allenby. The Ottoman Empire lost control over central Palestine. The following year they were completely driven from the region after the Battle of Megiddo. This victory boosted the morale of the Allied forces. Later, some British magazines claimed it as the end of the crusades.
The battle honour Battle of Jerusalem is still carried by British units such as the Queen's Lancashire Regiment.
Footnotes
Citations
Bibliography
Jerusalem Memorial Bearing the Names of Soldiers of the Forces of the British Empire who fell in Egypt and Palestine during the Great War and have no known graves. Part 1 A-L. London: Imperial War Graves Commission. 1928. OCLC 221064848.
The Official Names of the Battles and Other Engagements Fought by the Military Forces of the British Empire during the Great War, 1914-1919, and the third Afghan War, 1919: Report of the Battles Nomenclature Committee as Approved by The Army Council Presented to Parliament by Command of His Majesty. London: Government Printer. 1922. OCLC 29078007.
Blenkinsop, L.J. & J.W. Rainey, ed (1925). History of the Great War Based on Official Documents Veterinary Services. London: H.M. Stationers. OCLC 460717714.
Bostock, Harry P. (1982). The Great Ride The Diary of a Light Horse Brigade Scout World War 1. Perth: Artlook Books. OCLC 12024100.
Bruce, Anthony (2002). The Last Crusade: The Palestine Campaign in the First World War. London: John Murray Ltd. ISBN 978-0-7195-5432-2.
Carver, Michael, Field Marshal Lord (2003). The National Army Museum Book of The Turkish Front 1914-1918 The Campaigns at Gallipoli, in Mesopotamia and in Palestine. London: Pan Macmillan. ISBN 978-0-283-07347-2.
Erickson, Edward J. (2001). Ordered to Die A History of the Ottoman Army in the First World War: Forward by General Hx¼seyiln Kivrikoglu. No. 201 Contributions in Military Studies. Westport Connecticut: Greenwood Press. OCLC 43481698.
Erickson, Edward J. (2007). John Gooch and Brian Holden Reid. ed. Ottoman Army Effectiveness in World War I: A Comparative Study. No. 26 of Cass series: military history and policy. Milton Park, Abingdon, Oxon: Routledge. ISBN 978-0-203-96456-9.
Falls, Cyril; G. MacMunn, A.F. Beck (1930). Military Operations Egypt & Palestine from June 1917 to the end of the War. History of the Great War Based on Official Documents by Direction of the Historical Section of the Committee of Imperial Defence. 2 Part 1. London: HM Stationary Office. OCLC 644354483.
Grainger, John D. (2006). The Battle for Palestine, 1917. Woodbridge: Boydell Press. ISBN 978-1-84383-263-8.
Gullett, H.S. (1941). The Australian Imperial Force in Sinai and Palestine, 1914-1918. Official History of Australian in the War of 1914-1918, Volume VII. Canberra: Australian War Memorial. OCLC 220900153.
Hamilton, Patrick M. (1996). Riders of Destiny The 4th Australian Light Horse Field Ambulance 1917-18: An Autobiography and History. Gardenvale, Melbourne: Mostly Unsung Military History. ISBN 978-1-876179-01-4.
Hughes, Matthew, ed (2004). Allenby in Palestine: The Middle East Correspondence of Field Marshal Viscount Allenby June 1917 - October 1919. Army Records Society. 22. Phoenix Mill, Thrupp, Stroud, Gloucestershire: Sutton Publishing Ltd. ISBN 978-0-7509-3841-9.
Keogh, E. G.; Joan Graham (1955). Suez to Aleppo. Melbourne: Directorate of Military Training by Wilkie & Co.. OCLC 220029983.
Kinloch, Terry (2007). Devils on Horses in the words of the Anzacs in the Middle East 1916-19. Auckland: Exisle Publishing. ISBN 978-0-908988-94-5.
Lindsay, Neville (1992). Equal to the Task Volume 1 The Royal Australian Army Service Corps. Kenmore: Historia Productions. OCLC 28994468.
Moore, A. Briscoe (1920). The Mounted Riflemen in Sinai & Palestine The Story of New Zealand's Crusaders. Christchurch: Whitcombe & Tombs Ltd. OCLC 561949575.
Paget, G.C.H.V Marquess of Anglesey (1994). Egypt, Palestine and Syria 1914 to 1919. A History of the British Cavalry 1816-1919 Volume 5. London: Leo Cooper. ISBN 978-0-85052-395-9.
Powles, C. Guy; A. Wilkie (1922). The New Zealanders in Sinai and Palestine. Official History New Zealand's Effort in the Great War, Volume III. Auckland: Whitcombe & Tombs Ltd. OCLC 2959465.
Preston, R. M. P. (1921). The Desert Mounted Corps: An Account of the Cavalry Operations in Palestine and Syria 1917-1918. London: Constable & Co.. OCLC 3900439.
Tucker, Spencer, The Great War: 1914-18 (1998)
Wavell, Field Marshal Earl (1968). E.W. Sheppard. ed. The Palestine Campaigns. A Short History of the British Army (3rd ed.). London: Constable & Co..
Woodward, David R. (2006). Hell in the Holy Land World War I in the Middle East. Lexington: The University Press of Kentucky. ISBN 978-0-8131-2383-7.
More aircraft.
Source: WikiPedia