


Battle of Jutland - Picture
More about World War 1

|
|
Battle of Jutland
Date
31 May 1916 - 1 June 1916
Location
North Sea, near Denmark
Result
Tactically inconclusive; British dominance of the North Sea maintained
Date: 31 May 1916 - 1 June 1916
Location: North Sea, near Denmark
Result: Tactically inconclusive; British dominance of the North Sea maintained
Belligerents:
: Grand Fleet of the
Royal Navy
Commanders and leaders:
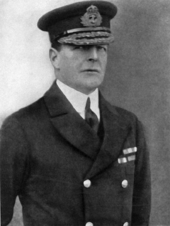
: Sir John Jellicoe
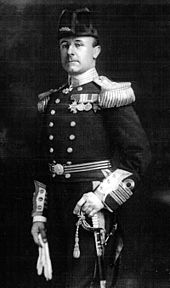
Sir David Beatty
Strength:
: 28 battleships
9 battlecruisers
8 armoured cruisers
26 light cruisers
78 destroyers
1 minelayer
1 seaplane carrier
Casualties and losses:
: 6,094 killed
510 wounded
177 captured
3 battlecruisers
3 armoured cruisers
8 destroyers
(113,300 tons sunk)
The Battle of Jutland (German: Skagerrakschlacht; Danish: Sx¸slaget ved Jylland / Sx¸slaget om Skagerrak) was a naval battle between the Royal Navy's Grand Fleet and the Imperial German Navy's High Seas Fleet during the First World War. It was fought on 31 May and 1 June 1916 in the North Sea near Jutland, Denmark. The battle was the largest naval battle and the only full-scale clash of battleships in the war. It was also only the third major fleet action between steel battleships following the battles of the Yellow Sea and Tsushima during the Russo-Japanese War.
The German fleet was commanded by Vice-Admiral Reinhard Scheer, and the Royal Navy's Grand Fleet by Admiral Sir John Jellicoe. The German fleet's intention was to lure out, trap, and destroy a portion of the Grand Fleet, as they believed that their smaller number of ships would be insufficient to engage the entire British fleet. This formed part of a larger strategy to break the British blockade of Germany and to allow German mercantile shipping to operate. Meanwhile, the Royal Navy was attempting to engage and destroy the High Seas Fleet, or keep the German force contained and away from Britain's own shipping lanes.
The Germans' plan was to use Vice-Admiral Franz Hipper's fast scouting group of five modern battlecruisers to lure Vice-Admiral Sir David Beatty's battlecruiser squadrons through a submarine picket line and into the path of the main German fleet. However, the British learned from signal intercepts that a major fleet operation was likely, so on 30 May, Jellicoe sailed with the Grand Fleet to rendezvous with Beatty, passing over the locations of the German submarine picket lines while they were unprepared.
On the afternoon of 31 May, Beatty encountered Hipper's battlecruiser force long before the Germans had expected, which eliminated any submarine influence. In a running battle, Hipper successfully drew the British vanguard into the path of the High Seas Fleet. By the time Beatty sighted the larger force and turned back towards the British main fleet, he had lost two battlecruisers from a force of six battlecruisers and four battleships, against the five ships commanded by Hipper. The battleships, commanded by Rear-Admiral Sir Hugh Evan-Thomas, were the last to turn and formed a rearguard as Beatty withdrew, drawing the German fleet in pursuit towards the main British positions. Between 18:30, when the sun was lowering on the western horizon, backlighting the German forces, and nightfall at about 20:30, the two huge fleets - totaling 250 ships between them - directly engaged each other twice.
Fourteen British and eleven German ships were sunk with great loss of life. After sunset, and throughout the night, Jellicoe manoeuvred to cut the Germans off from their base, in hopes of continuing the battle next morning, but under the cover of darkness, Scheer sailed behind the British fleet and returned to port.
Both sides claimed victory. The British lost more ships and twice as many sailors, and the British press criticised the Grand Fleet's failure to force a decisive outcome, but Scheer's plan of destroying a substantial portion of the British fleet also failed. The Germans continued to pose a threat, requiring the British to keep their battleships concentrated in the North Sea, but the battle confirmed the German policy of avoiding all fleet-to-fleet contact, and instead, the German Navy turned its efforts and resources to unrestricted submarine warfare and the destruction of Allied and neutral shipping. Subsequent reviews commissioned by the Royal Navy generated strong disagreement between supporters of Jellicoe and Beatty, and the two admirals' performance in the battle; this debate continues today.
Background and planning
German planning
With 16 dreadnought class battleships, compared with the Royal Navy's 28, the German High Seas Fleet stood little chance of winning a head-to-head clash. The Germans therefore adopted a divide-and-conquer strategy: staging raids into the North Sea and bombarding the English coast. The aim was to lure out small British squadrons and pickets, which could then be destroyed by superior forces or submarines.
In January 1916, Admiral von Pohl, commander of the German Fleet, fell ill. He was replaced by Scheer, who believed that the fleet had been used too defensively, had better ships and men than the British, and ought to take the war to them. According to Scheer, the German naval strategy should be:
to damage the English Fleet by offensive raids against the naval forces engaged in watching and blockading the German Bight, as well as by mine-laying on the British coast and submarine attack, whenever possible. After an equality of strength had been realised as a result of these operations, and all our forces had been made ready and concentrated, an attempt was to be made with our fleet to seek battle under circumstances unfavourable to the enemy.
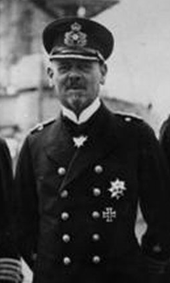
Picture - Reinhard Scheer, German fleet commander
On 25 April, a decision was made by the German admiralty to halt indiscriminate attacks by submarine on merchant shipping. This followed protests from neutral countries, notably the United States, that their nationals had been the victims of attacks. Germany agreed that future attacks would only take place in accord with internationally agreed prize rules, which required an attacker to give a warning and allow the crews of vessels time to escape, and not to attack at all neutral vessels. Scheer believed that it would not be possible to continue attacks on these terms, which took away the advantage of secret approach by submarines and left them vulnerable to even relatively small guns on the target ships. Instead, he set about deploying the submarine fleet against military vessels.
It was hoped that, following a successful German submarine attack, fast British escorts, such as destroyers, would be tied down by anti-submarine operations. If the Germans could catch the British in the expected locations, there were thought to be good prospects of at least partially redressing the balance of forces between the fleets. "After the British sortied in response to the raiding attack force" the Royal Navy's centuries-old instincts for aggressive action could be exploited to draw its weakened units towards the main German fleet under Scheer. The hope was that Scheer would thus be able to ambush a section of the British fleet and destroy it.
Submarine deployments
A plan was devised to station submarines offshore from British naval bases, and then stage some action that would draw out the British ships to the waiting submarines. The battlecruiser Seydlitz had been damaged in a previous engagement, but was due to be repaired by mid May, so an operation was scheduled for 17 May. At the start of May, difficulties with condensers were discovered on ships of the III battleship squadron, so the operation was put back to 23 May. Ten submarines - U-24, U-32, U-43, U-44, U-47, U-51, U-52, U-63, U-66, and U-70 - were given orders first to patrol in the central north sea between 17 and 22 May, and then to take up waiting positions. U-43 and U-44 were stationed in the Pentland Firth, which the Grand Fleet was likely to cross leaving Scapa Flow, while the remainder proceeded to the Firth of Forth, awaiting battlecruisers departing Rosyth. Each boat had an allocated area, which they could move around as necessary to avoid detection but they were instructed to keep within it. During the initial North sea patrol the ships were instructed to sail only north-south so that any enemy who chanced to encounter one would believe they were departing or returning from operations on the west coast (which required them to pass around the north of Britain). Once at their final positions, the ships were under strict orders to avoid premature detection that might give away the operation. It was arranged that a coded signal would be transmitted to alert the submarines exactly when the operation commenced, 'Take into account the enemy's forces may be putting to sea'.
Additionally, UB-27 was sent out on 20 May with instructions to work her way into the Firth of Forth past May Island. U-46 was ordered to patrol the coast of Sunderland, which had been chosen for the diversionary attack, but because of engine problems she was unable to leave port and U-47 was diverted to this task. On 13 May, U-72 was sent to lay mines in the Firth of Forth, on 23rd U-74 departed to lay mines in the Moray Firth, and on the 24th, U-75 was dispatched similarly west of the Orkney islands. UB-21 and UB-22 were sent to patrol the Humber, where (incorrect) reports had suggested the presence of British warships. U-22, U-46 and U-67 were positioned north of Terschelling to protect against intervention by British light forces stationed at Harwich.
On 22 May, it was discovered that Seydlitz was still not watertight after repairs and would not now be ready until the 29th. The ambush submarines were now on station and experiencing difficulties of their own: visibility near the coast was frequently poor due to fog, and sea conditions were either so calm the slightest ripple, as from the periscope, could give away their position, or so rough as to make it very hard to keep the vessel at a steady depth. The British had become aware of unusual submarine activity, and had begun counter patrols that forced the submarines out of position. UB-27 passed Bell Rock on the night of 23 May on its way into the Firth of Forth as planned, but was halted by engine trouble. After repairs she continued to approach, following behind merchant vessels and reached Largo Bay on 25 May. There the ship became entangled in nets that fouled one of the propellers, forcing them to abandon the operation and return home. U-74 was detected by four armed trawlers on 27 May and sunk 25 mi (22 nmi; 40 km) south east of Peterhead. U75 laid her mines off the Orkney islands, which although they played no part in the battle, were responsible later for sinking the cruiser Hampshire carrying Lord Kitchener (head of the army) on a mission to Russia on 5 June. U-72 was forced to abandon her mission without laying any mines when an oil leak meant she was laying a visible surface trail astern.
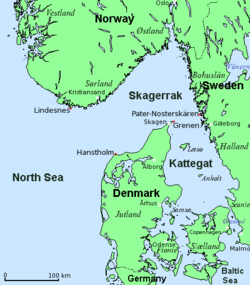
Picture - The throat of the Skagerrak, the strategic gateway to the Baltic and North Atlantic, waters off Jutland and Norway
Zeppelins
The Germans maintained a fleet of Zeppelins that they used for aerial reconnaissance and occasional bombing raids. The planned raid on Sunderland intended using Zeppelins to watch out for the British fleet approaching from the north, which might otherwise surprise the raiders.
By 28 May, strong north easterly winds meant that it would not be possible to send out the Zeppelins, so the raid again had to be postponed. The submarines could only stay on station until 1 June before their supplies would be exhausted and they had orders to return, so a decision had to be made quickly about the raid.
It was decided to use an alternative plan, abandoning the attack on Sunderland but instead sending a patrol of battlecruisers to the Skagerrak (the sea between Norway and Denmark) where it was likely they would encounter merchant ships carrying British cargo and British cruiser patrols. It was felt this could be done without air support, because the action would now be much closer to Germany, relying instead on cruiser and torpedo boat patrols for reconnaissance.
Orders for the alternative plan were issued on 28 May, though still hoping that last minute improvements in the weather would allow the original plan to go ahead. The German fleet assembled in the Jade river and at Wilhelmshaven was instructed to raise steam and be ready for action from midnight on 28 May.
Picture - Franz Hipper, commander of the German battlecruiser squadron
By 14:00 on 30 May, the wind was still too strong and the final decision was made to go with the alternative plan. The coded signal '31 May G.G.2490' was transmitted to the fleet to inform them the Skagerrak attack would start on 31 May. The pre-arranged signal to the waiting submarines was transmitted throughout the day from the E-Dienst radio station at Brugges, and the U-boat tender Arcona anchored at Emden. Only two of the waiting submarines, U-66 and U-32 received the order.
British response
Unfortunately for the German plan, the British had obtained a copy of the main German code book from the light cruiser SMS Magdeburg, which had been boarded by the Russian Navy after the ship ran aground in Russian territorial waters in 1914. German naval radio communications could therefore usually be quickly deciphered, and the British Admiralty usually knew about German activities.
The British Admiralty's Room 40 maintained direction finding and interception of German naval signals. It had intercepted and decrypted a German signal on 28 May ordering all ships to be ready for sea on the 30th. Further signals were intercepted and although they were not decrypted it was clear that a major operation was likely. At 11:00 on 30 May, Jellicoe was warned that the German fleet seemed prepared to sail the following morning. By 17:00, the Admiralty had intercepted the signal from Scheer, '31 May G.G.2490', making it clear something significant was imminent.
Not knowing the Germans' objective, Jellicoe and his staff decided to position the fleet to head off any attempt by the Germans to enter the North Atlantic, or the Baltic through the Skagerrak, by taking up a position off Norway where they could possibly cut off any German raid into the shipping lanes of the Atlantic, or prevent the Germans from heading into the Baltic. A position further west was unnecessary as that area of the North Sea could be patrolled by air using blimps and scouting aircraft.
Picture - John Jellicoe, British fleet commander
Consequently, Admiral Jellicoe led the 16 dreadnought battleships of the 1st and 4th Battle Squadrons of the Grand Fleet and three battlecruisers of the 3rd Battlecruiser Squadron eastwards out of Scapa Flow at 22:30 on 30 May. He was to meet the 2nd battle squadron of eight more dreadnought battleships commanded by Vice-Admiral Martyn Jerram coming from Cromarty. Hipper's raiding force did not leave the Outer Jade Roads until 01:00 on 31 May heading west of Heligoland island following a cleared channel through the minefields, heading north at 16 kn (18 mph; 30 km/h). The main German fleet of 16 dreadnought battleships of I and III Battle Squadrons left the jade at 02:30, being joined off Heligoland at 04:00 by the six pre-dreadnoughts of the II Battle Squadron coming from the Elbe river. Beatty's faster force of six ships of the 1st and 4th battlecruiser squadrons plus the 5th battle squadron of four fast battleships left the Firth of Forth on the next day, and Jellicoe's intention was to rendezvous with him 90 mi (78 nmi; 140 km) west of the mouth of the Skagerrak off the coast of Jutland and wait for the Germans or for their intentions to become clear. The planned position gave him the widest range of responses to likely German intentions.
Naval tactics in 1916
The principle of concentration of force was fundamental to the fleet tactics of this period (as in earlier periods). Tactical doctrine called for a fleet approaching battle to be in a compact formation of parallel columns, allowing relatively easy manoeuvring, and giving shortened sight lines within the formation, which made easier the passing of the signals necessary for command and control.
It was a fundamental advantage of such a formation that a fleet formed in several short columns could change its heading faster than one formed in a single long column. Since most command signals in this era were made by visible means, usually made with flags or shuttered searchlights between ships, the flagship was usually placed at the head of the centre column so that its signals might be more easily seen by the many ships of the formation. Wireless telegraphy was in use though security (radio direction finding), encryption, and the limitation of the radio sets, made their extensive use more problematic. Command and control of such huge fleets remained incredibly difficult.
Thus, it might take a very long time for a signal from the flagship to be relayed to the entire formation. It was usually necessary for a signal to be confirmed by each ship before it could be relayed to other ships, and an order for a fleet movement would have to be received and acknowledged by every ship before it could be executed. In a large single-column formation, a signal could take 10 minutes or more to be passed from one end of the line to the other, whereas in a formation of parallel columns, visibility across the diagonals was often better (and always shorter) than in a single long column, and the diagonals gave signal "redundancy", increasing the probability that a message would be quickly seen and correctly interpreted.
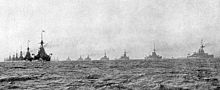
Picture - The British Grand Fleet steaming in parallel columns at the outbreak of war in 1914
However, before battle was joined the heavy units of the fleet would, if possible, deploy into a single column. To form the battle-line in the correct orientation relative to the enemy, the commanding admiral had to know the enemy fleet's distance, bearing, heading, and speed. It was the task of the scouting forces, consisting primarily of battlecruisers and cruisers, to find the enemy and to report this information in sufficient time, and, if possible, to deny the enemy's scouting forces the opportunity of obtaining the equivalent information.
Ideally, the battle-line would cross the intended path of the enemy column so that the maximum number of guns could be brought to bear, while the enemy could fire only with the forward guns of the leading ships, a manoeuvre known as "crossing the T". Admiral TÅgÅ, commander of the Japanese battleship fleet had achieved this against Admiral Rozhestvensky's Russian battleships in 1905 at the Battle of Tsushima, with devastating results. Jellicoe was to achieve this twice in one hour against the High Seas Fleet at Jutland, but on both occasions Scheer managed to turn away and disengage, thereby avoiding a decisive action.
Ship design
Within the existing technological limits, a trade-off had to be made between the weight and size of guns, the weight of armour protecting the ship, and the maximum speed. Battleships sacrificed speed for armour and heavy naval guns (11 in (280 mm) or larger). British battlecruisers sacrificed weight of armour for greater speed, while their German counterparts were armed with lighter guns. These weight savings allowed them to escape danger or catch other ships. Generally, the larger guns mounted on British ships allowed an engagement at greater range. In theory, a lightly armoured ship could stay out of range of a slower opponent while still scoring hits. The fast pace of development in the pre-war years meant that every few years a new generation of ships rendered its predecessors obsolete. Thus, fairly young ships could still be obsolete compared to the newest ships, and fare badly in an engagement against them.
Admiral John Fisher, responsible for reconstruction of the British fleet in the pre-war period, favoured large guns and speed. Admiral Tirpitz, responsible for the German fleet, favoured unsinkable ships and chose to sacrifice some gun size for improved armour. The German battlecruiser Derfflinger had belt armour equivalent in thickness - though not in terms of comprehensiveness - to the British battleship Iron Duke, significantly better than on the British battlecruisers such as Tiger. German ships had better internal subdivision and had fewer doors and other weak points in their bulkheads, but with the disadvantage that space for crew was greatly reduced. As they were only designed for cruises in the North Sea, they did not need to be as habitable as the British vessels, and their crews could live in barracks ashore when in harbour.
Order of battle
Jellicoe's Grand Fleet was split into two sections. The dreadnought Battle Fleet with which he sailed formed the main force and was composed of 24 battleships and three battlecruisers. The battleships were formed into three squadrons of eight ships, further subdivided into divisions of four, each led by a flag officer. Accompanying them were eight armoured cruisers (classified by the Royal Navy since 1913 as "cruisers"), eight light cruisers, four scout cruisers, 51 destroyers, and one destroyer-minelayer.
Picture - David Beatty commander British battlecruiser squadron
The Grand Fleet sailed without three of its battleships: Emperor of India in refit at Invergordon, Queen Elizabeth drydocked at Rosyth and Dreadnought in refit at Devonport. The brand new Royal Sovereign was left behind, with only three weeks in service, her untrained crew judged unready for battle.
British reconnaissance was provided by the Battlecruiser Fleet under David Beatty: six battlecruisers, four fast Queen Elizabeth-class battleships, 14 light cruisers and 27 destroyers. Air scouting was provided for by the attachment of the seaplane tender HMS Engadine, one of the first aircraft carriers in history to participate in a naval engagement.
The German High Seas Fleet under Scheer was also split into a main force and a separate reconnaissance force. Scheer's main battle fleet was composed of 16 battleships and six pre-dreadnought battleships arranged in an identical manner to the British. With them were six light cruisers and 31 torpedo-boats.
The German scouting force, commanded by Franz Hipper, consisted of five battlecruisers, five light cruisers and 30 torpedo-boats. The Germans had no equivalent to Engadine, and no heavier-than-air aircraft to operate with the fleet, but had the Imperial German Naval Airship Service's force of rigid airships available to patrol the North Sea.
The British capital ships carried a larger number of guns and a correspondingly larger weight of broadside than their German counterparts; 332,360 lb (150,760 kg) as compared to 134,216 lb (60,879 kg). Most of the battleships and battlecruisers on both sides also carried torpedoes of various sizes, as did the lighter craft.
The German battle fleet was hampered by the slow speed and relatively poor armament of the six pre-dreadnoughts of II Squadron, which limited maximum fleet speed to 18 kn (21 mph; 33 km/h), compared to maximum British fleet speed of 21 kn (24 mph; 39 km/h). On the British side, the eight armoured cruisers were deficient in both speed and armour protection. Both of these obsolete squadrons were notably vulnerable to attacks by more modern enemy ships.
Battlecruiser action
The route of the British battlecruiser fleet took it through the patrol sector allocated to U-32. After receiving the order to commence the operation, U-32 moved to a position 80 mi (70 nmi; 130 km) east of May Island at dawn on 31 May. At 03:40, she sighted the cruisers HMS Galatea and Phaeton leaving the Forth at 18 kn (21 mph; 33 km/h). She fired one torpedo at the leading cruiser at a range of 1,000 yd (910 m), but her periscope jammed 'up', giving away the position of the submarine as she manoeuvred to fire a second. The lead cruiser turned away to dodge the torpedo, while the second turned towards the submarine attempting to ram. U-32 crash-dived, and on raising periscope at 04:10 saw two battlecruisers (the 2nd Battlecruiser Squadron) heading southeast. They were too far away to attack, but Kapitx¤nleutnant von Spiegel reported the sighting of two battleships and two cruisers to Germany.
U-66 was also supposed to be patrolling off the Firth of Forth, but had been forced north to a position 60 mi (52 nmi; 97 km) off Peterhead by patrolling British vessels. This now brought her into contact with the 2nd Battle Squadron, coming from the Moray Firth. At 05:00, she had to crash dive when the cruiser Duke of Edinburgh appeared from the mist heading toward her. This was followed by another cruiser Boadicea and eight battleships. U-66 got within 350 yd (320 m) of the battleships preparing to fire, but was forced to dive by an approaching destroyer and missed the opportunity. At 06:35, she reported eight battleships and cruisers heading north.
The courses reported by both submarines were incorrect, because they reflected one leg of a zig-zag being used by British ships to avoid submarines. Taken with a wireless intercept of more ships leaving Scapa Flow earlier in the night, the impression was given in the German high command that the British fleet, whatever it was doing, was split into separate sections moving apart, which was precisely as the Germans wished to meet it.
Jellicoe's ships proceeded to their rendezvous undamaged and undiscovered. However, he was now misled by an Admiralty intelligence report, advising that the German main battlefleet was still in port. The Director of Operations Division, Rear Admiral Thomas Jackson had asked the intelligence division, Room 40, for the current location of German call sign DK, used by Admiral Scheer. They had replied that it was currently transmitting from Wilhelmshaven. It was known to the intelligence staff that Scheer deliberately used a different call sign when at sea, but no one asked for this information or explained the reason behind the query, to locate the German fleet.
The German battlecruisers cleared the minefields surrounding the Amrum swept channel by 09:00. They then proceeded northwest, passing 35 mi (30 nmi; 56 km) west of the Horn's Reef lightship heading for the Little Fisher Bank at the mouth of the Skagerrak. The High Seas Fleet followed some 50 mi (43 nmi; 80 km) behind. The battlecruisers were in line ahead, with the four cruisers of the II scouting group plus supporting torpedo boats ranged in an arc 8 mi (7.0 nmi; 13 km) ahead and to either side. The IX torpedo boat flotilla formed close support immediately surrounding the battlecruisers. The High Seas Fleet similarly adopted a line ahead formation, with close screening by torpedo boats either side and a further screen of five cruisers surrounding the column 5-8 mi (4.3-7.0 nmi; 8.0-13 km) away. Winds had finally moderated so that Zepelins could be used, and by 11:30 five had been sent out: L14 to the Skagerrak, L23 240 mi (210 nmi; 390 km) east of Noss Head in the Pentland Firth, L21 120 mi (100 nmi; 190 km) off Peterhead, L9 100 mi (87 nmi; 160 km) off Sunderland, and L16 80 mi (70 nmi; 130 km) east of Flamborough Head. Visibility, however, was still bad with cloud down to 1,000 ft (300 m).
Contact
By around 14:00, Beatty's ships were proceeding eastward at roughly the same latitude as Hipper's squadron, which was heading north. Had the courses remained unchanged, Beatty would have passed between the two German fleets, 40 mi (35 nmi; 64 km) south of the battlecruisers and 20 mi (17 nmi; 32 km) north of the High Seas Fleet at around 16:30, possibly trapping his ships just as the German plan envisioned. However, his orders were to stop his scouting patrol when he reached a point 260 mi (230 nmi; 420 km) east of Britain and then turn north to meet Jellicoe, which he did at this time. Beatty's ships were divided into three columns, with the two battlecruiser squadrons leading in parallel lines 3 mi (2.6 nmi; 4.8 km) apart. The 5th Battle Squadron was stationed 5 mi (4.3 nmi; 8.0 km) to the northwest, on the side furthest away from any expected enemy contact, while a screen of cruisers and destroyers was spread southeast of the battlecruisers. After the turn, the 5th Battle Squadron was now leading the British ships in the west-most column, Beatty's squadron was centre and rearmost, with the 2nd BCS to the west.
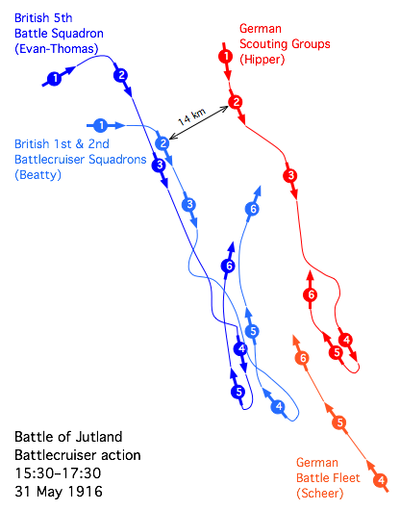
Picture - (1) 15:22 hrs, Hipper sights Beatty.
(2) 15:48 hrs, First shots fired by Hipper's squadron.
(3) 16:00 hrs-16:05 hrs, Indefatigable explodes, leaving two survivors.
(4) 16:25 hrs, Queen Mary explodes, nine survive.
(5) 16:45 hrs, Beatty's battlecruisers move out of range of Hipper.
(6) 16:54 hrs, Evan-Thomas' battleships turn north behind Beatty.
At 14:20 on 31 May, despite heavy haze and scuds of fog giving poor visibility, scouts from Beatty's force reported enemy ships to the southeast; the British light units, investigating a neutral Danish steamer (N J Fjord), which was stopped between the two fleets, had found two German destroyers engaged in the same mission (B109 and B110). The first shots of the battle were fired at 14:28 when HMS Galatea and Phaeton of the British 1st Light Cruiser Squadron opened on the German destroyers, which withdrew toward their own approaching light cruisers. At 14:36, the Germans scored the first hit of the battle when SMS Elbing, of Rear-Admiral Friedrich Bx¶dicker's Scouting Group II, hit her British counterpart Galatea at extreme range.
Meanwhile Beatty began to move his battlecruisers and supporting forces southeastwards and then east to cut the German ships off from their base, and ordered Engadine to launch a seaplane to try to get more information about the size and location of the German forces. This was the first time in history that a carrier-based aeroplane was used for reconnaissance in naval combat. Engadine's plane did locate and report some German light cruisers just before 15:30, and received anti-aircraft gunfire, but attempts to relay the plane's reports failed.
Unfortunately for Beatty, his initial course changes at 14:32 were not received by Sir Hugh Evan-Thomas's 5th Battle Squadron (it being too far away to read his flags), because the battlecruiser HMS Tiger - the last ship in his column - was no longer in a position where it could relay signals by searchlight to Evan-Thomas, as it had previously been ordered to do. Whereas before the north turn, Tiger had been the closest ship to Evan-Thomas, she was now further away than Beatty on Lion. Matters were aggravated because Evan-Thomas had not been briefed regarding standing orders within Beatty's Squadron, as his squadron normally operated with the Grand Fleet. Fleet ships were expected to obey movement orders precisely and not deviate from them. Beatty's standing instructions expected his officers to use initiative and keep position with the flagship. As a result, the four Queen Elizabeth-class battleships - which were the fastest and most heavily-armed in the world at that time - remained on the previous course for several minutes, ending up 10 mi (8.7 nmi; 16 km) behind rather than five. Beatty also had opportunity during the previous hours to concentrate his forces, and no reason not to do so, whereas he steamed ahead at full speed faster than the battleships could manage. Dividing the force had serious consequences for the British, costing them what would have been an overwhelming advantage in ships and firepower during the first half-hour of the coming battle.
With visibility favouring the Germans, at 15:22 Hipper's battlecruisers steaming approximately northwest, sighted Beatty's squadron at a range of about 15 mi (13 nmi; 24 km), while Beatty's forces did not identify Hipper's battlecruisers until 15:30. (position 1 on map). At 15:45, Hipper turned southeast to lead Beatty toward Scheer, who was 46 mi (40 nmi; 74 km) southeast with the main force of the High Seas Fleet.
The Run to the South
Beatty's conduct during the next 15 minutes has received a great deal of criticism, as his ships out-ranged and outnumbered the German squadron, yet he held his fire for over 10 minutes with the German ships in range. He also failed to use the time available to rearrange his battlecruisers into a fighting formation, with the result that they were still manoeuvring when the battle started.
At 15:48, with the opposing forces roughly parallel at 15,000 yd (14,000 m), with the British to the southwest of the Germans (i.e. on the right side), Hipper opened fire, followed by the British ships as their guns came to bear upon targets (position 2). Thus began the opening phase of the battlecruiser action, known as the "Run to the South", in which the British chased the Germans, and Hipper intentionally led Beatty toward Scheer. During the first minutes of the ensuing battle, all the British ships except Princess Royal fired far over their German opponents, due to adverse visibility conditions, before finally getting the range. Only Lion and Princess Royal had settled into formation, so the other four ships were hampered in aiming by their own turning. Beatty was to windward of Hipper, and therefore funnel and gun smoke from his own ships tended to obscure his targets, while Hipper's smoke blew clear. Also, the eastern sky was overcast and the grey German ships were indistinct and difficult to range.
Beatty had ordered his ships to engage in a line, one British ship engaging with one German and his flagship HMS Lion doubling on the German flagship SMS Lx¼tzow. However, due to another mistake with signalling by flag, and possibly that Queen Mary and Tiger were unable to see the German lead ship because of smoke, the second German ship, Derfflinger, was left unengaged and free to fire without disruption. SMS Moltke drew fire from two of Beatty's battlecruisers, but still fired with deadly accuracy during this time, putting nine shells into Tiger in the first 12 minutes. The Germans drew first blood. Aided by superior visibility, Hipper's five battlecruisers quickly registered hits on three of the six British battlecruisers. Seven minutes passed before the British managed to score their first hit.
The first near-kill of the Run to the South occurred at 16:00, when a 12 in (300 mm) salvo from Lx¼tzow wrecked the "Q" turret amidships on Beatty's flagship Lion. Dozens of crewmen were instantly killed, but far larger destruction was averted when the mortally wounded turret commander - Major Francis Harvey of the Royal Marines - promptly ordered the magazine doors shut and the magazine flooded. This prevented a massive magazine explosion at 16:28, when a flash fire ignited ready cordite charges beneath the turret and killed everyone in the chambers outside "Q" magazine. Lion was saved. HMS Indefatigable was not so lucky; at 16:02, just 14 minutes into the slugging match, she was smashed aft by three 11 in (280 mm) shells from SMS Von der Tann, causing damage sufficient to knock her out of line and detonating "X" magazine aft. Soon after, despite the near-maximum range, Von der Tann put another 11 in (280 mm) salvo on Indefatigable's "A" turret forward. The plunging shells probably pierced the thin upper armour and seconds later Indefatigable was ripped apart by another magazine explosion, sinking immediately with her crew of 1,019 officers and men, leaving only two survivors. (position 3).
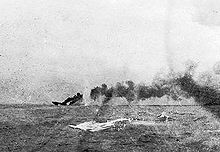
Picture - HMS Indefatigable sinking after being struck by shells from the German battlecruiser Von der Tann
Hipper's position deteriorated somewhat by 16:15 as the 5th Battle Squadron finally came into range, so that he had to contend with gunfire from the four battleships astern as well as Beatty's five remaining battlecruisers to starboard. But he knew his baiting mission was close to completion, as his force was rapidly closing with Scheer's main body. At 16:08, the lead battleship of the 5th Battle Squadron, HMS Barham, caught up with Hipper and opened fire at extreme range, scoring a 15 in (380 mm) hit on Von der Tann within 60 seconds. Still, it was 16:15 before all the battleships of the 5th were able to fully engage at long range.
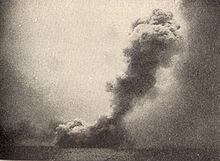
Picture - HMS Queen Mary blowing up
At 16:25, the battlecruiser action intensified again when HMS Queen Mary was hit by what may have been a combined salvo from Derfflinger and Seydlitz; she disintegrated when both forward magazines exploded, sinking with all but nine of her 1,275 man crew lost. (position 4). Commander von Hase, the first gunnery officer aboard Derfflingler, noted that:
The enemy was shooting superbly. Twice the Derfflinger came under their infernal hail and each time she was hit. But the Queen Mary was having a bad time; engaged by the Seydlitz as well as the Derfflinger, she met her doom at 1626. A vivid red flame shot up from her forepart; then came an explosion forward, followed by a much heavier explosion amidships. Immediately afterwards, she blew up with a terrific explosion, the masts collapsing inwards and the smoke hiding everything.
The enemy was shooting superbly. Twice the Derfflinger came under their infernal hail and each time she was hit. But the Queen Mary was having a bad time; engaged by the Seydlitz as well as the Derfflinger, she met her doom at 1626. A vivid red flame shot up from her forepart; then came an explosion forward, followed by a much heavier explosion amidships. Immediately afterwards, she blew up with a terrific explosion, the masts collapsing inwards and the smoke hiding everything.
During the Run to the South, from 15:48 to 16:54, the German battlecruisers made an estimated total of forty-two 11 in (280 mm) and 12 in (300 mm) hits on the British battlecruisers (nine on Lion, six on Princess Royal, seven on Queen Mary, 14 on Tiger, one on New Zealand, five on Indefatigable), and two more on the battleship Barham, compared with only eleven 13.5 in (340 mm) hits by the British battlecruisers (four on Lx¼tzow, four on Seydlitz, two on Moltke, one on von der Tann), and six 15 in (380 mm) hits by the battleships (one on Seydlitz, four on Moltke, one on von der Tann).
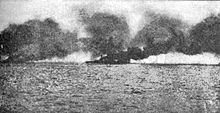
Picture - Beatty's flagship Lion burning after being hit by a salvo from Lx¼tzow
Two points to port
Shortly after, a salvo struck on or around HMS Princess Royal, which was obscured by spray and smoke from shell bursts. A signalman promptly leapt onto the bridge of Lion and announced "Princess Royal's blown up, Sir." Beatty famously turned to his flag captain, saying "Chatfield, there seems to be something wrong with our bloody ships today." (In popular legend, Beatty also immediately ordered his ships to "turn two points to port", i.e. two points nearer the enemy, but there is no official record of any such command or course change.) Princess Royal, as it turned out, was still afloat after the spray cleared.
At 16:30, Scheer's leading battleships sighted the distant battlecruiser action; soon after, HMS Southampton of Beatty's 2nd Light Cruiser Squadron led by Commodore William Goodenough sighted the main body of Scheer's High Seas Fleet, dodging numerous heavy-calibre salvos to report in detail the German strength: 16 dreadnoughts with six older battleships. This was the first news that Beatty and Jellicoe had that Scheer and his battlefleet were even at sea. Simultaneously, an all-out destroyer action raged in the space between the opposing battlecruiser forces, as British and German destroyers fought with each other and attempted to torpedo the larger enemy ships. Each side fired many torpedoes, but both battlecruiser forces turned away from the attacks and all escaped harm except Seydlitz, which was hit forward at 16:57 by a torpedo fired by the British destroyer HMS Petard. Though taking on water, Seydlitz maintained speed. The destroyer HMS Nestor, under the command of Captain Barry Bingham, led the British attacks. The British disabled the German torpedo boat V27, which the Germans soon abandoned and sank, and Petard then torpedoed and sank V29, her second score of the day. S35 and V26 rescued the crews of their sunken sister ships. But Nestor and another British destroyer - HMS Nomad - were immobilised by shell hits, and were later sunk by Scheer's passing dreadnoughts. Bingham was rescued, and won the Victoria Cross for his leadership in the destroyer action.
The Run to the North
As soon as he himself sighted the vanguard of Scheer's distant battleship line 12 mi (10 nmi; 19 km) away, at 16:40, Beatty turned his battlecruiser force 180°, heading north to draw the Germans toward Jellicoe. (position 5). Beatty's withdrawal toward Jellicoe is called the "Run to the North", in which the tables turned and the Germans chased the British. Because Beatty once again failed to signal his intentions adequately, the battleships of the 5th Battle Squadron - which were too far behind to read his flags - found themselves passing the battlecruisers on an opposing course and heading directly toward the approaching main body of the High Seas Fleet. At 16:48, at extreme range, Scheer's leading battleships opened fire.
Meanwhile, at 16:47, having received Goodenough's signal and knowing that Beatty was now leading the German battlefleet north to him, Jellicoe signalled to his own forces that the fleet action they had waited so long for was finally imminent; at 16:51, by radio, he so informed the Admiralty in London.
The difficulties of the 5th Battle Squadron were compounded when Beatty repeated the order to Evan-Thomas to "turn in succession" (rather than "turn together") at 16:48 as the battleships passed him. Evan-Thomas acknowledged the signal, but Lieutenant-Commander Ralph Seymour, Beatty's flag lieutenant, aggravated the situation when he did not haul down the flags (to execute the signal) for some minutes. At 16:55, when the 5BS had moved within range of the enemy battleships, Evan-Thomas issued his own flag command warning his squadron to expect sudden manoeuvres and to follow his lead, before starting to turn on his own initiative. The order to turn in succession would have resulted in all four ships turning in the same patch of sea as they reached it one by one, giving the High Seas Fleet repeated opportunity with ample time to find the proper range. In the event, the captain of the trailing ship (HMS Malaya) turned early, mitigating the adverse results.
For the next hour, the 5th Battle Squadron acted as Beatty's rearguard, drawing fire from all the German ships within range, while by 17:10 Beatty had deliberately eased his own squadron out of range of Hipper's now-superior battlecruiser force to give his damaged ships a respite from the accurate and deadly fire of his foes. Since visibility and firepower now favoured the Germans, there was no incentive for Beatty to risk further battlecruiser losses when his own gunnery could not be effective: illustrating the imbalance, Beatty's battlecruisers did not score any hits on the Germans in this phase until 17:45, but they had rapidly received five more before he opened the range (four on Lion, of which three were by Lx¼tzow, and one on Tiger by Seydlitz). Now the only targets the Germans could reach, the ships of the 5th Battle Squadron received simultaneous fire from Hipper's battlecruisers to the east (which HMS Barham and Valiant engaged), and from Scheer's leading battleships to the southeast (which HMS Warspite and Malaya engaged). Three took hits: Barham (four by Derfflinger), Warspite (two by Seydlitz), and Malaya (seven by the German battleships). Only Valiant was unscathed.
The four battleships were far better suited to take this sort of pounding than the battlecruisers, and none were lost, though Malaya suffered heavy damage, an ammunition fire, and heavy crew casualties. At the same time, the 15 in (380 mm) fire of the four British ships was accurate and effective. As the two British squadrons headed north at top speed, eagerly chased by the entire German fleet, the 5th Battle Squadron scored 13 hits on the enemy battlecruisers (four on Lx¼tzow, three on Derfflinger, six on Seydlitz) and five on battleships (though only one, on SMS Markgraf, did any serious damage). (position 6).
The fleets converge
Jellicoe was now aware that full fleet engagement was nearing, but had insufficient information on the position and course of the Germans. To assist Beatty, early in the battle at about 16:05, Jellicoe had ordered Rear-Admiral Horace Hood's 3rd Battlecruiser Squadron to speed ahead to find and support Beatty's force, and Hood was now racing SSE well in advance of Jellicoe's northern force. Rear-Admiral Arbuthnot's 1st Cruiser Squadron patrolled the van of Jellicoe's main battleship force as it advanced steadily to the southeast.
At 17:33, the armoured cruiser HMS Black Prince of Arbuthnot's squadron, on the far southwest flank of Jellicoe's force, came within view of HMS Falmouth, which was about 5 mi (4.3 nmi; 8.0 km) ahead of Beatty with the 3rd Light Cruiser Squadron, establishing the first visual link between the converging bodies of the Grand Fleet. At 17:38, the scout cruiser HMS Chester, screening Hood's oncoming battlecruisers, was intercepted by the van of the German scouting forces under Rear-Admiral Bx¶dicker.
Heavily outnumbered by Bx¶dicker's four light cruisers, Chester was pounded before being relieved by Hood's heavy units, which swung westward for that purpose. Hood's flagship HMS Invincible disabled the light cruiser SMS Wiesbaden shortly after 17:56. Wiesbaden became a sitting target for most of the British fleet during the next hour, but remained afloat and fired some torpedoes at the passing enemy battleships from long range. Meanwhile, Bx¶dicker's other ships fled toward Hipper and Scheer in the mistaken belief that Hood was leading a larger force of British capital ships from the north and east. A chaotic destroyer action in mist and smoke ensued as German torpedo boats attempted to blunt the arrival of this new formation, but Hood's battlecruisers dodged all the torpedoes fired at them. In this action, after leading a torpedo counterattack, the British destroyer HMS Shark was disabled, but continued to return fire at numerous passing enemy ships for the next hour.
The fleet action
Deployment
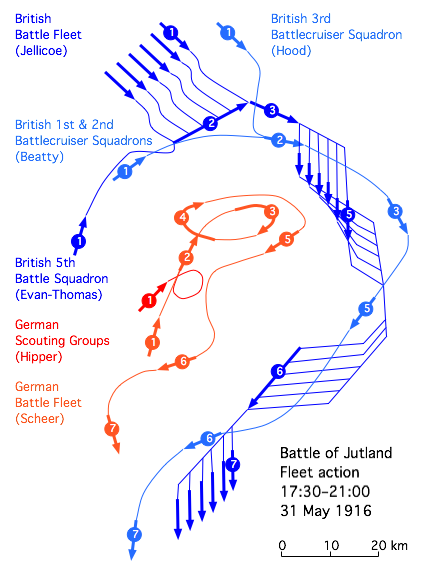
Picture - (1) 18:00 Battlecruisers rejoin respective fleets
(2) 18:15 British fleet deploys into battle line
(3) 18:30 German fleet under fire turns away
(4) 19:00 German fleet turns back
(5) 19:15 German fleet turns away for second time
(6) 20:00
(7) 21:00 Nightfall: Jellicoe assumes night cruising formation
In the meantime, Beatty and Evan-Thomas had resumed their engagement with Hipper's battlecruisers, this time with the visual conditions to their advantage. With several of his ships damaged, Hipper turned back toward Scheer at around 18:00, just as Beatty's flagship Lion was finally sighted from Jellicoe's flagship Iron Duke. Jellicoe twice demanded the latest position of the German battlefleet from Beatty, who could not see the German battleships and failed to respond to the question until 18:14. Meanwhile, Jellicoe received confusing sighting reports of varying accuracy and limited usefulness from light cruisers and battleships on the starboard (southern) flank of his force.
Jellicoe was in a worrying position. He needed to know the location of the German fleet to judge when and how to deploy his battleships from their cruising formation (six columns of four ships each) into a single battle-line. The deployment could be on either the westernmost or the easternmost column, and had to be carried out before the Germans arrived; but early deployment could mean losing any chance of a decisive encounter. Deploying to the west would bring his fleet closer to Scheer, gaining valuable time as dusk approached, but the Germans might arrive before the manoeuvre was complete. Deploying to the east would take the force away from Scheer, but Jellicoe's ships might be able to cross the "T", and visibility would strongly favour British gunnery - Scheer's forces would be silhouetted against the setting sun to the west, while the Grand Fleet would be indistinct against the dark skies to the north and east, and would be hidden by reflection of the low sunlight off intervening haze and smoke. Deployment would take twenty irreplaceable minutes, and the fleets were closing at speed. In one of the most critical and difficult tactical command decisions of the entire war, Jellicoe ordered deployment to the east at 18:15.
Windy Corner
Meanwhile, Hipper had rejoined Scheer, and the combined High Seas Fleet was heading north, directly toward Jellicoe. Scheer had no indication that Jellicoe was at sea, let alone that he was bearing down from the northwest, and was distracted by the intervention of Hood's ships to his north and east. Beatty's four surviving battlecruisers were now crossing the van of the British dreadnoughts to join Hood's three battlecruisers; at this time, Rear-Admiral Arbuthnot's flagship, the armoured cruiser HMS Defence, and her squadron-mate HMS Warrior both charged across Beatty's bows, and Lion narrowly avoided a collision with Warrior. Nearby, numerous British light cruisers and destroyers on the southwestern flank of the deploying battleships were also crossing each others' courses in attempts to reach their proper stations, often barely escaping collisions, and under fire from some of the approaching German ships. This period of peril and heavy traffic attending the merger and deployment of the British forces later became known as "Windy Corner".
Arbuthnot's armoured cruisers had no real place in the coming clash between modern dreadnoughts, but he was attracted by the drifting hull of the crippled Wiesbaden. With Warrior, Defence closed in for the kill, only to blunder right into the gun sights of Hipper's and Scheer's oncoming capital ships. Defence was deluged by heavy-calibre gunfire from many German battleships, which detonated her magazines in a spectacular explosion viewed by most of the deploying Grand Fleet; she sank with all hands (903 officers and men). Warrior was also hit badly, but she was spared destruction by a mishap to the nearby battleship Warspite. Warspite had her steering gear overheat and jam under heavy load at high speed as the 5th Battle Squadron made a turn to the north at 18:19. Steaming at top speed in wide circles, Warspite appeared as a juicy target to the German dreadnoughts and took 13 hits, inadvertently drawing fire from the hapless Warrior. Warspite was brought back under control and survived the onslaught, but was badly damaged, had to reduce speed, and withdrew northward; later (at 21:07), she was ordered back to port by Evan-Thomas. Warspite went on to a long and illustrious career, serving also in World War II. Warrior on the other hand, was abandoned and sank the next day after her crew was taken off at 08:25 on 1 June by Engadine, which towed the sinking armoured cruiser 100 mi (87 nmi; 160 km) during the night.
As Defence sank and Warspite circled, at about 18:19, Hipper moved within range of Rear-Admiral Hood's 3rd Battlecruiser Squadron, but was still also within range of Beatty's ships. At first, visibility favoured the British: HMS Indomitable hit Derfflinger three times and Seydlitz once, while Lx¼tzow quickly took 10 hits from Lion, Inflexible and Invincible, including two below-waterline hits forward by Invincible that would ultimately doom Hipper's flagship. But at 18:30, Invincible abruptly appeared as a clear target before Lx¼tzow and Derfflinger. The two German ships then fired three salvoes each at Invincible, and sank her in 90 seconds. A 12 in (300 mm) shell from the third salvo struck Invincible's Q-turret amidships, flash detonated the magazines below, and the ship blew up and split in two, killing all but six of her crew of 1,032 officers and men, including Rear-Admiral Hood. Of the remaining British battlecruisers, only Princess Royal received heavy-calibre hits at this time (two 12 in (300 mm) by the battleship Markgraf). Lx¼tzow, flooding forward and unable to communicate by radio, was now out of action and began to attempt to withdraw; therefore Hipper left his flagship and transferred to the destroyer SMS G39, hoping to board one of the other battlecruisers later.
Crossing the T
By 18:30, the main battlefleet action was joined for the first time, with Jellicoe effectively "crossing Scheer's T". The officers on the lead German battleships, and Scheer himself, were taken completely by surprise when they emerged from drifting clouds of smoky mist to suddenly find themselves facing the massed firepower of the entire Grand Fleet main battle line, which they did not know was even at sea. Jellicoe's flagship Iron Duke quickly scored seven hits on the lead German dreadnought, SMS Kx¶nig, but in this brief exchange, which lasted only minutes, as few as 10 of the Grand Fleet's 24 dreadnoughts actually opened fire. The Germans were hampered by poor visibility, in addition to being in an unfavourable tactical position, just as Jellicoe had intended. Realizing he was heading into a death trap, Scheer ordered his fleet to turn and flee at 18:33. Under a pall of smoke and mist, Scheer's forces succeeded in disengaging by an expertly executed 180° turn in unison ("battle about turn to starboard"), which was a well-practiced emergency manoeuvre of the High Seas Fleet.
It was now obvious that we were confronted by a large portion of the English fleet. The entire arc stretching from north to east was a sea of fire. The flash from the muzzles of the guns was seen distinctly through the mist and smoke on the horizon, although the ships themselves were not distinguishable. -Vice-Admiral Reinhard Scheer ,
Conscious of the risks to his capital ships posed by torpedoes, Jellicoe did not chase directly but headed south, determined to keep the High Seas Fleet west of him. Starting at 18:40, battleships at the rear of Jellicoe's line were in fact sighting and avoiding torpedoes, and at 18:54 HMS Marlborough was hit by a torpedo (probably from the disabled Wiesbaden), which reduced her speed to 16 mi (14 nmi; 26 km). Meanwhile, Scheer, knowing that it was not yet dark enough to escape and that his fleet would suffer terribly in a stern chase, doubled back to the east at 18:55. In his memoirs he wrote, "the manÅuvre would be bound to surprise the enemy, to upset his plans for the rest of the day, and if the blow fell heavily it would facilitate the breaking loose at night." But the turn to the east took his ships, again, directly towards Jellicoe's fully-deployed battle line.
Simultaneously, the disabled British destroyer Shark fought desperately against a group of four enemy destroyers and disabled SMS V48 with gunfire, but was finally torpedoed and sunk at 19:02 by the German destroyer S54. Shark's Captain Loftus Jones won the Victoria Cross for his heroism in continuing to fight against all odds.
"Gefechtskehrtwendung"
Commodore Goodenough's 2nd Light Cruiser Squadron dodged the fire of German battleships for a second time to re-establish contact with the High Seas Fleet shortly after 19:00. By 19:15, Jellicoe had crossed Scheer's "T" again. This time his arc of fire was tighter and deadlier, causing severe damage to the German battleships, particularly Rear-Admiral Behncke's leading 3rd Squadron (SMS Konig, Groxer Kurfx¼rst, Markgraf, and Kaiser all being hit, along with SMS Helgoland of the 1st Squadron), while on the British side, only the battlecruiser HMS Colossus was hit (twice by SMS Seydlitz, with little damage done).
At 19:17, for the second time in less than an hour, Scheer turned his outnumbered and outgunned fleet to the west using the "battle about turn" (German Gefechtskehrtwendung), but this time it was executed only with difficulty as the High Seas Fleet's lead squadrons began to lose formation under concentrated gunfire. To deter a British chase, Scheer ordered a major torpedo attack by his destroyers and a potentially sacrificial charge by Scouting Group I's four remaining battlecruisers. Hipper was still aboard the destroyer G39 and was unable to command his squadron for this attack. Therefore, SMS Derfflinger, under Captain Hartog, led the already heavily-damaged German battlecruisers directly into "the greatest concentration of naval gunfire any fleet commander had ever faced", at ranges down to 4 mi (3.5 nmi; 6.4 km). In what became known as the "death ride", all the battlecruisers except SMS Moltke were hit and further damaged, as 18 of the British battleships fired at them simultaneously. Derfflinger had two main gun turrets destroyed, with most of their crews killed, but survived the pounding and veered away with the other battlecruisers once Scheer was out of trouble and the German destroyers were moving in to attack. In this brief but intense portion of the engagement, from about 19:05 to about 19:30, the Germans sustained a total of 37 heavy hits while inflicting only two, Derfflinger alone receiving 14.
While his battlecruisers drew the fire of the British fleet, Scheer slipped away, laying smoke screens. Meanwhile, from about 19:16 to about 19:40, the British battleships were also engaging Scheer's destroyers, which executed several waves of torpedo attacks to cover his withdrawal. Jellicoe's ships turned away from the attacks and successfully evaded all 31 of the torpedoes launched at them - though in several cases, only just barely - and sank the German destroyer SMS S35. British light forces also sank V48, which had previously been disabled by HMS Shark. This action, and the turn away, cost the British critical time and range in the last hour of daylight, as Scheer intended, allowing him to get his heavy ships out of immediate danger.
The last major exchanges between capital ships in this battle took place just after sunset, from about 20:19 to about 20:35, as the surviving British battlecruisers caught up with their German counterparts, which were briefly relieved by Rear-Admiral Mauve's obsolete pre-dreadnoughts (the German 2nd Squadron). The British received one heavy hit on Princess Royal but scored five more on Seydlitz and three on other German ships. As twilight faded to night and HMS King George V exchanged a few final shots with SMS Westfalen, neither side could have imagined that the only encounter between British and German dreadnoughts in the entire war was already concluded.
Night action and German withdrawal
At 21:00, Jellicoe, conscious of the Grand Fleet's deficiencies in night-fighting, decided to try to avoid a major engagement until early dawn. He placed a screen of cruisers and destroyers 5 mi (4.3 nmi; 8.0 km) behind his battle fleet to patrol the rear as he headed south to guard Scheer's expected escape route. In reality, Scheer opted to cross Jellicoe's wake and escape via Horns Reef. Luckily for Scheer, most of the light forces in Jellicoe's rearguard failed to report the seven separate encounters with the German fleet during the night; the very few radio reports that were sent to the British flagship were never received, possibly because the Germans were jamming British frequencies. Many of the destroyers failed to make the most of their opportunities to attack discovered ships, despite Jellicoe's expectations that the destroyer forces would, if necessary, be able to block the path of the German fleet. Jellicoe and his commanders did not understand that the furious gunfire and explosions to the north (seen and heard for hours by all the British battleships) indicated that the German heavy ships were breaking through the screen astern of the British fleet. Instead, it was believed that the fighting was the result of night attacks by German destroyers. The most powerful British ships of all (the 15-inch-gunned 5th Battle Squadron) directly observed German battleships crossing astern of them in action with British light forces, at ranges of 3 mi (2.6 nmi; 4.8 km) or less, and gunners on the HMS Malaya made ready to fire, but her captain declined, deferring to the authority of Rear-Admiral Evan-Thomas - and neither commander reported the sightings to Jellicoe, assuming that he could see for himself and that revealing the fleet's position by radio signals or gunfire was unwise.
While the nature of Scheer's escape, and Jellicoe's inaction, indicate the overall German superiority in night-fighting, the results of the night action were no more clear-cut than were those of the battle as a whole. In the first of many surprise encounters by darkened ships at point-blank range, Southampton, Commodore Goodenough's flagship, which had scouted so proficiently, was heavily damaged in action with a German Scouting Group composed of light cruisers, but managed to torpedo the SMS Frauenlob which went down at 22:23 with all hands (320 officers and men).
From 23:20 to approximately 02:15, several British destroyer flotillas launched torpedo attacks on the German battlefleet in a series of violent and chaotic engagements at extremely short range (often under .5 mi (0.43 nmi; 0.80 km)). At the cost of five destroyers sunk and some others damaged, they managed to torpedo the light cruiser SMS Rostock, which sank several hours later, and the pre-dreadnought SMS Pommern, which blew up and sank with all hands (839 officers and men) at 03:10 during the last wave of attacks before dawn. Three of the British destroyers collided in the chaos, and the German battleship SMS Nassau rammed the British destroyer HMS Spitfire, blowing away most of the British ship's superstructure merely with the muzzle blast of its big guns, which could not be aimed low enough to hit the ship. Nassau was left with a 11 ft (3.4 m) hole in her side, reducing her maximum speed to 15 kn (17 mph; 28 km/h), while the removed plating was left lying on Spitfire's deck. Spitfire survived and made it back to port. Another German cruiser, SMS Elbing, was accidentally rammed by the dreadnought Posen and abandoned, sinking early the next day. Of the British destroyers, HMS Tipperary, Ardent, Fortune, Sparrowhawk and Turbulent were lost during the night fighting.
Just after midnight on 1 June, SMS Thx¼ringen and other German battleships sank the HMS Black Prince of the ill-fated 1st Cruiser Squadron, which had blundered into the German battle line. Black Prince was overwhelmed by point-blank gunfire, and blew up with all hands (857 officers and men) as her squadron leader Defence had done hours earlier. Lost in the darkness, the battlecruisers SMS Moltke and Seydlitz had similar point-blank encounters with the British battle line and were recognized, but were spared the fate of Black Prince when the captains of the British ships, again, declined to open fire, reluctant to reveal their fleet's position. At 01:45, the sinking battlecruiser Lx¼tzow - fatally damaged by Invincible during the main action - was torpedoed by the destroyer SMS G38 on orders of Lx¼tzow's Captain Viktor von Harder after the surviving crew of 1,150 transferred to destroyers that came alongside. At 02:15, the German destroyer SMS V4 suddenly had its bow blown off; V2 and V6 came alongside and took off the remaining crew and the V2 then sank the hulk. Since there was no enemy nearby, it was assumed that she had hit a mine or a had been torpedoed by a submarine.
At 02:15, five British ships of the 13th Destroyer Flotilla under Captain James Uchtred Farie regrouped and headed south. At 02:25, they sighted the rear of the German line. HMS Marksman inquired of the leader Champion as to whether he thought they were British or German ships. Answering that he thought they were German, Farie then veered off to the east and away from the German line. All but Moresby in the rear followed, as through the gloom she sighted what she thought were four pre-dreadnought battleships 2 mi (1.7 nmi; 3.2 km) away. She hoisted a flag signal indicating that the enemy was to the west and then closed to firing range, letting off a torpedo set for high-running at 02:37 then veering off to rejoin her flotilla. The four pre-dreadnought battleships were in fact two pre-dreadnoughts, Schleswig-Holstein and Schlesien, and the battlecruisers Von der Tann and Derfflinger. Von der Tann sighted the torpedo and was forced to steer hard a starboard to avoid it as it passed close to her bows. Moresby rejoined Champion convinced she had scored a hit.
Finally, at 05:20, as Scheer's fleet was safely on its way home, the battleship SMS Ostfriesland struck a British mine on her starboard side, killing one man and wounding ten, but was able to make port. Seydlitz, critically damaged and very nearly sinking, barely survived the return voyage and after grounding and taking on even more water in the evening of 1 June, had to be assisted in to port stern first, where she dropped anchor at 07:30 on the morning of 2 June.
The Germans were helped in their escape by the failure of the British admiralty in London to pass on seven critical radio intercepts obtained by naval intelligence indicating the true position, course and intentions of the High Seas Fleet during the night. One message was transmitted to Jellicoe at 23:15 that accurately reported the German fleets course and speed as of 21:14. However, the erroneous signal from earlier in the day that reported the German fleet still in port, and an intelligence signal received at 22:45 giving another unlikely position for the German fleet, had reduced his confidence in intelligence reports. Had the other messages been forwarded, which confirmed the information received at 23:15, or had British ships reported accurately sightings and engagements with German destroyers, cruisers and battleships, then Jellicoe could have altered course to intercept Scheer at the Horns Reef. The unsent intercepted messages had been duly filed by the junior officer left on duty that night, who failed to appreciate their significance. By the time Jellicoe finally learned of Scheer's whereabouts at 04:15, Scheer was too far away to catch and it was clear that the battle could no longer be resumed.
The outcome
Reporting
On 3 June, the Daily Mirror reported the German Director of the Naval Department had told the Reichstag: "The result of the fighting is a significant success for our forces against a much stronger adversary" as part of their communique to the press, the British Admiralty had said "...The British ships on which the brunt of the fighting fell were the battlecruiser fleet and some cruisers and light cruisers, supported by four fast battleships. Among these the losses were heavy.""
Assessments
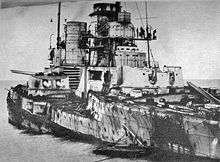
Picture - SMS Seydlitz was heavily damaged in the battle, hit by twenty-one main calibre shells, several secondary calibre and one torpedo. 98 men were killed and 55 injured
At Jutland, the Germans, with a 99-strong fleet, sank 115,000 long tons (117,000 t) of British ships, while a 151-strong British fleet sank 62,000 long tons (63,000 t) of German ships. The British lost 6,094 seamen; the Germans 2,551. Several other ships were badly damaged, such as Lion and Seydlitz. On the other hand, the British fleet remained in control of the North Sea at the end of the battle.
At a strategic level, the outcome has been the subject of a huge literature, with no clear consensus. In the immediate aftermath, the view of the battle as indecisive was widely held, and remains influential.
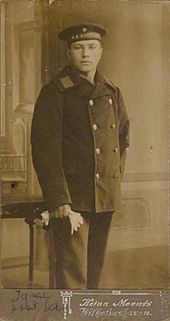
Picture - A crew member of SMS Westfalen
Despite numerical superiority, the British had been disappointed in their hopes for a decisive victory comparable to Trafalgar and the objective of the influential strategic doctrines of Alfred Mahan. The High Seas Fleet survived as a fleet in being. Most of its losses were made good within a month - even Seydlitz, the most badly damaged ship to survive the battle, was repaired by October and officially back in service by November. The Germans had failed in their objective of destroying a substantial portion of the British Fleet. No progress had been made towards the goal of allowing the High Seas Fleet to operate in the Atlantic Ocean.
Subsequently there has been considerable support for the view of Jutland as a strategic victory for the British. While the British had not destroyed the German fleet and had lost more ships than their enemy, the Germans had retreated to harbour and at the end of the battle the British were in command of the area. The German fleet would only sortie into the North Sea twice more, with a raid on 19 August and in October 1916. Apart from these two (abortive) operations the High Seas Fleet - unwilling to risk another encounter with the British fleet - confined its actvities to the Baltic sea for the remainder of the war. Jutland thus ended the German challenge to British naval supremacy. A German naval expert, writing publicly about Jutland in November 1918 commented, "Our Fleet losses were severe. On 1 June 1916 it was clear to every thinking person that this battle must, and would be, the last one".
At the end of the battle, the British had maintained their numerical superiority and had 23 dreadnoughts ready and four battlecruisers still able to fight, while the Germans had 10. The damaged dreadnoughts Warspite and Malaya went in for repairs, Queen Elizabeth and Emperor of India joined the fleet and Resolution and Ramillies shortly after that. Princess Royal and Tiger in dockyard were replaced by Australia. One month after the battle, the Grand Fleet was stronger than it had been before sailing to Jutland.
A third view, presented in a number of recent evaluations is that Jutland, the last major fleet action between battleships, illustrated the irrelevance of battleship fleets following the development of the submarine, mine and torpedo. In this view, the most important consequence of Jutland was the decision of the Germans to engage in unrestricted submarine warfare. Although large numbers of battleships were constructed in the decades between the wars, it has been argued that this outcome reflected the social dominance, among naval decision-makers, of battleship advocates who constrained technological choices to fit traditional paradigms of fleet action. In the event , battleships played a relatively minor role in World War II, in which the aircraft carrier emerged as the dominant offensive weapon of naval warfare.
British self critique
The official British Admiralty examination of the Grand Fleet's performance recognised two main problems:
Their armour-piercing shells exploded outside the German armour rather than penetrating and exploding within. As a result, some German ships with only 8 in (20 cm)-thick armour survived hits from 15-inch (381 mm) shells. Had these shells penetrated through the armour and then exploded, German losses would probably have been far greater.
Communication between ships and the British commander-in-chief were comparatively poor. For most of the battle, Jellicoe had no idea where the German ships were, even though British ships were in contact. They failed to report enemy positions, contrary to the Grand Fleet's Battle Plan. Some of the most important signalling was carried out solely by flag instead of wireless or using redundant methods to ensure communications- a questionable procedure given the mixture of haze and smoke that obscured the battlefield, and a foreshadowing of similar failures by habit-bound and conservatively-minded professional officers of rank to take advantage of new technology in World War II.
Shell performance
German armour-piercing shells were far more effective than the British shells, which often failed to penetrate heavy armour. The issue particularly concerned shells striking at oblique angles, which became increasingly the case at long range.
The issue of poorly performing shells had been known to Jellicoe, who as third sea lord from 1908-1910 had ordered new shells to be designed. However, the matter had not been followed through after his posting to sea and new shells had never been thoroughly tested. Beatty discovered the problem at a party aboard Lion a short time after the battle, where a Swedish Naval officer was present. He had recently visited Berlin, where the German navy had scoffed at how British shells had broken up on their ships' armour. The question of shell effectiveness had also been raised after the Battle of Dogger Bank, but no action had been taken. Hipper later commented, 'it was nothing but the poor quality of their bursting charges which saved us from disaster'.
Admiral Dreyer, writing later about the battle where he had been captain of the flagship, Iron Duke, estimated that effective shells as later introduced would have led to the sinking of six more German capital ships, based upon the actual number of hits achieved in the battle. The system of testing shells, which remained in use up to 1944, meant that, statistically, a batch of shells of which 70% were faulty stood an even chance of being accepted. Indeed, even shells that failed this relatively mild test had still been issued to ships. Analysis of the test results afterwards by the ordnance board suggested the likelihood that 30-70% of shells would not have passed the standard penetration test specified by the admiralty.
Efforts to replace the shells were initially resisted by the admiralty and action was not taken until Jellicoe became first sea lord in December 1916. As an initial response the worst of the existing shells were withdrawn from ships in early 1917 and replaced from reserve supplies. New shells were designed, but did not arrive until April 1918, and were never used in action.
Battlecruiser losses
The British battlecruisers were designed to chase and destroy enemy cruisers from a range at which cruisers could not reply. They were not designed to be ships of the line and exchange broadsides with the enemy. Although one German and three British battlecruisers were sunk, none of them were destroyed by enemy shells penetrating the belt armour and detonating the magazines. Each of the British battlecruisers were penetrated through a turret roof and her magazines ignited by flash fires passing through the turret and shell handling rooms. Lx¼tzow sustained 24 hits and her flooding could not be contained. She was eventually sunk by her escorts' torpedoes after her crew had been safely removed. Derfflinger and Seydlitz sustained 22 hits each but made it to port (though Seydlitz just barely).
The disturbing feature of the battlecruiser action is the fact that five German battlecruisers engaging six British vessels of this class, supported after the first twenty minutes, although at great range, by the fire of four battleships of the "Queen Elizabeth" class, were yet able to sink 'Queen Mary' and 'Indefatigable' ⦠The facts which contributed to the British losses, first, were the indifferent armour protection of our battlecruisers, particularly as regards turret armour, and, second, deck plating and the disadvantage under which our vessels laboured in regard to the light. -Sir John Jellicoe, Jellicoe's official despatch
An impression was given by Jellicoe and Beatty, as well as other senior officers that the loss of the Battlecruisers was caused by weak armour, despite reports by two committees, and earlier statements by Jellicoe and other senior officers that Cordite and its management were to blame. This led to calls for armour to be increased and an additional 1 in (2.5 cm) was placed over the relatively thin decks above magazines. To compensate for the increase in weight, ships had to carry correspondingly less fuel, water and other supplies. Whether or not thin deck armour was a potential weakness of British ships, the battle provided no evidence that it was the case. At least amongst the surviving ships, no enemy shell was found to have penetrated deck armour anywhere. The design of a new battlecruiser HMS Hood (which had started building at the time of the battle) was altered to give her 5,000 long tons (5,100 t) of additional armour.
Ammunition handling
British and German propellant charges differed in packaging, handling, and chemistry. The British propellant was of two types, MK1 and MD. The Mark 1 cordite had a formula 37% nitrocellulose, 58% nitroglycerine and 5% petroleum jelly. It was a good propellant but burned hot and caused an erosion problem in gun barrels. The petroleum jelly served as both a lubricant and a stabilizer. Cordite MD was developed to reduce barrel wear its formula being 65% nitrocellulose, 30% nitroglycerine and 5% petroleum jelly. While cordite MD solved the gun barrel erosion issue, it did nothing to improve its storage properties which were poor. Cordite was very sensitive to variations of temperature and acid propagation/cordite deterioration would take place at a very rapid rate. Cordite MD also had a property that it would shed micro-dust particles of nitrocellulose and iron pyrite. While cordite propellant was manageable it required a vigilant gunnery officer, strict cordite lot control, and frequent testing of the cordite lots in the ships' magazines.
British cordite propellant (handled in exposed silk bags) tended to burn violently, causing uncontrollable "flash fires" when ignited by nearby shell hits. In 1945, a test was conducted by the U.S.N. Bureau of Ordnance Bulletin of Ordnance Information, No.245, pp. 54-60. testing the sensitivity of Cordite to then current U.S. Naval propellant powders against a measurable and repeatable flash source finding that the result was that cordite would ignite at 530 mm/22" from the flash and the current U.S. powder at 120 mm,/5" the U.S. flashless powder at 25 mm./1" The result was that about 75 times the propellant would immediately ignite exposed to flash as compared to the U.S. powder. British ships had inadequate protection against these flash fires. German propellant (RP C/12, handled in brass cartridge cases) was less vulnerable and less volatile in composition. German propellants show that they were not that different in composition from cordite with one major exception. Centralite was symmetrical Diethyl Diphenyl Urea and served as a stabilizer that was superior to the petroleum jelly used in British practice. It stored better and burned but did not explode. stored and used in brass cases it proved much less sensitive to flash. RP C/12 - 64.13% nitrocellulose, 29.77% nitroglycerine, 5.75% centralite, 0.25% magnesium oxide and 0.10% graphite.
The Royal Navy Battle Cruiser Fleet had also emphasized speed in ammunition handling over established safety protocol. By staging charges in the chambers between the gun turret and magazine, the Royal Navy enhanced their rate of fire but left their ships vulnerable to chain reaction ammunition fires and magazine explosions. The British cordite charges were stored two silk bags to a metal cylindrical container with a 16-oz gunpowder igniter charge which was covered with a thick paper wad, some four charges being used on each projectile. The gun crews were removing the charges from their containers and removing the paper covering over the gunpowder igniter charges. The effect of having eight loads at the ready was to have 4 short tons (3,600 kg) of exposed explosive and each charge leaking small amounts of gunpowder from the igniter bags. The gun crews and therefor packed the turret to the magazines with an explosive train and one shell hit to a battlecruiser turret was enough to end a ship.
During the summer of 2003, a diving expedition examined the wrecks of Invincible, Queen Mary, Defence, and Lx¼tzow to investigate the cause of the British ships' tendency to suffer from internal explosions. From this evidence, a major part of the blame may be laid on lax handling of the cordite propellant for the shells of the main guns. This, in turn, was a product of contemporary British naval doctrine, which emphasized a rapid rate of fire. The wreck of the Queen Mary reveals that the working chamber of the X turret stacked with cordite containers instead of the magazine.
In practice-drills that emphasized firing speed, cordite could not be supplied to the guns rapidly enough through the hoists and hatches. To bring up the propellant in good time to load for the next broadside, many safety doors were kept open that should have been shut to safeguard against flash fires. Bags of cordite were also stocked and kept locally, creating a total breakdown of safety design features. This 'bad safety habit' carried over into real battle practices.
Furthermore, the doctrine of a high rate of fire also led to the decision in 1913 to increase the supply of shells and cordite held on the British ships by 50%, for fear of running out of ammunition. When this exceeded the capacity of the ships' magazines, cordite was stored in insecure places.
There was a further difference in the propellant itself. While RP C/12 burned when exposed to fire, it did not explode, as opposed to cordite. RP C/12 was extensively studied by the British and, after World War I, would form the basis of the later Cordite SC.
The memoirs of Alexander Grant, Gunner on Lion, suggest that some British officers were aware of the dangers of careless handling of cordite:
"With the introduction of cordite to replace powder for firing guns, regulations regarding the necessary precautions for handling explosives became unconsciously considerably relaxed, even I regret to say, to a dangerous degree throughout the Service. The gradual lapse in the regulations on board ship seemed to be due to two factors. First, cordite is a much safer explosive to handle than gun-powder. Second, but more important, the altered construction of the magazines on board led to a feeling of false security ⦠The iron or steel deck, the disappearance of the wood lining, the electric lights fitted inside, the steel doors, open because there was now no chute for passing cartridges out; all this gave officers and men a comparative easiness of mind regarding the precautions necessary with explosive material".
Grant had already introduced measures onboard Lion to limit the number of cartridges kept outside the magazine and to ensure doors were kept closed, probably contributing to her survival.
On 5 June 1916, the First Lord of the Admiralty advised Cabinet Members that the three Battle-cruisers had been lost due to unsafe cordite management.
On 22 November 1916, the Third Sea Lord, Rear Admiral Tudor, issued a report after detailed interviews of the survivors of the destroyed Battle-Cruisers detailing the stacking of charges by the gun crews in the handling rooms to speed up loading of the guns.
After the battle, the B.C.F Gunnery Committee issued a report (at the command of Admiral David Beatty) advocating immediate changes in flash protection and change handling reporting that among other things:
Some vent plates in magazines allowed flash into the magazines and should be retro-fitted to a new standard.
That bulkheads in HMS Lion's magazine showed buckling from fire under pressure (overpressure)despite being flooded and therefor supported by water pressure and had to be made stronger.
That doors opening inward to magazines were an extreme danger
That current designs of turrets could not eliminate flash from shell bursts in the turret from reaching the handling rooms
That ignition pads must not be attached to charges but instead be placed just before ramming.
That better methods be found for safe storage of ready charges than the current method.
That some method for rapidly drowning charges already in the handling path be devised.
That handling scuttles (special flash proof fittings for moving propellant charges through ship bulkheads) be fitted and be designed to handle overpressure.
The United States Navy in 1939 had quantities of Cordite N (a much improved Canadian propellant) and its Bureau of Ordnance objected strongly to its use on-board U.S. Warships considering it unsuitable as a naval propellant due to its inclusion of nitroglycerin.
Gunnery
British gunnery control systems, based on Dreyer tables were well in advance of the German ones, as demonstrated by the proportion of main calibre hits under manÅuvre and were fitted to the majority of British capital ships by May, 1916. The Royal Navy used centralised fire control systems on their capital ships, directed from a point high up on the ship where fall of shells could best be seen, utilising a director sight for both training and elevating the guns. This had been installed on ships progressively as the war went on because of its demonstrated advantages, and was installed on the main guns of all but two of the Grand Fleet's capital ships. The German battlecruisers controlled the fire of turrets using a training-only director, which also did not fire the guns at once. The rest of the German capital ships were without this innovation. German range finding equipment was generally superior to the British 9 ft (2.7 m) FT24, as its operators were trained to a higher standard due to the complexity of the Zeiss 3 m (9.8 ft) rangefinders. Their stereoscopic design meant that in certain conditions they could range on a target enshrouded by smoke. The German equipment was not superior in range to the British Barr & Stroud 15 ft (4.6 m) rangefinder found in the newest British capital ships, and unlike the British rangefinders, the German rangetakers had to be replaced as often as every thirty minutes as their eyesight became impaired, affecting the ranges provided to their gunnery equipment.
The results of the battle confirmed the value of centralised director firing of guns. The Royal Navy was prompted to install director firing systems to cruisers and destroyers where it had not thus far been used, and to secondary armament on battleships.
German ships were perceived to have been quicker in determining the correct range and thus obtained an early advantage. The British used a 'bracket system', whereby a salvo was fired at the best guess range and depending where it landed the range was progressively corrected up or down until successive shots were landing in front of and behind the enemy. The Germans used a 'ladder system' whereby an initial volley of three shots at different ranges was used, with the centre shot at the best guess range. The ladder system allowed the gunners to get ranging information from the three shots more quickly than the bracket system, which required waiting between shots to see how the last had landed. British ships adopted the German system.
It was determined that 41 ft 6 in (12.65 m)9-foot (2.7 m) rangefinders of the sort issued to most British ships were not adequate at long range and did not perform as well as the 15-foot (4.5 m) rangefinders on some of the most modern ships. In 1917, rangefinders of base lengths of 25 ft (7.6 m) and 30 ft (9.1 m) were introduced on the battleships to improve accuracy.
Signalling
Throughout the battle, British ships experienced difficulties with communications, whereas the Germans did not suffer such problems. The British preferred signalling by ship to ship flag and lamp signals, avoiding wireless, whereas the Germans used wireless successfully. One conclusion drawn was that flag signals were not a satisfactory way to control the fleet. Experience using lamps, particularly at night when issuing challenges to other ships, demonstrated this was an excellent way to advertise your precise location to an enemy, inviting a reply by gunfire. Recognition signals by lamp once seen could also easily be copied in future engagements.
British ships both failed to report engagements with the enemy, but also in the case of cruisers and destroyers failed to actively seek out the enemy. A culture had arisen within the fleet of not acting without orders, which could prove fatal when any circumstances prevented orders being sent or received. Commanders failed to engage the enemy because they believed other more senior officers must also be aware of the enemy nearby, and would have given orders to act if this was expected. Wireless, the most direct way to pass messages across the fleet (although it was being jammed by German ships) was avoided either for perceived reasons of not giving away the presence of ships, or for fear of cluttering up the airwaves with unnecessary reports.
Fleet Standing Orders
Naval operations were governed by standing orders issued to all the ships. These attempted to set out what ships should do in all circumstances, particularly in situations where ships would have to react without referring to higher authority, or when communications failed. A number of changes were introduced as a result of experience gained in the battle.
A new signal was introduced instructing squadron commanders to act independently as they thought best while still supporting the main fleet, particularly for use when circumstances would make it difficult to send detailed orders. The description stressed that this was not intended to be the only time commanders might take independent action, but was intended to make plain times when they definitely should. Similarly, instructions on what to do if the fleet was instructed to take evasive action against torpedoes were amended. Commanders were given discretion that if their part of the fleet was not under immediate attack, they should continue engaging the enemy rather than turning away with the rest of the fleet. In this battle, when the fleet turned away from Scheer's destroyer attack covering his retreat, not all the British ships had been affected, and could have continued to engage the enemy more closely.
A number of opportunities to attack enemy ship by torpedo had presented themselves but been missed. All ships, not just the destroyers armed principally with torpedoes but also battleships, were reminded that they carried torpedoes intended to be used whenever an opportunity arose. Destroyers were instructed to close the enemy fleet to fire torpedoes as soon as engagements between the main ships on either side would keep enemy guns busy directed at larger targets. Destroyers should also be ready to immediately engage enemy destroyers if they should launch an attack, endeavouring to disrupt their chances of launching torpedoes and keep them away from the main fleet.
A new signal was provided for deploying the fleet to the centre, rather than as previously only either to left or right of the standard closed-up formation for travelling, to add some flexibility when deploying for attack. The fast and powerful 5th Battle Squadron was moved to the front of the cruising formation so it would have the option of deploying left or right depending upon the enemy position. In the event of engagements at night, although the fleet still preferred to avoid night fighting, a destroyer and cruiser squadron would be specifically detailed to seek out the enemy and launch destroyer attacks.
Controversy
At the time, Jellicoe was criticised for his caution and for allowing Scheer to escape. Beatty, in particular, was convinced that Jellicoe had missed a tremendous opportunity to annihilate the High Seas Fleet and win what would amount to another Trafalgar. Jellicoe was promoted away from active command to become First Sea Lord, the professional head of the Royal Navy, while Beatty replaced him as commander of the Grand Fleet.
The controversy raged within the navy and in public for about a decade after the war. Criticism focused on Jellicoe's decision at 19:15. Scheer had ordered his cruisers and destroyers forward in a torpedo attack to cover the turning away of his battleships. Jellicoe chose to turn to the southeast, and so keep out of range of the torpedoes. If, instead, he had turned to the west, could his ships have dodged the torpedoes and destroyed the German fleet? Supporters of Jellicoe, including the historian Cyril Falls, pointed to the folly of risking defeat in battle when you already have command of the sea. Jellicoe himself, in a letter to the Admiralty months before the battle, had stated that he intended to turn his fleet away from any mass torpedo attack (that being the universally accepted proper tactical response to such attacks, practiced by all the major navies of the world), and that in the event of a fleet engagement in which the enemy turned away he would assume that the intention was to draw him over mines or submarines and that he would decline to be so drawn. The Admiralty approved this plan and expressed full confidence in Jellicoe at the time (Oct. 1914).
The stakes were high, the pressure on Jellicoe immense, and his caution certainly understandable. His judgment might have been that even 90% odds in favour were not good enough to bet the British Empire. The former First Lord of the Admiralty Winston Churchill said of the battle that Jellicoe "was the only man on either side who could have lost the war in an afternoon."
The criticism of Jellicoe also fails to sufficiently credit Scheer, who was determined to preserve his fleet by avoiding the full British battle line, and who showed great skill in effecting his escape.
Beatty's actions
On the other hand, some of Jellicoe's supporters condemned the actions of Beatty for the British failure to achieve a complete victory. Although Beatty was undeniably brave, his mismanagement of the initial encounter with Hipper's squadron and the High Seas Fleet cost considerable advantage in the first hours of the battle. His most glaring failure was in not providing Jellicoe with periodic information on the position, course and speed of the High Seas Fleet. Beatty, aboard the battlecruiser Lion, left behind the four fast battleships of the 5th Battle Squadron - the most powerful warships in the world at the time - engaging with six ships when better control would have given him 10 against Hipper's five. Though Beatty's larger 13.5 in (340 mm) guns outranged Hipper's 11 in (280 mm) and 12 in (300 mm) guns by thousands of yards, Beatty held his fire for 10 minutes and closed the enemy squadron until within range of the Germans' superior gunnery, under lighting conditions that favoured the Germans. Most of the British losses in tonnage occurred in Beatty's force.
Losses
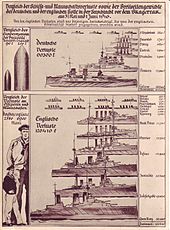
Picture - 1916 German propaganda postcard, comparing the adversaries' losses.
Total British losses were 6,784 men, total German losses 3,039, totalling 9,823 men.
British
Battlecruisers Indefatigable, Queen Mary, Invincible
Armoured cruisers Black Prince, Warrior, Defence
Flotilla Leaders Tipperary
Destroyers Shark, Sparrowhawk, Turbulent, Ardent, Fortune, Nomad, Nestor
German
Battlecruiser Lx¼tzow
Pre-Dreadnought Pommern
Light cruisers Frauenlob, Elbing, Rostock, Wiesbaden
(Heavy Torpedo-Boats) Destroyers V48, S35, V27, V4, V29
Selected honours
The Victoria Cross is the highest military decoration awarded for valour "in the face of the enemy" to members of the British Empire armed forces. The Ordre pour le Mérite was the Kingdom of Prussia and consequently the German Empire's highest military order until the end of the First World War.
Pour le Mérite
Franz Hipper (SMS Lx¼tzow)
Reinhard Scheer (SMS Friedrich der Grosse)
Victoria Cross
The Hon. Edward Barry Stewart Bingham (HMS Nestor)
John Travers Cornwell (HMS Chester)
Francis John William Harvey (HMS Lion)
Loftus William Jones (HMS Shark)
Status of the survivors and wrecks
On the 90th anniversary of the battle, in 2006, the Ministry of Defence announced that the 14 British vessels lost in the battle were being designated as protected places under the Protection of Military Remains Act. The last surviving veteran of the battle, Henry Allingham, a British RAF (originally RNAS) airman, died on 18 July 2009 aged 113; by which time he was the oldest documented man in the world and one of the last surviving veterans of the whole war. One ship survives and is still in commission as a Royal Naval Reserve depot in Belfast, Northern Ireland: the light cruiser HMS Caroline.
Remembrance
The Battle of Jutland was annually celebrated as a great victory by the right wing in Weimar Germany. This "victory" was used to repress the memory of the dreadful role of the German navy in the German Revolution of 1918-19 as well as the memory of the defeat in World War I in general. (The celebrations of the Battle of Tannenberg played a similar role in the Weimar Republic.) This is especially true for the city of Wilhelmshaven, where wreath-laying ceremonies and torch-lit parades were performed until the end of the 1960s.
Citations and notes
Bennett, Geoffrey (2005). Naval Battles of the First World War. London: Pen & Sword Military Classics. ISBN 1-84415-300-2.
Brooks, John (2005). Dreadnought Gunnery at the Battle of Jutland: The Question of Fire Control. London: Frank Cass Publishers. ISBN 0714657026.
Campbell, John (1998). Jutland: An Analysis of the Fighting. Lyons Press. ISBN 1-55821-759-2.
English, Major J.A. (1979). "The Trafalgar Syndrome: Jutland and the Indecisiveness of Naval Warfare". Naval War College Review XXXII (3).
Forczyk, Robert (2009). Russian Battleship vs Japanese Battleship (Yellow Sea 1904-05). Great Britain: Osprey. ISBN 978-1-84603-330-8.
Gx¶tz, Georg (2010). "Remembering the Battle of Jutland in Post-War Wilhelmshaven". In Niven, William; Paver, Chloe. Difficult Pasts. Memorialisation In Germany since 1945. Macmillan. pp. 360-368. ISBN 978-0-230-20703-5.
Keegan, John. The First World War. Alfred A. Knopf, Inc. ISBN 0-375-40052-4.
Kennedy, Paul M. (1983). The Rise and Fall of British Naval Mastery. London: Macmillan. ISBN 0-333-35094-4.
Lambert, Nicholas A (January 1998). ""Our Bloody Ships" or "Our Bloody System"? Jutland and the Loss of the Battle Cruisers, 1916". The Journal of Military History (The Journal of Military History, Vol. 62, No. 1) 61 (1): 29-55. doi:10.2307/120394. http://jstor.org/stable/120394.
Marder, Arthur J. (1966). Volume III: Jutland and after, May 1916 - December 1916. From the Dreadnought to Scapa Flow. Oxford University Press.
Massie, Robert K. (2003). Castles of Steel: Britain, Germany, and the Winning of the Great War at Sea. Random House. ISBN 0345408780.
Massie, Robert K. (1991). Dreadnought: Britain, Germany and the coming of the great war. Random House. ISBN 0394528336.
Morison, Samuel E. Leyte, June 1944; History of United States Naval Operations in World War II. 1956. Little & Brown.
Nasmith, Col.George (1919). Canada's Sons and Great Britain during the World War. Introduction by Gen. Sir Arthur W. Currie. Thomas Allen Publishings, Toronto.
O'Connell, Robert J. (1993). Sacred vessels: the cult of the battleship and the rise of the U. S. Navy. Oxford: Oxford University Press. ISBN 0195080068.
Tarrant, V.E.. Jutland: The German Perspective - A New View of the Great Battle. Weidenfeld & Nicolson. (note:Tarrant makes all time references in German time, one hour ahead of times used in article)
Further reading
Bacon, Reginald (1925). The Jutland Scandal. London.
Butler, Daniel Allen (2006). Distant Victory: The Battle of Jutland and the Allied Triumph in the First World War. Praeger Publishers. ISBN 0275990737.
Corbett, Julian (2003). Volume III: Naval Operations. Official History of the War (Reprint). London: Longmans & Co.. ISBN 1843424916.
H.W. Fawcett & G.W.W. Hooper, RN (editors), The fighting at Jutland (abridged edition); the personal experiences of forty-five officers and men of the British Fleet London: MacMillan & Co, 1921
George, S.C. (1981). Jutland to Junkyard. Edinburgh: Paul Harris Publishing. ISBN 0-86228-029-X.
Gordon, Andrew (1996). The Rules of the Game: Jutland and British Naval Command. London: John Murray.
Groos, Fregattenkx¤pitan Otto (1925) (in German). Der Krieg in der Nordsee. Der Krieg zur See: 1914-1918. Bx¤nd V. Berlin: Mittler & Sons.
Hough, Richard (1975). Dreadnought, A history of the Modern Battleship. Macmillan Publishers.
Legg, Stuart (1966). Jutland, an Eye-Witness Account of a Great Battle. New York City: The John Day Company.
London, Charles (2000). Jutland 1916, Clash of the diDreadnoughts. Campaign #72. Osprey Publishing.
Marder, Arthur J.. Volume II: The War Years to the eve of Jutland, 1914-1916. From the Dreadnought to Scapa Flow. Oxford University Press.
Roberts, John Arthur (2003). Battlecruisers. ShipShape. London: Caxton Editions. ISBN 1840675306.
Steel, Nigel; Hart, Peter (2004). Jutland 1916: Death in the Grey Wastes. London: Cassell. ISBN 0304358924.
More aircraft.
Source: WikiPedia