


Battle of Magdhaba - Picture
More about World War 1
|
|
Battle of Magdhaba
Date
23 December 1916
Location
Sinai peninsula, Egypt
Result
Australian, British Empire and New Zealand victory
Date: 23 December 1916
Location: Sinai peninsula, Egypt
Result: Australian, British Empire and New Zealand victory
Belligerents:
: Australia
British Empire
New Zealand
Commanders and leaders:
: Harry Chauvel
Strength:
: 3 mounted brigades
1 camel brigade
Casualties and losses:
: 22 dead
121 wounded
Suez - Romani - Magdhaba - Rafa - 1st Gaza - 2nd Gaza - El Buggar - Beersheba - 3rd Gaza - Mughar Ridge - Jerusalem - Abu Tellul - Arara - Megiddo
The Battle of Magdhaba (officially known by the British as the Affair of Magdhaba) took place on 23 December 1916 south and east of Bir Lahfan in the Sinai desert, some 18-25 miles (29-40 km) from the Mediterranean coast and the town of El Arish. The attack was made (after a long night march) by Australian, British and New Zealand mounted troops against a well entrenched Ottoman force. This engagement occurred during the Sinai and Palestine Campaign of World War I.
The Ottoman Army had been forced to retreat across the Sinai Peninsula after the decisive victory by British Empire forces at the Battle of Romani early in August 1916 marked the end of Ottoman attacks on the Suez Canal. The Australian and New Zealand (Anzac) Mounted Division commanded by Major General Henry George Chauvel pushed the Ottoman Army's "Desert Force" commanded by Kress von Kressenstein back across the Sinai to El Arish.
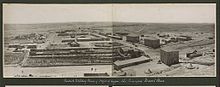
The day before the Allied advance reached El Arish it was found to have been abandoned. But the Ottoman Army maintained a strong defensive position at Magdhaba some 18-30 miles (29-48 km) to the south east on the Wadi el Arish, not far from their main desert base at Hafir el Auja. Situated across the Egyptian frontier in the Ottoman Empire and linked to Beersheba and thence to Jerusalem and Damascus by road and railway, Hafir el Auja was a substantial base. This base could support the garrison at Magdhaba with reinforcements and supplies and if left intact, these two positions would seriously threaten the right flank of the British advance along the coast.
Picture - Ottoman military town of Hafir el Aujah, the Principal Desert Base
Preamble
The fighting campaign across the Sinai desert required dash and determination as well as conscientious attention to detail by all those involved, to ensure all ammunition, rations and every pint of water and bale of horse fodder required was available when needed. Mounted operations so far from base in such barren country had never been attempted before; cavalry actions during the European Wars of 1866 and 1870, and the American Civil War raids, took place in fairly close proximity to the units' bases and in country where food and water was available. The Sinai was so inhospitable that if a man was left behind he might die in the burning desert sun during the day and bitter cold at night, or if a water bottle was accidentally tipped up or leaked it could mean no water for its owner for perhaps 24 hours in extremes of temperature. The Ottoman Army garrison at Magdhaba could be housed in the village which had a water well and was supported by their main desert base at Hafir el Auja. But the British Imperial Army's base was a considerable distance away; some 30 miles (48 km) beyond El Arish almost at the limits of their lines of communication. So it was vital all supplies were well organised and suitably packaged for transporting with the column or following closely behind.
Prelude
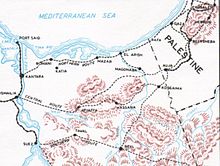
Picture - Keogh's Map 3 shows the desert region; Magdhaba and the railway from Auja to Beersheba.
The British War Office's stated policy in October 1916 was for offensive on the Western Front and defensive everywhere else. But the battle of attrition on the Somme coupled with a change of Britain's Prime Minister, (Lloyd George succeeded Asquith on 7 December) made attacks on Germany's weak points away from the Western Front, desirable. Encouraged to seek successes in the East although without any reinforcements, General Murray Commander in Chief of the Egyptian Expeditionary Force, thought that an advance to El Arish would threaten the southern Ottoman Empire and possibly prevent Ottoman units being transferred away to other theatres of war.
General Murray's responsibilities extended from the Senussi Campaign in the Egyptian Western Desert to the Sinai Peninsular. He commanded four infantry divisions of 6000 men, two of which, the 42nd (East Lancashire) Division and 52nd (Lowland) Division together with six mounted brigades; the Anzac Mounted Division's 1st, 2nd, 3rd Light Horse, New Zealand Mounted Rifles and the 5th Mounted Yeomanry Brigades and the Imperial Camel Corps Brigade served in the Sinai region. He considered this force to be under strength by at least a division for an advance to Beersheba, but felt he could gain El Arish on the Mediterranean Sea and form an effective base there for further operations.
After the Battle of Romani the Anzac Mounted Division pursued the retreating Ottoman Army to Bir el Abd and along the coast to the outpost at Bir el Mazar by mid September. The Maghara Hills in the interior of the Sinai Peninsula was also attacked by an Allied force based on the Suez Canal in mid October. Although not won at the time, all these positions were eventually abandoned by their Ottoman garrisons in the face of growing Allied garrisons. Along the Lines of Communication garrisons were developed to protect the continuing advance of the British railway and water pipeline built by the Egyptian Labour Corps - these were augmented by constant patrolling. The line of communications was marked by railway stations and sidings, airfields and signal installations and by standing camps where troops could be accommodated in huts. At this time the Egyptian Expeditionary Force had a ration strength of 150,000 British and 6,000 Indian troops, and 13,000 Egyptian labourers in the labour corps.
By early December 1916 the railway had covered half the distance from Kantara to the Palestine border; to Bir el Mazar and British intelligence reported the Ottoman Army building a railway from Beersheba to Magdhaba. Mounted patrols to the outskirts of El Arish found 1,600 well entrenched enemy holding the town supported by forces based 25 miles (40 km) south-east of El Arish on the banks of the Wadi el Arish at Magdhaba and Abu Aweigila. The area of El Kossaima, El Auja, and Abu Aweigila had been the subject of a detailed reconnaissance patrol by Australian Flying Corps on 15 November when 24 photographs of all camps and dumps were taken.
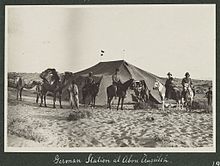
Picture - German Station at Abou Augeileh
Before the advance to El Arish could begin the problems created by the complete absence of a water supply between El Mazar and El Arish had to be solved. By mid December the pipeline's eastward progress made it possible to store sufficient water at Maadan (Kilo. 128) and the concentration of sufficiently large numbers of camels and camel drivers of the Egyptian Camel Transport Corps, to carry the water forward in support the attacking force, was complete.
During October to December while the infrastructure was developed to support the advance, Chauvel the commander of Anzac Mounted Division was granted six weeks leave. He travelled to the U.K. on 25 October returning to duty on 12 December 1916. Trooper Ingham marked his return:
"Yesterday we were inspected by General Chauvel who is just back from his trip to England. We were all pleased to see him as he is well liked by both officers and men. A chap feels pretty safe with a leader like him. I saw him riding backwards and forwards under heavy fire at Romani and Bir-el-Abd and it seemed that he did not know what danger was. Now that he is back we don't think it will be long before we are at the Turks again."
In October 1916 Lieutenant General Sir Charles Dobell had been appointed to command the newly created Eastern Force. With his headquarters at Kantara, he became responsible for the security of the Suez Canal and the Sinai Peninsula. Five days before Chauvel's return, on 7 December 1916 General Murray appointed Lieutenant General Sir Philip Chetwode commander of the newly formed Desert Column. Chetwode had commanded cavalry on the western front; pursuing the retreating Germans after the First Battle of the Marne. The new command structure of Desert Column grouped the 53rd (Welsh) Infantry Division serving in the Suez Canal Defences, with the 42nd and 52nd Infantry Division, the Anzac Mounted Division, 5th Mounted Yeomanry Brigade and the Imperial Camel Corps Brigade.
Advance to El Arish
Just a week after Major General Chauvel returned from leave the advance to El Arish was able to begin on 20 December. The Anzac Mounted Division left Bir Gympie for El Arish at 21:45 less the 2nd Light Horse Brigade which was in the rear patrolling the lines of communication. So it was the 1st and 3rd Australian Light Horse, the New Zealand Mounted Rifles Brigade and the 5th Mounted Yeomanry Brigade which made the trek to El Arish.
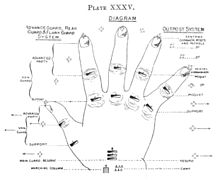
Picture - Guard Systems for Marching Column
On the day they set out for El Arish, Australian airmen reported both the Maghara Hills in the center of the Sinai Peninsula and El Arish appeared to have been evacuated by the Ottoman Army. By 02:00 on 21 December the column was about Um Zughla and a halt was called until 03:30 when the trek continued to El Arish where, at 07:45 troops entered the town to make contact with the civil population and see about water. One prisoner only was captured in the town, and lines of observation were set up and maintained to watch the country east and south of El Arish. By 16:00 1st and 3rd Light Horse, New Zealand Mounted Rifles and the Imperial Camel Corps Brigades were in bivouac at El Arish. The only casualties during the day were two members of 1st Light Horse Brigade who were blown up by a stranded mine on the beach.
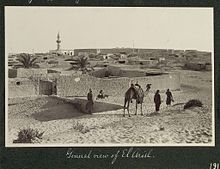
Picture - General View of El Arish
The day after El Arish was occupied, the leading brigade of 52nd Division reached the town on 22 December and together with the 5th Mounted Yeomanry Brigade, fortified the position. Also on 22 December 1916 at 10:00 Chetwode landed on the beach opposite Anzac Divisional Headquarters to begin his appointment as commander of Desert Column. Chetwode reported that he had arranged rations and horse feed to arrive at El Arish at 16:30 with a view to the Anzac Mounted Division advancing to Magdhaba 18 miles (29 km) away. With essential rations organised, the mounted force commanded by Chauvel marched out at 00:45 on the night of 22-23 December.
Ottoman defences at Magdhaba
The garrison was increased from 500 to about 1,400 Ottoman soldiers, it may have been as many as 2,000. This main defending force consisted of two battalions, each of about 600 men, from the 80th Infantry Regiment (2/80th Battalion commanded by Izzet Bey and the 3/80th Battalion commanded by Rushti Bey). The 80th Infantry Regiment was administratively allotted to the 27th Infantry Division, although it was attached to the 3rd Infantry Division for most of 1916. There were also two squads from the 80th Machine Gun Company (said to have been armed with only one machine gun) the balance of this company having been sent north to Shellal. The defending force was supported by a Mountain Battery of four outdated Krupps 7.5 cm Gebirgskanone M 1873 guns on loan from the 1st Mountain Regiment as the 80th Regiment's own artillery battery was stationed at Nekhl. Attached to the Ottoman garrison at Magdhaba were a camel company (without camels) and a number of other military service units including elements from the 3rd Company of the 8th Engineer Battalion, 3rd Company, 27th Medical Company, 43rd Mobile Hospital and the 46th Cooking Unit. The garrison was commanded by Kadri Bey, the CO (Commanding Officer) of the 80th IR.
First indications of the Ottoman Army's withdrawal from El Arish had been seen by Allied planes as early as 25 October, so their retirement was not a sudden, panicked reaction. The position at Magdhaba was a series of well sited and developed redoubts, almost impossible to locate in the flat ground near the Wadi el Arish. The garrison occupied a fortified series of about six redoubts, linked by a series of entrenchments, on both sides of the wadi over an area of about 2 miles (3.2 km) from east to west. They were inspected the day before the attack, on 22 December 1916 by von Kressenstein, the Commander of the Ottoman "Desert Force" who drove from his base at Hafir el Auja. He expressed satisfaction in the garrison's ability to withstand any assault.
Being about 40 miles (64 km) from British railhead and 25 miles (40 km) from El Arish, the Ottoman Army probably did not think a force large enough to successfully attack the garrison could be organised before the British had established a supply base at El Arish. In this, they underestimated the determination of the Australian, British and New Zealand force. And they were probably unaware of the arrival of a new British commander who had the forethought and logistical organisational abilities of Lieutenant General Chetwode and his staff.
Attack force
The assault on Magdhaba was made by:
1st Light Horse Brigade; 1st, 2nd and 3rd Light Horse Regiments,
3rd Light Horse Brigade; 8th, 9th and 10th Light Horse Regiments,
New Zealand Mounted Rifles Brigade; Auckland, Canterbury and Wellington Mounted Rifles Regiments
Imperial Camel Corps Brigade
Inverness and Somerset Batteries, Royal Horse Artillery
Hong Kong & Singapore Battery of mountain guns.
This force which may have numbered as many as 7,000 men, marched out about midnight riding 40 minutes, dismounting and leading for 10 minutes and halting for 10 minutes, every hour until almost 05:00 when the column halted in the plain, 4 miles (6.4 km) from Magdhaba. The column had been guided by Scouts and the garrison's fires had been clearly visible for about an hour indicating an attacking force was not expected to set out so soon after the 30 miles (48 km) ride to El Arish.
The attacking force was supported by the Royal Flying Corps 5th Wing stationed at Mustabig. Being a composite formation with the No. 14 (British) Squadron and No. 1 Squadron Australian Flying Corps (also known as No. 67 (Australian) Squadron), it was ordered to provide close air support, long range scouting and long range strategic bombing. One British and 10 Australian planes dropped a hundred bombs on Magdhaba on 22 December and during the battle, they bombed and machine gunned the area but targets were difficult to find.
Battle
At 06:30 the No. 14 (British) Squadron and the Australian Flying Corps' No. 1 Squadron attacked the Ottoman defences, drawing some fire to reveal locations of machine guns and some trenches. Five redoubts were identified, arranged around the village housing the only supply of water in the area. They also provided frequent reports (14 were received between 07:50 and 15:15) giving estimated positions, strength, and movements of the Ottoman garrison. These were often given verbally by the observer, after the pilot landed near headquarters.
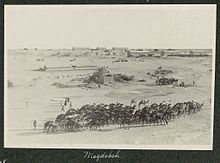
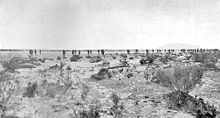
Picture - Magdhaba village
Following Chauvel's plan, a strongly enveloping action was quickly initiated. The main attack was from the north and east by the New Zealand Mounted Rifles (commanded by Brigadier General Chaytor in line of troop columns with Vickers and Lewis guns, together with the 3rd Light Horse Brigades; this force under the command of Chaytor. The ground attack began on the virtually featureless battleground (except for the village and the Wadi El Arish) when Allied artillery opened fire while Chaytor's group moved towards the Ottoman Army's right and rear. Despite heavy Ottoman firing some of the mounted troops managed to find cover and dismount about 1,600 yards (1.5 km) from Ottoman defences, while others got as close as 400 yards (0.37 km), before dismounting to attack on foot. By this time units of the Imperial Camel Corps Brigade were moving straight on Magdhaba in a south easterly direction, following the telegraph line and by 08:45 they were slowly advancing on foot in line. The reserve; the 1st Light Horse Brigade followed the Imperial Camel Corps Brigade units.

Picture - Map of Magdhaba showing Ottoman redoubts in green and attacking forces in red.
Ottoman Army batteries and trenches at Magdhaba were extremely difficult to locate, but by 10:00 the New Zealand Mounted Rifles Brigade was advancing towards their firing line. Also at this time an aerial report described small groups of the garrison starting to retire. As a consequence the still mounted 1st Light Horse Brigade was ordered to move direct on the town, passing the dismounted Imperial Camel Corps Brigade units on their way. But meeting severe shrapnel fire as they trotted over the open plain, they took cover in the bed of the Wadi el Arish. Dismounting in the wadi they continued their advance at 10:30 against the Ottoman left. The Imperial Camel Corps Brigade units continued their advance over the dead flat ground for 900 yards employing covering fire by sections.
Picture - Advance of the 9th Light Horse Regiment (3rd L. H. Brigade)
Based on a firm appreciation of the situation, the attack was carried out with confidence, skill and boldness. By 12:00, all brigades were hotly engaged as the 3rd Light Horse Brigade commenced a sweep round the garrison's right flank. At 13:00 the Imperial Camel Corps Brigade units' right had advanced to gain touch with the 1st Light Horse Brigade. Fifty-five minutes later the continuing fierce fighting was beginning to tell on the Ottoman garrison. There continued to be reports of small numbers retiring and at 14:15 the 10th Light Horse Regiment began making their way round the left. At 14:55 the Imperial Camel Corps Brigade units were within 500 yards of the Ottoman defences and at 15:20 together with the 1st Light Horse Brigade, they attacked the garrison's No. 2 position. Ten minutes later the New Zealand Mounted Rifles Brigade with fixed bayonets swarmed over the trenches to the east of the houses and the 10th Light Horse Regiment advancing from the south captured two trenches on that side, so that all retreat to the Ottoman garrison was cut off. At 16:00, the Light Horse won No. 2 redoubt and Chaytor reported gaining buildings and redoubts on the left. After a telephone call between Chauvel and Lieutenant General Chetwode pressure was continued to be pressed and an attack by all units took place at 16:30. The Ottoman garrison held on until the dismounted attackers were within 20 yards (0.018 km) (inaccurate shooting by the defenders being responsible for only light casualties). But by that time there was no doubt that the Ottoman Army was losing the fight as the garrison was surrendering in small groups. All organised resistance ceased ten minutes later and as darkness came on sporadic firing petered out; prisoners were rounded up and horses collected and watered at the captured wells. Chauvel rode into Magdhaba and gave the order to clear the battlefield.
Allied casualties were five officers killed and seven wounded, 17 other ranks killed and 117 wounded; a total of 12 killed and 134 wounded (the New Zealand Mounted Rifles Brigade suffered two officers, seven men and 36 other ranks wounded); and the loss of 146 men, 22 of them killed.
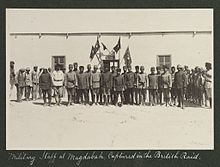
Picture - The military staff at Magdabah before the attack
No more than 200 enemy escaped before being captured; the 1,282 prisoners included Khadir Bey commanding 80th Regt, Izzat Bey, Commanding 2/80th Battalion, Rushti Bey, commanding 3/80th Battalion among 43 officers. Over 300 Ottoman Army soldiers were killed; 97 were buried on the battlefield and 40 wounded were cared for.
Von Kressenstein has been accused of withdrawing his troops and leaving the garrison at Magdhaba isolated. While Chauvel has been accused of deciding to withdraw. Firstly that because his force was at the extreme limits of the mounted units' lines of communication, the attacking force could not remain in the field for long and limited access to water forced a decision to withdraw. And secondly, that after reviewing the latest reports from the brigades and the overall situation he decided to break off the action, but before the order reached the troops, by 16.30 the fight was being won.
Aftermath
Additional water had been organised by Desert Column staff and sent from El Arish to Lahfan. At 15:30 a water convoy from Lahfan, ordered to move to Magdhaba at 15:10 was reported to be on its way. As the Allies had left El Arish the night before carrying only one water bottle per man, it was only after filling up from the water convoy that the New Zealand Mounted Rifles and 3rd Light Horse Brigades left Magdhaba to marched back in their own time; drawing rations and forage at Lahfan. Divisional Headquarters, Anzac Mounted Division and escort left Magdhaba ahead of them, at 23:30 reaching El Arish at 04:10 on 24 December 1916.
Lieutenant Colonel Granville with part of his own regiment, the 1st Light Horse and two squadrons of the Auckland Mounted Rifle Regiment and one Squadron from 3rd Light Horse Brigade bivouacked for the night at Magdhaba and continued clearing the battlefield the next morning. Convoys with supplies were ordered up to support these troops. And material assistance was given to the returning columns by GOC 52nd Infantry Division in the loan of camels, fantasses, sand carts and gun teams; the latter being sent out on his own initiative to meet the returning teams.
A dressing station set up 3 miles (4.8 km) west of Magdhaba by the New Zealand Field Ambulance Mobile Section and 1st Light Horse Field Ambulance treated eighty wounded during the day of battle, some urgent surgery being carried out and anti-tetanic injections administered, together with nourishment. These cases were evacuated during the night by sandcarts and torturous camel cacolets to El Arish, No. 1 Ambulance Convoy assisting. The remaining wounded; 44 Allied and 66 Ottomans collected on the 23rd and 24th were taken to an Ottoman hospital found within the fortifications and later on 24 December were sent to the dressing-station and from there, at 17:00 the ambulance convoy set out on its 23 miles (37 km) march to the receiving station. The convoys were met, a few miles from El Arish, by sand-carts lent by the 52nd Infantry Division, in which the wounded who had suffered the cacolets, travelled in comfort to the receiving station, arriving at 04:00 of 25 December. The 52nd Infantry Division supplied medical stores and personnel to assist, and although arrangements were made for evacuation to railhead two days later, evacuation by sea was planned. Due to a gale with rain and hail on 27 December this could not be carried out, so it was on 29 December that the largest single ambulance convoy organised in the campaign, 77 sandcarts, nine sledges, and a number of cacolet camels, moved out in three lines along the beach with 150 wounded. All but a few, too bad to move being evacuated the following day to Kantara on the Suez Canal.
In an address to the troops after the battle the recently arrived commander of Desert Column, Lieutenant General Chetwode expressed his appreciation for the mounted rifle and light horse method of attack. He reportedly said that in the history of war, he had never known cavalry to not only locate and surround the enemy's position, but to dismount and fight as infantry with rifle and bayonet.
With the victory at Magdhaba, the occupation of El Arish, the first town on the Mediterranean Sea was secured by the victory and the 52nd Infantry Division quickly fortifying the town. The British navy also arrived on 22 December and supplies began being landed from these ships on the beach, on 24 December 1916. The railway arrived on 4 January 1917 followed by the water pipeline, and El Arish grew quickly as it developed into a major base for the Allied army.
After their defeat at Magdhaba, aerial reconnaissances found Ottoman forces moving their headquarters from Beersheba while the garrison at El Auja was slightly increased; other Ottoman outposts at El Kossaima and Nekhl remained in position. The strong defensive system of trenches and redoubts at El Magruntein, defending Rafa was also still occupied by the Ottoman Army.
Footnotes
Citations
"Anzac Mounted Division War Diary". Canberra: Australian War Memorial. December 1916. http://www.awm.gov.au/collection/war_diaries/first_world_war/subclass.asp?levelID=1338.
The Official Names of the Battles and Other Engagements Fought by the Military Forces of the British Empire during the Great War, 1914-1919, and the third Afghan War, 1919: Report of the Battles Nomenclature Committee as Approved by The Army Council Presented to Parliament by Command of His Majesty. London: Government Printer. 1922. OCLC 29078007.
Bou, Jean (2009). Light Horse: A History of Australia's Mounted Arm. Australian Army History. Port Melbourne: Cambridge University Press.
Bruce, Anthony (2002). The Last Crusade: The Palestine Campaign in the First World War. London: John Murray Ltd. ISBN 0719554322 9780719554322.
Carver, Michael, Field Marshal Lord (2003). The National Army Museum Book of The Turkish Front 1914-1918 The Campaigns at Gallipoli, in Mesopotamia and in Palestine. London: Pan Macmillan. ISBN 0283073470 9780283073472.
Cutlack, F.M. (1941). "The Australian Flying Corps in the Western and Eastern Theatres of War, 1914-1918". Official History of Australia in the War of 1914-1918 Volume VIII. Canberra: Australian War Memorial. OCLC 220899617. http://www.awm.gov.au/histories/first_world_war/volume.asp?levelID=67894.
Dennis, Peter; Jeffrey Grey, Ewan Morris, Robin Prior with Jean Bou (2008). The Oxford Companion to Australian Military History. Melbourne: Oxford University Press, Australia & New Zealand.
Downes, R.M.; A. G. Butler, F. A. Maguire, R. W. Cilento (1938). "The Campaign in Sinai and Palestine". Official History of the Australian Army Medical Services, 1914-1918 Part II in Volume 1 Gallipoli, Palestine and New Guinea. Canberra: Australian War Memorial. OCLC 156587074. http://www.awm.gov.au/histories/first_world_war/volume.asp?levelID=67898.
Grainger, John D. (2006). The Battle for Palestine, 1917. Woodbridge: Boydell Press. ISBN 1843832631 9781843832638.
Gullett, H.S. (1941). Chapter XIV - Magdhaba "The Australian Imperial Force in Sinai and Palestine, 1914-1918". Official History of Australian in the War of 1914-1918 Volume VII. Canberra: Australian War Memorial. OCLC 220900153. http://www.awm.gov.au/cms_images/histories/8/chapters/14.pdf Chapter XIV - Magdhaba.
Hill, A. J. (1978). Chauvel of the Light Horse A Biography of General Sir Harry Chauvel, GCMG, KCB. Melbourne: Melbourne University Press. ISBN 0522841465 9780522841466.
Keogh, E. G.; Joan Graham (1955). Suez to Aleppo. Melbourne: Directorate of Military Training by Wilkie & Co.. OCLC 220029983.
Powles, C. Guy; A. Wilkie (1922). The New Zealanders in Sinai and Palestine. Official History New Zealand's Effort in the Great War, Volume III. Auckland: Whitcombe & Tombs Ltd. OCLC 2959465.
Pugsley, Christoper (2004). The Anzac Experience New Zealand, Australia and Empire in the First World War. Auckland: Reed Books. ISBN 0790009412 9780790009414.
Turkish General Staff (1979). Birinci Dx¼nya Harbi'nde Turk harbi. Sina-Filistin cephesi, Harbin BaÅlangicindan Ä°kinci Gazze Muharebeleri Sonuna Kadar. Sinai-Palestine Front from the beginning of the war to the end of the 2nd Gaza Battle, Volume 4, 1st Part. Ankara: IVncu Cilt 1nci Kisim.
Wavell, Field Marshal Earl (1968). E.W. Sheppard. ed. The Palestine Campaigns. A Short History of the British Army (3rd ed.). London: Constable & Co..
Woodward, David R. (2006). Hell in the Holy Land World War I in the Middle East. Lexington: The University Press of Kentucky. ISBN 9780813123837 0813123836.
More aircraft.
Source: WikiPedia