


Battle of Megiddo - Picture
More about World War 1
|
|

Battle of Megiddo
Date
19 September - 1 October 1918
Location
Megiddo, Ottoman Empire modern day Israel
Result
Decisive Allied victory
Date: 19 September - 1 October 1918
Location: Megiddo, Ottoman Empire modern day Israel
Result: Decisive Allied victory
Belligerents:
: United Kingdom
Australia
India
New Zealand
France
French Armenian Legion
Arab insurgents
Commanders and leaders:
: Edmund Allenby
Strength:
: Allied
12,000 mounted troops,
57,000 infantry,
540 guns
Arab
unknown
Casualties and losses:
: 782 killed,
382 missing,
4,179 wounded
Australia
India
New Zealand
France
French Armenian Legion
Arab insurgents
Suez - Romani - Magdhaba - Rafa - 1st Gaza - 2nd Gaza - El Buggar - Beersheba - 3rd Gaza - Mughar Ridge - Jerusalem - Abu Tellul - Arara - Megiddo
Mecca - Medina - Taif - Yanbu - Aqaba - Wadi Musa - al-Samna - Megiddo
The Battle of Megiddo (Turkish: Megiddo Muharebesi, less commonly known as the Battle of Armageddon and sometimes called the Rout of Nablus (Nablus Hezimeti) or the Battle of the Nablus Plain by the Turks), from 19 September to 1 October 1918, and its subsequent exploitation, was the culminating victory in British General Edmund Allenby's conquest of Palestine during World War I. British Empire forces made a massive push into the Jezreel Valley from the west, through the Carmel Ridge, then engulfed the Ottoman forces in the valley and on the River Jordan. When he was made a viscount, Allenby took the name of this battle as his title, becoming the First Viscount Allenby of Megiddo.
Allenby's operations succeeded at very little cost, in contrast to many offensives during the First World War, and were widely praised. The British made significant use of both cavalry and aircraft, a historically rare combination.
Situation from the fall of Jerusalem to September 1918
Stalemate
After capturing Jerusalem at the end of 1917, Allenby's forces were greatly weakened when many of his infantry units (no less than 60 out of approximately 90 battalions) had to be sent to reinforce the British armies on the Western Front after the Germans launched their Spring Offensive. Allenby's tank force was also shipped off to France, and would not return before the Armistice on the Western Front came into effect. In spite of this, Allenby tried to maintain the pressure on the retreating Turks by twice sending cavalry across the Jordan to capture Amman and Es Salt. The Jordan crossing was contested at the Battle of Hijla and at Ghoraniyeh. Both attacks were defeated, although Allenby retained a small bridgehead across the Jordan north of the Dead Sea.
At the same time (effectively from 8 March), the Ottoman command changed. The highest level Ottoman headquarters in Palestine was the Yıldırım Army Group. (Yıldırım translates roughly as "thunderbolt", and the name was taken from the nickname of Sultan Bayezid I). The Army Group had originally been formed for the purpose of recapturing Baghdad which had been captured by British forces on 11 March 1917, but had been diverted to Palestine after the British success at the Battle of Beersheba threatened the front there. The Army Group's commander was the German General Erich von Falkenhayn, who wished to continue the Ottoman retreat to shorten his lines of communication and reduce the need for static garrisons. However, he was unpopular among Ottoman officers, mainly because he relied almost exclusively on German rather than Turkish staff officers, and was blamed for the defeats at Gaza and Jerusalem. In February 1918, he was replaced by another German General, Otto Liman von Sanders, who had commanded the successful Ottoman defence during the Gallipoli Campaign. Von Sanders reasoned that continued retreat in Palestine would demoralise the Ottoman troops, ruin their draught animals, encourage the Arab Revolt to spread further north into the Ottoman rear areas and also lead to all the Ottoman forces to the south in the Hejaz being finally isolated. His forces halted their retreat and dug in to resist further British advances, even regaining some ground near the Jordan.
Allied reorganisation
Over the following summer, Allenby's forces were built back up to full strength. The 3rd (Lahore) Division and 7th (Meerut) Division (both from the British Indian Army) were transferred from the Mesopotamian Campaign to replace the 52nd (Lowland) Division and 74th (Yeomanry) Division which had been sent complete with their headquarters and artillery to the Western Front. Two Indian mounted divisions (the 4th Cavalry Division and the 5th Cavalry Division) were transferred to Palestine from the Western Front where there was comparatively little use for mounted troops, and were reorganised to incorporate some of Allenby's Yeomanry units. Except for the 54th (East Anglian) Division which had retained all its British units, Allenby's other depleted infantry divisions were rebuilt with newly-raised units from India, with three Indian battalions to every British battalion. For several months, the RAF had enjoyed complete supremacy in the air and did not need reinforcements, but at Allenby's request more planes and men were supplied.
As this reorganisation proceeded, most of what action there was took place east of the Jordan where the Arab Northern Army (part of the Arab Revolt) was operating under the overall leadership of the Emir Feisal. Its regular soldiers, mostly former Arab conscripts into the Ottoman Army who had deserted or been captured, commanded by Jaafar Pasha, maintained a blockade of the Ottoman garrison at Ma'an after a failed attack (the Battle of Al-Samna) earlier in the year, while irregulars under Lawrence of Arabia forayed from Aqaba against the Turks' Hejaz railway. West of the Jordan, the Turks themselves mounted a brief attack at Abu Tellul near the river, but were defeated by Australian Light Horse units with heavy casualties to a German Jx¤ger unit.
Allied plan
Allenby intended to break through the western end of his front, near the Mediterranean coast, where the terrain was suitable for large-scale cavalry manoeuvres and where British troops had seized crossings over a stream, the Nahr al-Auja, which was almost the only natural defensive position on this part of the front, during the last phases of the fighting in 1917. Once the breakthrough had been achieved, Allenby intended that the mounted troops of the Desert Mounted Corps would pass through the resulting gap in the Ottoman front lines, reach the passes through the Carmel Range before Ottoman troops could forestall them, and seize the communication centres of Al-Afuleh and Beisan, thus trapping the Ottoman armies west of the Jordan.
To make the task of this breakthrough and exploitation easier, Allenby made laborious efforts to deceive the Turks as to his intentions, as he had done at the Third Battle of Gaza. To fix the Turks' attention on the wrong end of the front, the detached Anzac Mounted Division in the Jordan Valley simulated the activity of the entire mounted corps. Troops marched openly down to the valley by day, and were secretly taken back by lorry at night to repeat the process the next day. Vehicles or mules dragged harrows along tracks to raise dust clouds, simulating other troop movements. Dummy camps and horse lines were constructed. Meanwhile, a British Imperial Camel Corps battalion joined Arab irregulars in a raid near Amman, scattering corned beef tins and documents as proof of their presence. Lawrence sent agents to openly buy up huge quantities of forage in the same area. As a final touch, British newspapers and messages were filled with reports of a race meeting to take place in Gaza on 19 September, the day on which the attack was to be launched.
West of the Jordan, the Allied forces enjoyed undisputed air supremacy by this time. The squadrons of the Royal Air Force and the Australian Flying Corps outnumbered and outclassed the Ottoman and German aircraft detachments in Palestine. Ottoman and German reconnaissance aircraft could not even take off without being engaged by British or Australian fighters, and could therefore not see through Allenby's deceptions, nor spot the true Allied concentration which was concealed in orange groves and plantations.
Almost the entire Ottoman fighting strength was in the front line. As tactical reserves, there were only two German regiments west of the Jordan, and an understrength Ottoman cavalry division near Amman. Further back there were only some "Depot Regiments", not organised as fighting troops, and scattered garrison units. All Ottoman units were understrength and demoralised by desertions, sickness and shortage of supplies.
Orders of battle
On 17 September 1918, the opposing armies were deployed as follows:
Yildirim Army Group (Otto Liman von Sanders)
Eighth Army (Jevad Pasha) - Plain of Sharon
XXII Corps (Refet Bey)
46th Division
7th Division
20th Division
Asia Korps (Oberst Gustav von Oppen) also named Left Wing Group
19th Division
16th Division
German "Pasha II" detachment (regiment)
2nd Caucasian Cavalry Division
Seventh Army (Mustafa Kemal Pasha) - Judaea and Jordan Valley
III Corps (Ismet Bey)
1st Division
11th Division
XX Corps (Ali Fuat Pasha)
26th Division
53rd Division
German 146 Infantry Regiment
Fourth Army (Jemal Kuchuk Pasha, "the Lesser")
VIII Corps (Jordan River) (Yasin Hilmi Bey, also known as Salman el-Hashimi)
48th Division
Composite Division
II Corps
Ma'an and Hauran detachment
62nd Division
Three composite detachments
Jordan Group (Amman)
24th Division
3rd Cavalry Division
Egyptian Expeditionary Force (Edmund Allenby)
XXI Corps (Lieutenant General Edward Bulfin) - main attack
60th Division
7th Indian Division
75th Division
3rd Indian Division
54th (East Anglian) Division
French Armenian Legion - independent detachment
(Mixed infantry and cavalry brigade)
XX Corps (Lieutenant General Philip Chetwode) - subsidiary attack
10th Division
53rd Division
Chaytor's Force (Major General Edward Chaytor) - eastern flank
Anzac Mounted Division
(Indian) Imperial Service Infantry brigade
West Indian Brigade (two battalions)
Jewish Legion (38th & 39th Battalions Royal Fusiliers)
Desert Mounted Corps (Lieutenant General Henry Chauvel) - exploitation
4th (Indian) Mounted Division
11th Light Armoured Motor Battery, Machine Gun Corps (Armoured cars)
1st Light Car Patrol
5th (Indian) Mounted Division
12th Light Armoured Motor Battery
2nd Light Car Patrol
Australian Mounted Division
7th Light Car Patrol
RAF Palestine Brigade (Brigadier-General Amyas Borton)
Fifth (Corps) Wing (Lieutenant-Colonel Charles Burnett)
No. 14 Squadron
No. 113 Squadron
No. 142 Squadron
Fortieth (Army) Wing (Lieutenant-Colonel Richard Williams)
No. 1 Squadron Australian Flying Corps
No. 111 Squadron
No. 144 Squadron
No. 145 Squadron (1 flight only)
Regular Infantry Brigade (Jaafar Pasha) - Ma'an
Sherifian and Egyptian Camel Corps - (T. E. Lawrence)
Rualla and Howeitat tribesmen - (Nuri as-Said, Auda abu Tayi)
Haurani insurgents
Opening attack
On 17 September 1918, Arabs under T. E. Lawrence and Nuri as-Said began destroying railway lines around the vital rail centre of Deraa. Lawrence's initial forces (a Camel Corps unit from Feisal's Army, an Egyptian Camel Corps unit, some Gurkha machine gunners, British and Australian armoured cars and French mountain artillery) were soon joined by up to 3,000 Rualla and Howeitat tribesmen, under noted fighting chiefs such as Auda abu Tayi. Although Lawrence was ordered by Allenby only to disrupt communications around Deraa for a week and Lawrence himself had not intended a major uprising to take place in the area immediately, to avoid Ottoman reprisals, a growing number of local communities spontaneously took up arms against the Turks.
As the Turks reacted, sending the garrison of Al-Afuleh to reinforce Deraa, the units of Chetwode's Corps made attacks in the hills above the Jordan, intending to further divert the Turks' attention to this flank, although this did not fool the Ottomans. At the last minute, an Indian deserter warned the Turks about the impending main attack. The commander of Ottoman XXII Corps wished to withdraw to forestall the attack but his superiors Jevad Pasha, commanding the Ottoman Eighth Army, and Liman (who feared that the deserter was himself an attempted intelligence bluff) forbade him to do so.
At 1:00am on 19 September, the RAF Palestine Brigade's single Handley Page O/400 heavy bomber dropped sixteen 112 pounds (51 kg) bombs on the Ottoman Headquarters and telephone exchange in Al-Afuleh. This cut the communications between Liman's headquarters and those of the Ottoman Seventh and Eighth Armies for the following vital two days, dislocating the Ottoman command. Other aircraft also bombed Seventh Army's headquarters at Nablus and Eighth Army's headquarters at Tulkarm, crippling both formations.
At 4:30am, Allenby's main attack opened. A barrage by 385 guns (with 60 trench mortars, and two destroyers off the coast) fell on the Ottoman 7th and 20th Infantry Division's front-line positions. As the barrage ceased at 4:50 AM, the British infantry advanced and quickly broke through the Turkish lines. Within hours, the cavalry were moving north along the coast, with no Turkish reserves to check them. By the end of the first day, the remnants of the Ottoman Eighth Army were in disorderly retreat under air attack into the hills to the east, covered by a few rearguards. Jevad Pasha himself had fled, and Mustafa Kemal Pasha was unable to re-establish control over Eighth Army's troops.
The RAF prevented any of the German aircraft based at Jenin from taking off and interfering with the British land operations. Two S.E.5s, armed with bombs, circled over the German airfield all day on 19 September. When they spotted any movement on the ground, they bombed the airfield. Each pair of aircraft were relieved every two hours and before departing each pair machine-gunned the German hangars.
Destruction of the Ottoman Armies
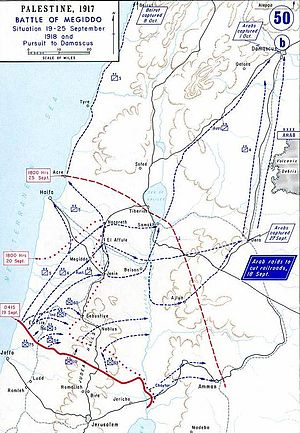
Picture - Progress of Battle, 19-24 September 1918
During the early hours of 20 September 1918, the Desert Mounted Corps secured the defiles of the Carmel Range. The 4th Mounted Division passed through these to capture El Afule and Beisan, complete with the bulk of two Depot Regiments. A brigade of the 5th Mounted Division attacked Nazareth, where Liman von Sanders's HQ was situated, although Liman himself escaped, and another (the Imperial Service Cavalry Brigade) captured the vital port of Haifa the next day. A brigade of the Australian Mounted Division occupied Jenin, threatening the rear of the Ottoman Seventh Army.
Destruction of the Ottoman Seventh Army
Once nothing stood between Allenby's forces and Mustafa Kemal's Seventh Army in Nablus, Kemal decided that he lacked sufficient men to fight the British forces. With the railway blocked, the Seventh Army's only escape route lay to the east, along the Nablus-Beisan road that led down the Wadi Fara into the Jordan valley.
On the night of 20-21 September the Seventh Army began to evacuate Nablus. By this time the Seventh Army was the last formed Ottoman army west of the Jordan and although there was a chance that Chetwode's XX Corps might cut off their retreat, the XX Corps had been delayed by Ottoman rearguards and had made poor progress in its advance. On 21 September, the Seventh Army was spotted by aircraft in a defile west of the river. The RAF proceeded to bomb the retreating Turks and destroyed their entire column. Waves of bombing and strafing aircraft passed over the Turks every three minutes and although the operation had been intended to last for five hours, the Seventh Army was routed in 60 minutes. All transport, artillery and heavy equipment was abandoned or destroyed, many Turks were killed and the survivors were scattered and leaderless. The wreckage of the destroyed column stretched over six miles and Lawrence would later write that "the RAF lost four killed. The Turks lost a corps."
Later operations
Over the next four days, the Fourth Mounted Division and Australian Mounted Division rounded up large numbers of demoralised and disorganised Ottoman troops in the Jezreel Valley. Many of the surviving refugees were attacked and captured by Arabs as they approached or tried to bypass Deraa.
Several German and Turkish aircraft had continued to operate from Deraa, harassing the Arab irregulars and insurgents still attacking railways and isolated Ottoman detachments about the town. At Lawrence's urging, British aircraft began operating from makeshift landing strips nearby from 22 September, and bombed the airfield at Deraa early on 23 September.
Liman had attempted to deploy a few rear-area detachments to hold the line of the Jordan and Yarmuk rivers around the Sea of Galilee. A charge by an Australian Light Horse brigade at last light on 26 September captured the town of Samakh, breaking this line.
Allied Exploitation
Allenby now ordered his cavalry to cross the Jordan, to capture Amman, Deraa and Damascus. Meanwhile, the 3rd Indian Division advanced north along the coast towards Beirut and the 7th Indian Division advanced on Baalbek in the Beqaa Valley, where the rearmost Ottoman depots and reinforcement camps were situated.
The Ottoman Fourth Army had begun to retreat from Amman in increasing disorder on 22 September 1918. A British Corps-sized detachment under Major General Edward Chaytor crossed the Jordan as the Turks fell back and abandoned the crossings. The Anzac Mounted Division captured Amman on 26 September. The Ottoman detachment from Ma'an found its line of retreat blocked south of Amman, and surrendered intact to the Anzac Mounted Division rather than risk slaughter by Arab irregulars.
The 4th Mounted Division moved to Deraa, which had already been abandoned to Arab forces, and then advanced north on Damascus in company with them. The retreating Turks committed several atrocities against hostile Arab villages; in return, the Arab forces took no prisoners. An entire Ottoman brigade (along with some German and Austrians) was massacred near the village of Tafas on 27 September, with the Ottoman commander Jemal Pasha narrowly escaping. The Arabs repeated the performance the next day, losing a few hundred casualties while wiping out nearly 5,000 Turks in these two battles.
The 5th Mounted Division and Australian Mounted Division advanced directly across the Golan Heights towards Damascus. They fought actions at Benat Yakup, Kuneitra, Sasa and Katana, before they reached and closed the north and northwest exits from Damascus on 29 September. On 30 September, the Australians circled north of the city and intercepted the garrison as they tried to retreat through the Barada gorge. Damascus fell the next day. Jemal Pasha fled, having failed to inspire last-ditch resistance.
Overall, the campaign resulted in the surrender of 75,000 Ottoman soldiers.
Last actions
5th Mounted Division and Arab detachments advanced north, capturing Aleppo on 26 October 1918. They then advanced to Mouslimmiye, where Mustafa Kemal (now in command of the Yıldırım Army Group) had rallied some men under XXII Corps HQ. Kemal held his positions until 31 October, when hostilities ceased following the signing of the Armistice of Mudros.
Battle honours
The successful action at Megiddo resulted in the Megiddo battle honour to be awarded to units of the Commonwealth forces participating in the battle. Two subsidiary battle honours, Sharon and Nablus were also awarded.
Importance to Bahx¡'x Faith
The Bahx¡'x Faith in 1918 and today has its administrative and spiritual center in the environs of Haifa. As a direct result of the events of the battle, the leader of the Bahx¡'x Faith at the time was rescued after death threats were made against him in case the Ottoman side was to lose. In addition, because of `Abdu'l-Bahx¡'s preparations against famine caused by social chaos caused by war, and his generosity in sharing food stores built up, he was knighted by the British Empire, though it was a title he never used.
In addition to the practical implications, the Bahx¡'xs believe the battle was one way the prophecies of the Battle of Armageddon were accomplished.
Media related to Battle of Megiddo (1918) at Wikimedia Commons
Baker, Anne (2003). From Biplane to Spitfire. Barnsley, Yorkshire: Pen and Sword Books. ISBN 0850529808.
Erickson, Edward J. (2001). Ordered to die: a history of the Ottoman army in the First World War. Greenwood Publishing Group. ISBN 0313315167. http://books.google.com/?id=XUlsP0YuI1AC&dq=Ordered+to+die.
Falls, Cyril (1964). Armageddon, 1918. J.B. Lippincott. ISBN 0933852053.
Lawrence, Thomas Edward (1926). Seven Pillars of Wisdom. Penguin Books. ISBN 0140015961.
Liddell Hart, Basil Henry. History of the First World War. London: Pan Books. ISBN 9780330233545.
Maude, Roderick. The Servant, the General and Armageddon. George Ronald. ISBN 0-85398-424-7.
Perrett, Bryan (1999). Megiddo 1918 - the Last Great Cavalry Victory. Osprey Military Campaign Series. 61. Oxford: Osprey. ISBN 1-85532-827-5.
Further reading
Daddis, Gregory (2005) (PDF). Armageddonâs Lost Lessons - Combined Arms Operations in Allenbyâs Palestine Campaign. Air University Press. http://aupress.maxwell.af.mil/Wright_Flyers/Text/wf20.pdf
Stephen Lambden, "Catastrophe, Armageddon and Millennium: some aspects of the Bx¡bx-Bahx¡âx exegesis of apocalyptic symbolism", Bahx¡'x Studies Review, Volume 9, 1999/2000.
Cline, Eric H. (2000), The Battles of Armageddon: Megiddo and the Jezreel Valley from the Bronze Age to the Nuclear Age, University of Michigan Press, ISBN 0472097393
More aircraft.
Source: WikiPedia