


Battle of Messines - Picture
More about World War 1
|
|

Battle of Messines
Date
7-14 June 1917
Location
Flanders, Belgium
Result
Decisive British victory
Date: 7-14 June 1917
Location: Flanders, Belgium
Result: Decisive British victory
Belligerents:
: United Kingdom
Australia
New Zealand
Commanders and leaders:
: Herbert Plumer
Alexander Godley
Alexander Hamilton-Gordon
Thomas Morland
Strength:
: 12 divisions
216,000 men total
Casualties and losses:
: 23,749
Australia New Zealand
The Battle of Messines was a battle of the western front of the First World War. It began on 7 June 1917 when the British Second Army under the command of General Herbert Plumer launched an offensive near the village of Mesen (Messines) in West Flanders, Belgium. The target of the offensive was a ridge running north from Messines village past Wytschaete village which created a natural stronghold southeast of Ypres. One of the key features of the battle was the detonation of 19 mines immediately prior to the infantry assault, a tactic which disrupted German defences and allowed the advancing troops to secure their objectives in rapid fashion. The attack was also a prelude to the much larger Third Battle of Ypres, known as Passchendaele, which began on 11 July 1917.
Background
The assault on Messines ridge was conceived in early 1916, as Plumer sought ways to break German control of important strategic locations in the Ypres area. When it became apparent that the French offensive on the River Aisne would not succeed, General Douglas Haig reconceived the Messines operation as a precursor to a larger assault in the Ypres sector and ordered Plumer to proceed with the attack as soon as possible. Not only would capturing Messines Ridge give the British control of important strategic ground, it would also flatten out the southern flank of the Ypres Salient. This would both reduce the manpower needed to maintain the front, and reduce the German strategic and tactical advantages in the area.
Mining operations
Co-ordinated by the Corps of Royal Engineers tunnelling companies, over a period beginning more than a year before the attack, Canadian, Australian, New Zealand and British engineers tunnelled under the German trenches and laid 22 mines totaling 455 tonnes of ammonal explosive. Several compliments were given to the military geologists who planned the tunnels. âIt was said that one reason for the great success of the British operations at Messines ridge, where fifty or more mines were exploded, was the skill of the geologist who planned their location; for in some cases they were so surrounded by quicksands that the Germans could not countermine. I cannot vouch for the truthfulness of this, but, knowing the men concerned, I believe it.â After the war, an examination of the lessons learned in military geology to reorganize the German Army also reviewed this incident: "Starting early in 1916 the British conducted a most extensive and persistent mining offensive against the âWytschaete Salientâ. After March 1916 they had the advice of two military geologists in this undertaking; sub-surface conditions here were especially complex: several different Tertiary and Quaternary formations with separate ground water tables made mining most troublesome, but the advice of the British geologists helped to overcome many technical difficulties. Starting from a long distance away, their sappers drifted galleries several hundred meters long (5454 m altogether) to points deep underneath the German front lines; moreover, they diverted the attention of German sappers from their deepest attack galleries by making countless secondary attacks using the upper mine galleries. Thus the military geologists on the British side proved themselves to be âindispensible and extremely valuable.â To solve the problem of wet soil, the tunnels were made in the layer of "blue clay", 80-120 feet (25-30 m) below the surface. The galleries dug in order to lay these mines totalled over 8,000 metres in length, and had been constructed in the face of tenacious German counter-mining efforts. On several occasions, German tunnellers were within metres of large British mine "chambers". One mine was found by the Germans, and the chamber was wrecked by a countermine.
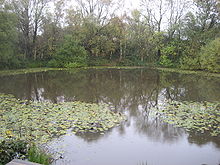
Picture - "Lone Tree Crater" in November 2009
The largest of the 22 Messines mines was at Spanbroekmolen; the "Lone Tree Crater" formed by the blast was approximately 250 feet (80 m) in diameter, and 40 feet (12 m) deep. The mine consisted of 41 tons of ammonal explosive, located in a chamber dug 88 feet (27 m) below ground.
The evening before the attack, General Plumer remarked to his staff, "Gentlemen, we may not make history tomorrow, but we shall certainly change the geography."
Opposing forces
On the British side, the assault was conducted entirely by the three corps of Plumer's British Second Army. On the northern edge of the sector was the British X Corps-under the command of Thomas Morland-comprising the 23rd, 47th and 41st Divisions. In the centre was the British IX Corps-commanded by Alexander Hamilton-Gordon-consisting of the 19th British, 16th Irish and 36th Ulster Divisions. To the southeast, Alexander Godley commanded the II Anzac Corps-composed of the 25th British, 1st New Zealand and 3rd Australian Divisions. Each of these corps held a fourth division in reserve-the 24th for the X, the 11th for the IX, and the 4th Australian for the II Anzac-for use in follow-up attacks.
Opposing Plumer's Second Army were forces of the German Fourth Army, under the command of Friedrich Bertram Sixt von Armin. To the northeast, the 204th and 35th divisions defended Hill 60 and Battle Wood. In the centre, the 2nd Division and 3rd Bavarian Division defended Messines and Wytschaete. In the southeast, the southern banks of the River Douve were defended by the 4th Bavarian Division. The German defenses relied on an "elastic" defense method; the front-lines were lightly defended, with heavier defensive bunkers up to half a mile behind the front lines.
Battle
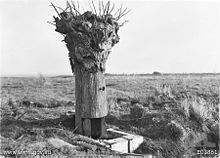
Picture - A dummy tree used as an observation post on Hill 63 by Australian troops during the battle
The operation plan for the attack on Messines Ridge called for heavy artillery strikes before zero hour. At 3AM, the mines would be detonated; followed by a frontal assault of nine infantry divisions aimed at securing the ridge. In the week before the attack began, some 2,200 artillery guns bombarded the German trenches with an estimated 3-4 million shells. Equipped with up-to-date and intricate maps of the battlefield, British artillery succeeded in destroying close to 90% of the German field-gun positions on Messines Ridge.
Detonation of the mines
At 02:50am on 7 June, the artillery bombardment ceased. Expecting an immediate infantry assault, German defenders returned to their forward positions. At 3:10am, the mines were detonated, killing approximately 10,000 German soldiers and destroying most of the fortifications on the ridge, as well as the town of Messines itself. Reports were made that the shockwave from the explosion was heard as far away as London and Dublin. To make matters worse for the Germans, the explosions occurred while the front line troops were being relieved, meaning both groups (relieving and relieved) were caught in the blasts.
While determining the actual power of explosions is difficult, the 1917 Messines mines detonation was likely the largest planned explosion in history prior to the Trinity atomic weapon test in July 1945, and the largest non-nuclear planned explosion in history prior to the British explosive efforts on the Heligoland Islands in April 1947. With approximately 10,000 killed, the Messines detonation is history's deadliest non-nuclear man-made explosion of any kind (planned or accidental).
Artillery plan
Artillery fire resumed at the same moment as the explosion of the mines. The fireplan called for most of the 18-pounder field guns to fire a creeping barrage of shrapnel immediately ahead of the advance, while the other field guns and 4.5 inch howitzers fired a standing barrage some 700 yards (640 m) further ahead. The standing barrage was aligned with known German positions, and lifted to the next target when the advance reached within 400 yards (370 m) of it. As each objective was taken by the infantry, the creeping barrage would pause 150 to 300 yards (140 to 270 m) ahead of them and become a standing barrage, protecting the newly-gained positions from counterattack while the infantry consolidated. During this time the pace of fire slackened to one round per gun a minute, enabling the guns and the crews a respite, before resuming full intensity as the barrage moved on. The heavy and super-heavy artillery fired on German rear areas, and over 700 machine guns participated in the barrage plan using indirect fire over the heads of their own troops.
Assault
Immediately after the mine explosions closely following the creeping artillery barrage, British, Australian and New Zealand troops from the II ANZAC Corps, IX Corps and X Corps advanced on the Messines salient from three sides. The front lines were overrun without opposition. German troops surrendered "in droves", and the first series of objectives had been secured almost entirely within three hours. Advancing on the southern flank, the New Zealand Division captured the village of Messines proper, despite intricate layers of fortifications beyond the front line.
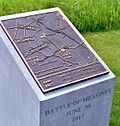
Picture - Bronze plaque overview of the Battle of Messines assault on 7 June 1917
In the center section, 5 kilometres (3.1 mi) to the north, the 36th (Ulster) Division and 16th (Irish) Division advanced in tandem, the Irish capturing the village of Wytschaete and pushing forward to secure their objectives. Many considered this joint effort to be of considerable political significance, given the turmoil in Ireland at the time. The Irish Nationalist Party MP Major William Redmond was fatally wounded in this action. The most serious resistance was in the northern sector, where the 47th (1/2nd London) Division had to navigate across the Ypres-Comines canal. This obstacle slowed the advance considerably, but the Londoners had secured all their objectives by mid-morning, and the goals of the first phase were achieved by 10:00am at all points on the line of attack.
Once the first series of objectives was secured, more than forty batteries of artillery were brought forward to support the second phase of the attack. Bombardment continued for several hours, and at approximately 3:00pm the reserve divisions, supported by tanks, advanced towards the second line of objectives. In just over an hour, all these were secured. At 11:00AM, German troops counterattacked at several points along the new British lines. Although British troops had had very little time to consolidate their positions, the German attacks were easily repulsed and ultimately resulted in further territorial gains. Heavy British artillery strikes on 10 June meant that further counterattacks-already being planned and prepared by German commanders-never materialized.
There were four Victoria Crosses awarded during the battle, two in the Australian 3rd Division (to Private John Carroll and Captain Robert Cuthbert Grieve), one in the New Zealand Division (to Lance-Corporal Samuel Frickleton) and one in the 25th Division (to Private William Ratcliffe).
Aftermath
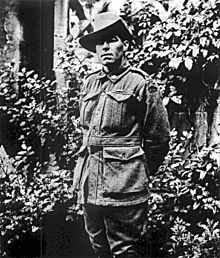
Picture - Australian Victoria Cross recipient, Private John Carroll
The operation was almost totally successful. Meticulously planned, and well executed, the assault secured all its objectives in less than twelve hours, took more than 7,000 prisoners, and suffered a relatively modest 24,000 total casualties. The combination of tactics proven in other sectors-notably the use of mines, creeping barrages, and small-unit tactics-allowed for almost complete surprise and rapid advances. The offensive also secured the southern end of the Ypres salient in preparation for the subsequent offensive in that area.
Although the operation was successful, it had the effect of over-inflating expectations for the Passchendaele offensive. While Messines led Haig and other British commanders to believe that success could be had relatively cheaply in the main offensive as well, the circumstances of the operations were substantially different, and attempts to apply similar tactics would result in a general failure.
Not all of the mines that had been laid were detonated. Two of the original 21 mines were not ignited, and their locations were subsequently forgotten. On 17 July 1955, a lightning strike set off one of the remaining mines. There were no human casualties, but one cow was killed. The 21st mine-the mine abandoned due to its discovery by German counter-miners-is believed to have been found, but no attempt has been made to remove it.
Western Front (World War I)
Third Battle of Ypres
Ronald Skirth, British pacifist artilleryman, vowed not to take another human life after the Battle of Messines
Burke, Tom, MBE; "A Guide to the Battlefield of Wijtschate: June 1917", The Royal Dublin Fusiliers Association (pub June 2007); ISBN 0-9550418-1-3
Groom, Winston (2002). A Storm in Flanders, the Ypres Salient, 1914-1918. Atlantic Monthly Press. ISBN 0-87113-842-5
Keegan, John; The First World War New York: Alfred A. Knopf, 1999
Liddell Hart, B.H. The Real War 1914-1918. Boston: Little, Brown and Company, 1930
Steel, Nigel; Hart, Peter (2001). Passchendaele-The Sacrificial Ground. Cassel. pp. 45 & 54. ISBN 9781407214672.
Stokesbury, James L; A short history of World War I. New York: Perennial, 1981
Strachan, Hew; The First World War. New York: Viking, 2003
Wolff, Leon; In Flanders Fields, Passchendaele 1917.
Further reading
Bean, C.E.W.; "The Battle of Messines", Chapter 15 in The Official History of Australia in the War of 1914-1918, Vol IV, The AIF in France: 1917, 1941.
Passingham, Ian; Pillars of Fire: the Battle of Messines Ridge, June 1917, 1998.
Stewart, H; "The Battle of Messines", Chapter V in The New Zealand Division 1916-1919: A Popular History based on Official Records, 1921.
More aircraft.
Source: WikiPedia