

Battle of Rafa - Picture
More about World War 1
|
|
Battle of Rafa
Date
9 January 1917
Result
British victory
Date: 9 January 1917
Result: British victory
Belligerents:
: United Kingdom
Australia
New Zealand
Commanders and leaders:
: Philip Chetwode
Harry Chauvel
Edward Chaytor
Strength:
: 5 mounted brigades
Casualties and losses:
: 71 killed,
415 wounded
Harry Chauvel Edward Chaytor
Suez - Romani - Magdhaba - Rafa - 1st Gaza - 2nd Gaza - El Buggar - Beersheba - 3rd Gaza - Mughar Ridge - Jerusalem - Abu Tellul - Arara - Megiddo
The Battle of Rafa, officially known as the Action of Rafah, took place to the north and east of Sheikh Zowa'id during the Sinai and Palestine Campaign of the First World War, at El Maugratine just south of the town of Rafa on the frontier between the Egyptian Sinai and the Ottoman Empire.
Background
Following the first victory of the Sinai and Palestine Campaign at the Romani on 4 August 1916, British forces had been on the offensive in the Sinai. Their pace of advance was governed by the speed by which the railway and water pipeline could be constructed from the Suez Canal. By December 1916 Anzac Mounted Division less 2nd Light Horse Brigade had captured the garrison at Magdhaba which had threatened British occupation of El Arish. The 52nd Infantry Division arrived at El Arish while railhead was still 30 miles (48 km) away, and began to fortify this newly occupied forward British base. On 4 January 1917 the railway with all its important supply capacity, infrastructure development and garrisons reached El Arish on the Mediterranean Sea. Here supplies of all kinds could be unloaded by the Egyptian Labour Corps and distributed safely by the Egyptian Camel Transport Corps with artillery support assured under the protection and dominance of the Royal Navy.
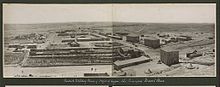
Air patrols on 7 January showed the Turkish still held strong forces at El Kossaima and Hafir el Auja which could threaten the right flank of the advancing Allies, by reinforcing Rafa.
Picture - Ottoman Military Town of Hafir el Aujah, the Principal Desert Base
General Sir Archibald Murray the commander of British forces in Egypt, was keen to complete the advance across the north of the Sinai, believing this would compel the Turkish forces to abandon their desert bases and outposts. He decided to order the advance as soon as possible and on 8 January 1917, patrols of Australian Flying Corps' No. 1 Squadron covered the concentration for the attack on Rafa. In the afternoon, under the command of Lieutenant General Philip Chetwode (Desert Column) and Major General Harry Chauvel (Anzac Mounted Division), the mounted force rode out of El Arish towards Rafa where a 2,000-strong Turkish garrison was based.
Prelude
Attack Force
Mounted units of Desert Column under the command of Chetwode moved out to the attack. They were:
Anzac Mounted Division's Australian 1st and 3rd Light Horse, the New Zealand Mounted Rifles Brigades and the Inverness, Leicesters and Somersets Territorial Royal Horse Artillery batteries; the division commanded by Chauvel;
1st, 2nd and 3rd Battalions Camel Brigade (with its Hong Kong and Singapore Mountain Battery);
British 5th Mounted (Yeomanry) Brigade with a battery of the Honourable Artillery Company (18-pounders), and
No. 7 Light Car Patrol - six Ford cars equipped with machine-guns.
With a thirty-mile ride ahead, the force began their journey before sun set on 8 January 1917, risking an attack by aircraft, but waiting for the cover of darkness would not leave enough time for the force to arrive at el Magruntein.
Initially they trekked over very heavy sand-dunes, which were very difficult for the doubled teams of horses pulling the guns and ammunition wagons. Eventually the great shallow trough of the Old Road or Pilgrims' Way, worn down by traffic since ancient times appeared and the guns and ammunition wagons travelled on the firm middle way while the mounted units rode on either side. The vanguard of the column reached Sheikh Zowaiid at about 10 am where the first grass the horses had seen since leaving Australia was encountered. This was on the edge of the fertile grasslands of the maritime plain sixteen miles north of El Arish.
Turkish entrenchments
No. 1 Squadron Australian Flying Corps, which had been based at Mustabig during the El Arish, Magdhaba operations, moved forward to five miles west of El Arish and on 5 January observed 2,000 to 3,000 Turkish troops of the 31st Regiment digging defensive positions south of Rafa. This force together with field artillery and a battery of mountain guns became strongly entrenched on the highest ground about Hill 255 called El Magruntein.
Photographs provided by reconnaissance aeroplanes confirmed the four main formidable defensive positions; the central redoubt about 200 feet above and dominating the surrounding grassland was supported by three systems of redoubts identified as A, B and C systems with trenches on the slopes spreading out towards the south-east, south and south-west. These strong, well prepared and well sited redoubt and trench systems had a clear view of a battlefield devoid of cover for some 2,000 yards. The only weakness was to the north-east, or the rear side of the position.
Battle
The attacking force rested at Sheikh Zowaiid until 1 am on 9 January 1916 when the column began its approach towards Rafa leaving behind all wheels excepting the guns themselves. This was done by order of the Column Commander, Chetwode, under protest from all the brigadiers as it meant advancing to battle without any reserve ammunition for the guns, rifles and machine guns.
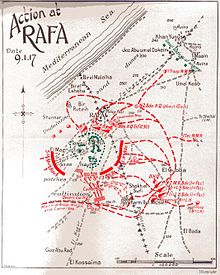
Picture - Battle of Rafa Map
While the 1st Light Horse and the New Zealand Mounted Rifles Brigades rode to a position from which to attack from the south, east and north, the 5th Mounted Yeomanry Brigade with the six Ford motor cars of the British 7th Light Car Patrol in support, continued along the Old Road straight towards Rafa.
In the vanguard of the New Zealand Mounted Rifles Brigade's advance, the Auckland Regiment was first to reach the boundary pillars indicating the Egypt and Turkish frontier at six o'clock in the morning.
At 7 am the Turkish garrison was isolated by the cutting of the telegraph lines to Gaza, and the British horse artillery batteries commenced firing on the redoubts.
Just after 8 am orders were issued to Brigadier Chaytor for the attack by his New Zealand Mounted Rifles Brigade on the group of trenches identified as C4 and C5; and the 1st Light Horse Brigade was ordered to attack C3, C2 and C1 Group; after which both brigades were to then attack the central redoubt. The three battalions of the Imperial Camel Corps Brigade were ordered to attack D Group fortifications and 3rd Light Horse Brigade remained in reserve.
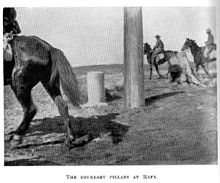
Picture - Boundary Pillars on Frontier
At 10 am the attack began with the Auckland Mounted Rifle Regiment, supported by two machine guns leading with the Canterbury Mounted Rifle Regiment on their right. This regiment overran Rafa and intercepted six Germans, 2 Turkish officers, 16 other ranks and 21 Bedouins attempting to retire. By 11 am Brigadier Chaytor commanding New Zealand Mounted Rifles Brigade had moved his Headquarters to the Boundary Post one mile south-east of Rafa, immediately behind the Auckland Regiment and half an hour later the attack was progressing well all along the line.
However, the Turkish forces were in a strong defensive position and their redoubts were ideally placed to provide supporting fire for each other. In most places the dismounted attacking troops were utterly exposed to view from the redoubts and a constant stream of fire was maintained upon the Turkish parapets to keep the defenders suppressed. Though Chauvel called on his men to renew the effort, by early to mid-afternoon the mistake of leaving the ammunition vehicles behind was paid as the British attack appeared to falter and supplies of ammunition began to run low. The New Zealand Mounted Rifles Brigade ran out of ammunition for four machine guns and the Inverness Battery of the Royal Horse Artillery ran out of shells and had to withdraw.
At 2.45 an Turkish machine-gun officer and three Germans who had been captured by a Wellington Mounted Rifle Regiment troop, stated that the Turkish 160th Regiment had left Shellal on the Wadi Ghuzzeh when the attack began with the intention of reinforcing the Rafa garrison. Shellal was about 10 miles or three and a half hours away and at 3.30 pm Chetwode ordered all available guns to fire on the Central Redoubt and for a general assault to take place. The progress was slow and German planes became very active in their bombing and the Turkish forces in the trenches were continuing their stubborn fight. Also two troops of the Wellington Regiment were engaged with the advanced guard of the Turkish reinforcements coming south from Khan Yunus and Shellal. Chetwode later wrote: 'We were quite stuck up in the open, about 400 yards from the trenches, about 3 p.m., and I ordered the New Zealanders to work round the rear and assault the principal work from the rear.'
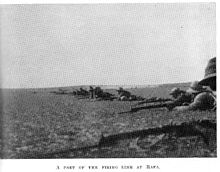
Picture - Part of the Firing Line
At 4 pm General Chaytor ordered a general assault, and the hail of bullets on the redoubt made it smoke like a furnace. This kept the Turkish fire down to such an extent and so disturbed his aim that our men were able to cover the last 600 to 800 yards of smooth grassy slope in two rushes, everyone determined to finish the job. Without artillery support but under cover of machine gun and rifle fire, Brigadier Chaytor's New Zealand Mounted Rifles Brigade won the Central Redoubt in spectacular final bayonet charges; many men firing as they ran.
After a day of steady methodical and persistent work, the attack was carried through in perfect manner exhibiting the characteristic tenacity of the New Zealanders and their fighting Brigadier. After the success of this critical action, the remaining positions quickly fell to the other brigades, as they were being dominated and enfiladed by the New Zealanders from the central keep. It was New Zealand's day.
The mounted force less a strong rearguard move back to Sheikh Zowaiid arriving about midnight, where there was water and rations for horse and man.
After the victory at Rafa, Chauvel was made KCMG, in recognition of his services and the gallantry of the Anzac Mounted Division at El Arish, Magdhaba and Rafah.
Use of machine-guns
A feature of the successful attack was the determined use of machine-guns. These advanced in the firing line, crossing their fire to get better targets, co-operating with one another and with the machine guns of the 1st Light Horse Brigade and advancing to within 400 yards of the Turk's main position. Four guns of the Canterbury Regiment on the right flank gave good covering fire at effective ranges. These guns were placed in a trench, but were afterwards moved forward to a sunken road, from which position they were able to maintain overhead covering fire until the assaulting troops were within a few yards of the trenches. The position of these guns was also of such a nature that had the pressure from the Turkish reinforcements advancing from Shellal proved too heavy to be held off, and the New Zealand Mounted Rifles Brigade forced to retire to the coast, they would have been most useful and effective in covering the retirement.
Ammunition
It was the intention of Desert Column Headquarters that the reserve Ammunition Supply would be sent on after daylight, but there was a failure of the Ammunition Supply during the critical hours of the battle and in many cases it failed to reach the units in the firing line. Major Wilkie, quartermaster of the Wellington Regiment remained at Sheikh Zowaiid with the supply convoys; but during the early hours of the battle was so concerned at the small amount of SAA (Small Arms Ammunition .303 used by both rifles and machine guns) his regiment had gone into battle with, that he went forward to Rafa and hearing that his regiment was calling for ammunition, seized a cable wagon, emptied out the signalling gear and wire, filled it with boxes of SAA and galloped across to the New Zealand Mounted Rifles Brigade - thus replenishing the machine guns in time for the great assault on the Redoubt and materially helping in the final success.
Comparisons and similarities
The Magdhaba and Rafa operations of the Sinai Campaign fought two and a half weeks apart, have been linked by a number of comparisons and similarities.
At both Magdhaba and Rafa support was provided by aeroplanes. At both Magdhaba and Rafa excellent work by the Scouts brought each part of the Anzac Mounted Division to its allotted place on time.
At Rafa, the Turkish repeated the same mistake as at Magdhaba when they left an isolated garrison. In both engagements the defenders were located in well designed and strongly fortified redoubt and entrenchment systems where they controlled the field with heavy fire power dominating the fire fight for most of the day.
Although fought between similar sized forces two and a half weeks apart, the operations at Magdhaba and Rafa were treated very differently by the Battles Nomenclature Committee. They assigned 'Affair' to the victory at Magdhaba as they considered it had been between forces of less than a division, while the victory at Rafa was considered to be an 'Action;' fought between division sized forces.
The three brigades of the Anzac Mounted Division and part of the Imperial Camel Corps Brigade which attacked Magdhaba also attacked Rafa, augmented by the 5th Mounted Yeomanry Brigade and No. 7 Light Car Patrol. Magdhaba was defended by 1,600 troops. At Magdhaba Turkish losses amounted to between 1,242 and 1282 prisoners including 43 officers, and four mountain guns. And at El Magruntein/Rafa 1,900 men defended the position and 1,500 prisoners of war were captured.
These two victories highlighted both the strengths and the weaknesses of light horse during the Sinai campaign. Both engagements were fought without infantry as they took place 18 and 30 miles from base and too far for the infantry to march, fight and return. However, they were just the operations the mounted men were trained for, and in an address the day after the battle of Magdhaba and two days after his arrival at the front, Chetwode acknowledged this expertise, when he said "that the mounted men at Magdhaba had done what he had never known cavalry in the history of war to have done before, i.e., they had not only located and surrounded the enemy's position but they had got down to it as infantry and had carried fortified positions at the point of the bayonet." And at Rafa the 5th Mounted Yeomanry Brigade lacked the drills, skill and command drive to match the Anzac Mounted Division's quick responses and movements.
At Magdhaba it was Chauvel's plan. He quickly initiated a strong enveloping action with the aim of capturing the Turkish positions. This attack was well-planned and carried out with great skill and boldness, every man showing a skill and intelligent appreciation of the situation and fearless confidence in himself and his comrades. At Rafa the mounted attack was a repetition, generally following the same sequence/pattern/course as the action at Magdhaba although more prolonged, and strikingly similar to the 1st Gaza.
The attackers were on the point of retiring when bold action saved the day; both Magdhaba and Rafa had been close-run things. At Magdhaba a time constraint was placed on the Anzac Mounted Division, operating at the extreme limit of its lines of communication, to remain on the field because of limited access to water for men and horses and a withdrawal was decided. At Rafa slow progress, the water situation and the approach of Turkish reinforcements nearly forced a withdrawal. With ammunition and food at Sheikh Zowaiid and Turkish relief approaching, Chetwode at about 4.30 pm prepared orders for a retreat at a similar moment of decision at Magdhaba when Chauvel decided to withdraw just when the fight was being won. The same situation recurring at el Magruntein/Rafa caused again by lack of the commander's confidence in his troops.
At Magdhaba the order to retire was given but before it reached the troops at about 4.30 p.m., the position was captured. Chaytor's report in the New Zealand Mounted Brigade's War Diary does not mention an order to retire from Magdhaba. Indeed a phone conversation between Chauvel and Chetwode occurred between 2.15 and 4.30 when continued pressure and an all units attack was ordered for 4.30 when surrenders began.
At Rafa at 4.30 pm a 'preliminary order' to withdraw was issued but the main redoubt was captured at 4.45 p.m. and the battle won by 5.30 pm. Chetwode discussed the situation at Rafa on the phone between 4.25 and 4.30 pm when he decided to withdraw, Chauvel concurring. A phone conversation took place at Rafa between Chetwode and Chauvel but the Wellington and Canterbury Mounted Rifle Regiments, New Zealand Mounted Rifles Brigade make no mention of an order to retire from Rafa.
Casualties
Under threat of an Turkish counter-attack from the east, the British force withdrew towards El Arish, leaving a strong rearguard of two light horse regiments under the command of Lieutenant-Colonel Maygar as a covering force for the light horse field ambulances who were gathering the wounded. All available empty wagons were sent up from Sheikh Zowaiid to help clear the battlefield; Ambulance Carts and the Stretcher Bearers were still busy and the work of tending and collecting the wounded. This work was carried on far into the night, even though the Ambulances had worked without ceasing throughout the long day.
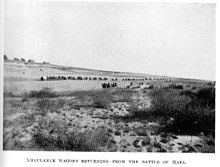
Picture - Ambulance Wagons returning to El Arish from Rafa
The official Australian Army Medical Services historian describes caring for the wounded: 'Some 100 or more wounded, British and Turk, lay in the 3rd Light Horse Field Ambulance advanced dressing-station, with few blankets, no food, and no lights, all these conveniences having, in the confusion, gone back to Sheikh Zowaiid on the equipment camels. The 5th Mounted Field Ambulance, with a large number of wounded, was in a similar plight. No. 1 Welsh Ambulance Convoy, long overdue, had not arrived - the convoy had indeed received such alarming reports from retiring parties, that it had returned to Sheikh Zowaiid. All telephonic communication had accidentally been cut off, the Turks were close at hand, the night was a bitter one. Cold, hungry, and hourly expecting capture, the wounded suffered severely. The Turkish held off, but it was not until early next morning that, on the arrival of the 3rd Light Horse Brigade at Sheikh Zowaiid, the Welsh ambulance convoy received orders to return to Magruntein. At 8 a.m. the wounded were sent to Sheikh Zowaiid, and early the same afternoon all the sandcarts of the 52nd Division arrived from El Arish and [end p. 596] evacuated them to the receiving station there. Some of these sandcarts went out close to Rafa to bring in a number of wounded Turks who had been missed, and arrived back at Sheikh Zowaiid at 5.30 a.m. on January 11 without molestation, although the rearguard had come in. After treatment and a nightâs rest at Sheikh Zowaiid the remainder of the wounded were evacuated in the 1st Light Horse Field Ambulance transport and two Welsh ambulance convoys to El Arish, where they arrived at 6 p.m. Thence they were taken away to Kantara on January 12 by ambulance train, which now came within three miles of El Arish.
Chetwode's losses were much greater than at Magdhaba; 71 killed, 415 wounded and one missing. Elsewhere its claimed the victory at Rafa was won at a cost of 467 casualties to Chetwode's Desert Column, including 124 New Zealanders.
Captures
The New Zealand Mounted Rifles Brigade remained close to the main redoubt while prisoners amongst whom were German machine gunners, were collected and sent to Sheikh Zowaiid; the 4 captured guns were taken away.
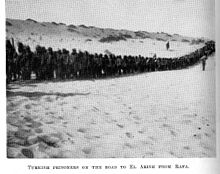
Picture - Prisoners on the Road to El Arish from Rafa
All 1,800 defenders were killed or captured. The Turkish and Germans lost between 1,434 and 1,635 prisoners.
The Turkish and Germans lost about 200 killed and 162-168 wounded.
Aftermath
On the night of 19 January 1917, ten days after the victory at El Magruntein/Rafa, with the benefit of a full moon, German and Turkish airplanes carried out a ferocious night bombing of El Arish with its increasingly important stores depot. It was the biggest aerial bombing raid yet inflicted on the Allied force, judging from the almost continuous loud thudding sound made by exploding bombs. As well as dropping bombs, these planes, probably the powerful new Taube Albatros D.III, swooped down firing machine-gun bullets into the camp and the losses, particularly in the horse lines which were an obvious target from the air, were considerable.
Also on 19 January aerial reconnaissance found the Turkish had evacuated El Kossaima and decreased its strength at El Auja.
It had been thought that the Turkish would hold on to the Nekhl area in the center of the Sinai Peninsula, including the village of Bir el Hassana, Gebel Helal, Gebel Yelleg and Gebel el Heitan, to assert their authority over the Arabs in the area. Two columns of Light Horse and British Yeomanry off set out from Suez and Serapeum near Ismailia with three aeroplanes in support to attack Nekhl 60 miles east. However on 17 February when the columns were not far off, the aeroplanes found the area abandoned.
The Sinai desert campaign ended with the expulsion of the Ottoman Empire from Egyptian territory. And yet, this great series of victories is described by Lieutenant-General Sir Harry Chauvel's biographer as a series of withdrawals; from Bir el Abd he 'ordered a general withdrawal,' from Bir el Mazar he 'ordered a withdrawal,' from Magdaba he decided 'to break off the action' and from Rafa Chetwode decided 'to break off and withdraw, Chauvel concurring.'
The victorious troopers were entirely surprised by the land they found. It was a "delightful country, cultivated to perfection and the crops look quite good if not better than most English farms, chiefly barley and wheat. The villages were very pretty - a mass of orange, fig and other fruit trees ... The relief of seeing such country after the miles and miles of bare sand was worth five years of a life."
With victory at Rafa, the steady progress of the railway and pipeline and the build up of supplies at El Arish, the British were gaining a position from which to advance, but to do so would require the capture of the Ottoman Empire's fortifications at Gaza.
Battles Nomenclature Committee, Army, The Official Names of the Battles and Other Engagements Fought by the Military Forces of the British Empire during the Great War, 1914-1919, and the third Afghan War, 1919: Report of the Battles Nomenclature Committee as Approved by The Army Council Presented to Parliament by Command of His Majesty (London, 1922)
Bruce, Anthony. The Last Crusade The Palestine Campaign in the First World War (London: John Murray Ltd, 2002)
Carver, Field Marshal Lord. The National Army Museum Book of The Turkish Front 1914-1918 The Campaigns at Gallipoli, in Mesopotamia and in Palestine (London: Pan Macmillan, 2003)
Coulthard-Clark, Chris (1998) Where Australians Fought: The Encyclopaedia of Australia's Battles St Leonards: Allen and Unwin. ISBN 978-1-86448-611-7.
Cutlack, F. M. Official History of Australia in the War of 1914-1918 Volume VIII The Australian Flying Corps in the Western and Eastern Theatres of War, 1914-1918 (11th edition, 1941) Australian War Memorial web site Official Histories.
Dennis, Peter. et al. The Oxford Companion to Australian Military History 2nd edition (Melbourne: Oxford University Press Australia & New Zealand, 2008)
Downes, R. M. The Campaign in Sinai and Palestine Part II in Volume 1 Gallipoli, Palestine and New Guinea of A. G. Butler, Official History of the Australian Army Medical Services, 1914-1918 (2nd edition 1938) Australian War Memorial; Official Histories.
Grainger, John D, The Battle for Palestine, 1917 (Woodbridge: Boydell Press, 2006)
Gullett, Henry (1941). The Australian Imperial Force in Sinai and Palestine, 1914-1918, Volume VII: Chapter 15: Rafa. Official History of Australia in the War of 1914-1918 (10th ed.). Canberra. http://www.awm.gov.au/cms_images/histories/8/chapters/15.pdf.
Hill, A.J. Chauvel of the Light Horse A Biography of General Sir Harry Chauvel, GCMG, KCB (Melbourne: Melbourne University Press, 1978)
Keogh, E.G. Suez to Aleppo (Melbourne: Directorate of Military Training, 1955)
Powles, C. Guy. The New Zealanders in Sinai and Palestine Volume III Official History New Zealand's Effort in the Great War (Auckland: Whitcombe & Tombs Ltd, 1922)
Powles, Charles Guy (1928). Chapter X. - Of the Battle of Rafa and the First Crossing of the Boundary into Palestine. The History of the Canterbury Mounted Rifles 1914-1919. Whitcombe and Tombs Limited. http://www.nzetc.org/tm/scholarly/tei-WH1CMRi-t1-body-d10.html.
Pugsley, Christoper. The Anzac Experience New Zealand, Australia and Empire in the First World War (Auckland: Reed Books, 2004)
More aircraft.
Source: WikiPedia