


Battle of Romani - Picture
More about World War 1
|
|
Battle of Romani
Date
3-5 August 1916
Location
Sinai peninsula, Egypt
Result
Allied victory
Date: 3-5 August 1916
Location
Sinai peninsula, Egypt
Result: Allied victory
Belligerents:
: British Empire
United Kingdom
Australia
New Zealand
British India
Commanders and leaders:
: Archibald Murray H.A. Lawrence
Harry Chauvel
Strength:
: 10,000
Casualties and losses:
: 1,130
United Kingdom
Australia
New Zealand
British India
German Empire
Harry Chauvel
Suez - Romani - Magdhaba - Rafa - 1st Gaza - 2nd Gaza - El Buggar - Beersheba - 3rd Gaza - Mughar Ridge - Jerusalem - Abu Tellul - Arara - Megiddo
The Battle of Romani took place near the Egyptian town of Romani which lies 23 miles (37 km) east of the Suez Canal near the Mediterranean shore of the Sinai peninsula. On the night of August 3, 1916, an Ottoman army, under the command of Friedrich Freiherr Kress von Kressenstein, attacked the British Empire forces at Romani. The position at Romani was strategically important, as it controlled the northern approach to the Suez canal. After a night and day of pressing back the defenders, the Ottoman assault could not go forward. Fierce rearguard actions were fought back to the enemy's forward base at Katia on 5 August and thereafter back to their main base at Bir el Abd, which although strongly defended was abandoned on 12 August 1916.
This first substantial victory against the Ottoman Empire in World War I was the first great victory of the Sinai and Palestine Campaign. It brought complete safety except from aerial attack, to the Suez Canal, and an end to the Defence of the Suez Canal campaign. Thereafter the Allies were on the offensive, pushing the Ottoman army back across the Sinai to battle once more at Magdhaba, and on into Ottoman Empire territory; to Rafa and Gaza.
Prelude
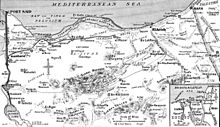
Picture - Sinai and the Suez Canal zone in 1917
The Ottoman army goal for the First Suez Offensive was to control or destroy the Suez Canal, thereby denying the use of the waterway to the Allies and in doing so aiding the Central Powers. This Ottoman offensive in early 1915, travelling through the central Sinai via Jifjafa and the Wady Um Muksheib, succeeded in reaching the Suez Canal but was driven off by the British defenders.
The antagonists were all concerned with operations on the Western Front and Gallipoli for the rest of 1915, but in April 1916 Kress von Kressenstein led a raiding party of about 2000 which attacked and decimated the 5th Mounted Brigade of Yeomanry at Katia. This conflict, Affair of Katia is also known as the First Pelusium.
By the middle of 1916 the water sources on the central Sinai route relied on by the attacking force in 1915 had been destroyed and any future Ottoman attack would have to be made via the northern route. The Romani position was crucial to any attacking army using this route, although it was just out of artillery range of the canal, but, as a strongly held base entrenched by British infantry and patrolled by Australian Light Horse which could attack and decimate the enemy's right flank should an attempt to bypass Romani.
So the task of the Ottoman Army which next crossed the Sinai Peninsula by the northern route was to drive the Allied forces from the Romani area. After achieving this, the Ottoman force could move forward close enough to attack the Suez Canal with artillery without exposing them to counter battery fire or infantry attack.
Kress von Kressenstein organised a joint force of Ottomans, Arab ancillary forces, German machine gunners and Austrian artillery which was moved slowly towards Romani. This force including the 3rd Infantry Division, totaled 11,873 men armed with 3,293 rifles, 56 machine guns, 30 artillery pieces and two anti-aircraft gun sections.
British Command Structure
The commander of the Allied forces in Egypt, General Sir Archibald Murray had his headquarters in Cairo to better deal with the multiple threats to Egypt from the south, west and east.
At the time of the Battle of Romani, his available forces comprised two British infantry divisions (the 42nd Division and the 52nd (Lowland) Division) commanded by Major-General W.E.B. Smith and the Anzac Mounted Division commanded by Major-General H.G. Chauvel, containing the 1st, 2nd and 3rd Light Horse Brigades, the New Zealand Mounted Rifles Brigade and the 5th Mounted Brigade (British Yeomanry).
Lieutenant-General H.A. Lawrence, Commander of No. 3 Section Canal Defences which included Romani, was Major-Generals Chauvel and Smith's commander. He was based at Kantara, where the 42nd Infantry Division and the 3rd Light Horse Brigade were also stationed. The New Zealand Mounted Rifles and 5th Mounted Yeomanry Brigades were based at Hill 70 east of Kantara, leaving only the 52nd Infantry Division and the 1st and 2nd Light Horse Brigades actually at Romani.
Ottoman Forces
Ottoman Army forces in the area just before the battle included 2,000 to 3,000 at Bir Bayud, another force of 6,000 camels at Bir el Abd, 3,000 Ottomans at Oghratina with the nearest enemy camp at Bir el Mazar, some 42 miles or 70 kilometers to the east, where 2,000 troops were based.
Estimates of the main body range from 28,000 to 11,000, under the leadership of Kress von Kressenstein. However, it seems likely the Ottoman force consisted of a total of 16,000 men with 11,000 or 11,873 combatants armed with between 3,293 and 12,000 rifles, and from 30, 38 to 56 machine guns. They have been identified as the Ottoman Army's reinforced 3rd (Anatolian) Infantry Division; 31st, 32nd and 39th Infantry Regiments, a Camel Regiment, the German Pasha I formation, 30 artillery pieces in four heavy artillery batteries of German and Austrian artillery and a mountain battery, a machine gun battalion of eight machine-gun companies, and two anti-aircraft gun sections or five anti-aircraft groups.
A strong aerial reconnaissance capability with increased numbers of enemy aircraft which were faster and more effective than the 'hopelessly outclassed' British aircraft was maintained over the contested ground.
Eve of Battle
On 18 July, a large Ottoman force; the 3rd Division plus additional detachments, reached the oasis area at Oghratina, east of Romani. This enemy movement was undetected until 19 July when an aerial reconnaissance found the advancing columns of Kress' force. An Australian Light Horse Brigade advanced the next day day to find touch with the enemy; harassing them until nightfall when an outpost was left out overnight. The following day the only other available Light Horse Brigade repeated the same operations of harassment as the day before and they continued to do alternate duty until just before the battle began. The War Diary of 1st Light Horse Brigade for July 1916 describes their brigade's and the 2nd Light Horse Brigade's engagements with the enemy from 20 July until the end of the month. [This document can be viewed at the Australian War Memorial's web site. Go to 'First World War Diaries' sub class '10 Light Horse' and select the 1st Light Horse Brigade. Its tag is 'AWM4, 10/1/24 - July 1916'].
The New Zealand Official Historian, C. G. Powles who was serving at that time as Brigade Major, New Zealand Mounted Rifles Brigade, describes the effects of these forward patrols by 1st and 2nd Australian Light Horse Brigades after 19 July:
'These tactics were so skilfully carried out that every move of the Turk was known to us; and he daily reported to Constantinople - "British again driven back towards the Canal." By daylight on August 3 the enemy had advanced to and occupied Katia Oasis - within striking distance of the infantry line at Romani. Immediately in front of Katia lay our open right flank with the Old Caravan Route leading to Dueidar and the Canal. The possibility of the Ottoman attack developing in this direction had been considered by General Lawrence in consultation with Divisional Commanders; and the plans for meeting such an attack fully discussed.'
The battle
Picture - Romani and surrounds, 1916
General Murray had anticipated an Ottoman attack to the south of the fortified line and the Ottomans obliged. On the night of August 3 an Ottoman force, believed to be 8,000 strong, followed behind the 2nd Light Horse Brigade as it was returning to Romani from a day reconnaissance. Having detected that the attack was imminent, Chauvel had positioned the 1st Light Horse Brigade on a loose defensive line running from Katib Gannit at the southern tip of the infantry entrenchment, heading southwest along the edge of the sand hills, passing through a large sand hill called Mount Meredith and ending at Hod el Enna.
Though vastly outnumbered, the light horsemen fought an effective delaying action at close quarters. They relinquished ground slowly. Around 2.30am on August 4, after the moon had set, the Ottomans made a bayonet charge on Mount Meredith and the light horsemen evacuated the position at 3am. The Australians were eventually forced back to a large east/west sand dune called Wellington Ridge at the southern edge of the Romani encampment.
Having been held south of Romani, the Ottomans attempted a further outflanking maneuver to the west and concentrated 2,000 troops around another sand hill called Mount Royston, southwest of Romani. At dawn Chauvel sent the 2nd Light Horse Brigade back into action in front of Mount Royston. The Ottoman advance was at a standstill everywhere. After a long night march the Ottoman troops now faced a difficult day under the desert sun without a source of water and exposed to the Romani artillery.
Shortly after dawn the Ottomans succeeded in forcing the Australians off Wellington Ridge which placed them within 700 metres of the Romani camp and exposed to machine gun and rifle fire from the entrenched infantry and shelling from the horse artillery, they were unable to press the attack further.
As soon as General Lawrence was certain a major attack was in progress, he instructed Chaytor's brigades to advance from Hill 70 to counter-attack against the Ottoman flank. The Ottomans at Mount Royston were checked to the north by the 3rd and 6th Light Horse Regiments, under constant bombardment from the horse artillery and the heavy artillery of the 52nd Division and when the New Zealand Mounted Rifle and 5th Mounted Brigades attacked from the west, the depleted and exhausted enemy surrendered en masse, around 6pm on August 4. The 8000 strong enemy was brought to a standstill by the two Light Horse Brigades, the Wellington Mounted Rifle Regiment and the 52nd Infantry Division.
Both sides sought much needed rest on the night of August 4. At dawn on August 5 the Australian Light Horse regiments and the New Zealand Wellington Mounted Rifle Regiment that had been holding the line opposite Wellington Ridge, mounted an attack on the Ottoman positions and by 5am had captured 1,000 prisoners and driven off the remainder. Everywhere along the front the Ottomans were either retreating or surrendering.
The fight for Romani, and ultimately the Suez Canal, had been won by the British infantry and Australian, British and New Zealand mounted troops.
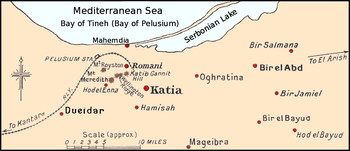
Map of Battle
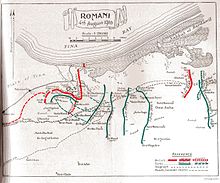
Picture - Positions 19th July to 9th August. British lines in red and Ottomans in green
This map included in the New Zealand Official History shows the position of Kress' columns from 19 July advancing towards Romani as solid green lines, to the extent of his advance at 12.30 on 4 August, to the south of Romani and not far from Pelusium. It was at this point that the combined force of the 5th Mounted, New Zealand Mounted Rifles, 1st and 2nd Light Horse Brigades and the 52nd Infantry Division forced the enemy to halt and begin his long slow fighting retreat, eventually back to Bir el Abd.
The crucially important movement of 5th Mounted and New Zealand Mounted Rifle Brigades from Hill 70 to extend the line of defence as the enemy continued to press forward on 4 August, is shown by a red dotted line. And the position of the attack at Bir el Abd on 9 August by 3rd Light Horse, New Zealand Mounted Brigades with a combined brigade made up of the severely depleted 1st and 2nd Light Horse Brigades which had seen continuous fighting from 20 July to 5 August, is shown as a solid red line with the enemy position on that day, as a green dotted line. The enemy abandoned their base of Bir el Abd on 12 August 1916.
The first day's battle
New Zealand's Official History provides the following detailed view of the battle:
'August 4, was the last day of the Mohammedan Feast of Bairam; and the Ottomans would probably attack on that day so General Chauvel decided to leave out for the night the whole of the 1st Light Horse Brigade to hold an out-post line of about 3 miles to cover all the entrances to the sandhill plateau, which formed the Romani position, and which were unprotected by infantry posts. It was this skilful placing of the 1st Light Horse Brigade by the Divisional Commander General Chauvel, that upset the Ottoman plan - causing the enemy to deploy four hours before he intended to and making one of his columns change direction in the dark, forcing it into the soft and steeply undulating sand dunes lying between Romani and Kantara.
'Just before midnight the 1st Light Horse Brigade called up the Divisional HQ by telephone and reported that bodies of the enemy were appearing in front of the out-post line, and that firing had commenced.
This out-post line ⦠withstood the enemy's main attack from 12 midnight to 4 am on the 4th, when the 1st Brigade was reinforced by the 2nd Brigade; and then the two Brigades as previously arranged, pivoting on the extreme right of the infantry position, gradually withdrew to a line which had already been decided upon, covering the right flank and rear of the Romani position.
It soon became apparent that the enemy's attack was made in three columns in numbers about 8000. One, their right column, attacked the 52nd Division in front. This attack was easily held off, but the 52nd Division was subjected to severe shelling during the day. The Ottoman centre column and his left column were most skilfully led round the open flank on the 52nd Division's right, and on to seize the camp and the railway. ⦠The enemy were so determined in their attack that they would undoubtedly have reached the railway but for the gallant and skilful resistance put up by the Light Horse Brigades and our Wellington Regiment. There was no moon and the Ottoman masses could not be seen. Our men could only fire at the flash of the enemy rifles and beat off his bayonet attack when it came.
As has been said, at daylight the 2nd Light Horse Brigade, with the Wellington Regiment reinforced the 1st Light Horse Brigade, prolonging the latter's right. The enemy's weight was such that the two Brigades gradually drew back until about 11 am. The enemy's main attack, arrested by the well-directed fire of the RHA Batteries of the Anzac Mounted Division, and by our rifle and machine gun fire, which was contributed to considerably by the 52nd Division infantry posts on the right of the Romani position, appeared then to have exhausted itself, but held its ground.
The camps as well as the firing line were heavily shelled by the Ottoman guns of various calibres including 5.9" and 10.5 cm. guns, and were severely bombed by enemy planes.
The enemy now held a line running from the Bardawil [on the Mediterranean coast] along the front of the 52nd Division entrenched position and thence bending westward through, and including, the great sand hill called Mount Meredith to the great sand dune Mount Royston ⦠This latter position dominated the camp area at Romani and threatened the railway line ⦠It was just at this critical period of the day's fighting that the NZMR Brigade with some Yeomanry appeared on the high ground to the west of Mount Royston, and our counter stroke began. â¦
[A]t 2 o'clock on the morning of the 4th General Chaytor had been advised of the Ottoman advance against Romani and moved with his Brigade the two remaining New Zealand Mounted Rifle regiments towards Dueidar along the Old Caravan Route; but events moving so rapidly at Romani and the Ottoman attack proving so strong and reaching so close to the railway, that when within a mile of Dueidar he was ordered to move to Canterbury Hill close to Mount Royston, where he arrived at 11 o'clock, finding Yeomanry from the 5th Mounted Brigade already in touch with the enemy on the south west of Mount Royston.
The attack on Mount Royston at once began; and some infantry from the 42nd Division began to arrive from the Suez Canal at the Pelusium railway station close by. Aided by the accurate and rapid shooting of the Somerset RHA Battery the New Zealand Brigade soon obtained a footing on Mount Royston; and by a very gallant advance in which the Yeomanry took part, the position was captured late in the afternoon; and it was occupied by the infantry, who had arrived too late to take part in the fighting. The mounted men continued to advance until darkness put an end to the fighting, capturing some 1200 unwounded Ottomans and a mountain battery. The prisoners were sent into the Pelusium railway station and the New Zealand Brigade with the Yeomanry fell back to the railway line to feed and water their horses while the two Light Horse Brigades put out an outpost line upon the field of battle. The 3rd LH Brigade, which so far had not been engaged, reached Dueidar after dark.'
Having travelled by train to Pelusium station near Romani from Kantara during the day, the 127th Infantry Brigade of the 42nd Division took over outpost duties at 1930 hours, from the New Zealand Mounted Rifle and 5th Mounted Yeomanry Brigades which withdrew to water and rest at Pelusium.
The second day's battle
'And now began the third phase, the thrusting back of the enemy into the desert. At 4 o'clock in the morning of August 5 the [Anzac Mounted] Division began to move, advancing towards Katia. The 1st and 2nd Light Horse Brigades, with them the Wellington Regiment New Zealand Mounted Rifles Brigade and the Ayrshire and Leicestershire batteries, captured large numbers of prisoners and quantities of material in every mile of their advance. The Wellington Regiment with the 7th Light Horse Regiment and supported on the left by infantry posts of the 52nd Division, fixed bayonets and stormed "Wellington Ridge," a position dominating the camps. They encountered heavy rifle and machine gun fire, but rushing up the sandy slope with irresistible dash, they quickly broke through the Ottoman front line. The enemy became demoralised and our troops pressed forward from ridge to ridge without a pause.
At noon the situation was as follows : - Away on the right, south of the Old Caravan Road attacking the enemy in Bir El Hamisah, was the 3rd Light Horse Brigade. Next came the New Zealand Mounted Rifles Brigade close up to the south-west edge of the Katia palms; on their left was 1st, 2nd Light Horse and 5th Mounted Yeomanry Brigades in that order; and on their left again the 52nd Division was attacking Abu Hamra.
Behind the [Anzac] Mounted Division came the 42nd Infantry Division marching in much distress in the scorching sand.
The Ottomans were making a very determined stand on the line Bir El Hamisah-Katia-Abu Hamra, [the line the enemy had held the day before the battle began] using their guns to good effect and with numerous machine guns well placed in the palms fringing on the eastern side of the great flat marsh which stretched right across the front of the enemy's position and gave them a most excellent field of fire.
A general attack was decided upon to commence at 2.30 pm at which hour the New Zealand Brigade, and the 1st and 2nd Light Horse Brigades advanced at the gallop over the exposed country. The 5th Light Horse Regiment fixed bayonets which glittered in the sun, and the great line of galloping horses presented a magnificent spectacle - shell fire was unheeded, bullets buried themselves in the sand dunes as the horses surged over them. The advance continued until the ground became too swampy to carry the horses; and the men dismounted and went in on foot. â¦
Meanwhile the 3rd Light Horse on the extreme right were held up and failing to work round the enemy's right flank drew off, and this led to the Canterbury Regiment getting the full force of a strong Ottoman counter attack.
Darkness put an end to the battle and the Anzac Mounted Division withdrew to water the horses, leaving Lieut. Johnson with his troop of the Auckland Regiment as a listening post.
The 1st and 2nd Light Horse Brigades who had borne the heat and burden of the ⦠long and arduous days prior to the battle, and who withstood so gallantly the weight of the enemy's attack on the night of August 3 and early morning of August 4, were now so tired out that they were sent back to the bivouac lines at Romani and Etmaler. But the 5th Mounted Yeomanry Brigade which had been attached to the Anzac Mounted Division remained under General Chauvel's command.
Orders were received to follow up the enemy - while the two infantry divisions, the 42nd and the 52nd, were respectively to advance to Katia and Abu Hamra and to hold these places.'
The Infantry
On the second day of battle 5 August 1916, the 42nd Infantry Division along with the 52nd Infantry Division which had fought the previous day from their entrenched position, were ordered to move out to support the mounted Australian and New Zealand brigades. Although the 42nd Infantry Division had served in Egypt for some time and fought at Gallipoli they were not trained to operate in the conditions they found in the Sinai desert. They went out into heavy sand in mid summer heat, with insufficient water causing extreme distress and tragedy.
Without strong infantry support the mounted troops were unable to stop the enemy making a disciplined withdrawal to water at Katia that night and to fall back in good order, the following day.
The 127th Infantry Brigade, 42nd Division eventually reached Katia on 6 August but 800 men had died in the two-day march from Pelusium Station. The 125th Brigade of the 42nd Division and the 155th, and 157th Brigades of the 52nd Division also had many men fall victim to thirst and the blazing sun and the infantry pursuit could not go on.
British advance
With the British infantry divisions beaten by the conditions, it fell to the Anzac Mounted Division to push the Ottoman Army force back across the desert; from Katia to Oghratina. Very strong rearguards supported by artillery, were encountered at position after position on 6, 7 and 8 August at places which had been prepared for the possibility of retreat, during the Ottoman Army's cautious advance to Romani.
Assistance was given to the Anzac Mounted Division in the south by a small camel column, which harassed the Ottomans' left flank working through Bir El Mageibra, Bir El Aweidia and Hod El Bayud from the Ballah railhead; the northern most forward defence of the fortifications protecting the Suez Canal. [The map of Improved Defences on Sinai and Palestine Campaign page shows the position of Ballah railhead.]
Action at Bir el Abd - 9 to 12 August
With the concurrence of General Lawrence General Chauvel an attempt was made to overwhelm the enemy rearguard at Bir El Abd, 20 miles from the Romani lines by the Anzac Mounted Division. The 1st and 2nd Light Horse Brigades, only half strength after fighting on the front line from 20 July to 5 August, were formed into a composite brigade called Royston's Column under General Royston.
With the New Zealanders in the centre following the telegraph line, Royston's Column on the left; and the 3rd Light Horse Brigade on the right and in touch with a small flying column, the Anzac Mounted Division began its advance on Bir el Abd at daylight on 9 August 1916. The enemy were soon encountered on a front of about 10 miles and driven back on to Bir El Abd.
'At 5 o'clock the New Zealand Brigade reached the high ground overlooking El Abd and there withstood a heavy counter attack by the Ottomans who came on in two columns of 5000 to 6000 each. But well backed up by the Somerset and Leicester batteries the Brigade firmly established itself across the telegraph line and the Old Caravan Road. By mid-day our advance had been completely checked - the Turks bringing up fresh troops and counter-attacking most determinedly. His guns were also well placed and his fire heavy and accurate.'
'The Ayrshire Battery which was with Royston's column [1st and 2nd Light Horse Brigades] was badly cut up and great difficulty was experienced in moving the guns when he was forced to retire, being obliged to give ground for nearly a mile. The 3rd Light Horse Brigade, after advancing well up on the right flank was also forced to give ground by the accuracy of the Ottoman shell fire, but the New Zealand Brigade held on in the centre and owing to the bending back of both wings were holding a very exposed line on the forward slopes of the hills overlooking the Hod. Though the enemy by the burning of store depots and by movement which could be observed was showing great anxiety to retire, yet finding he could hold his position and that his flanks were not threatened and being reinforced with fresh troops from El Arish, he again delivered a fierce counter-attack on a frontage of about 2 ½ miles right to our centre. The brunt of this attack was born by the Canterbury and Auckland Regiments, and by a squadron of [5th Mounted Brigade] Warwickshire Yeomanry, which was under General Chaytor's command. The attack was gallantly withstood and the Ottomans beaten off just as darkness fell.
A great fight [had been] put up by ⦠the section of machine guns attached to the Canterbury Regiment, ⦠[which] had all guns available playing upon the advancing Ottomans arresting their advance when within 100 yards of the New Zealand position.'
'At daylight next morning strong patrols went forward and remained in touch with the enemy throughout the day, but the horses were too tired to enable an attack in force to be made.
'On the 11th no serious fighting took place, but the enemy was watched and harassed, and plans were made for an attack on the 12th. The advance began at daylight and our patrols soon reported that the enemy was retiring - Bir El Abd was found to be evacuated - and he was followed as far as Salmana, where a small rear-guard was encountered.
'Difficulties of transport and feeding the troops precluded the advance being carried any further, and arrangements were made to hold the country as far east as Bir El Abd.'
'The tenacity and endurance of our own troops of the Mounted Brigades was magnificent. The battle was fought and persevered with through abnormal summer heat, regardless of long periods of thirst suffered by man and beast. The artillery and machine guns covered our advances. In defence they wrought havoc on the enemy's attack. No words can adequately express the untiring devotion of the medical officers, the stretcher bearers and the sand-cart drivers who were ever in the firing line, traversing enormous distances and doing all that lay in their power to alleviate the suffering of the wounded.'
Casualties
The official history of Australian Army Medical Services provides the following further information:
'The operations of these three weeks from July 19 had served as a severe test of the organisation, equipment, and training of the medical service, and, speaking generally, it had stood the test well.'
'The total number of patients treated by the ambulances of the Anzac Mounted Division between August 4 and August 9 was 1,314, including 180 enemy wounded. ... Casualties in the E.E.F. were as follows.-
The Ottoman Army suffered 1250 killed which were buried after the battle, 4000 were taken prisoner and their total casualties were estimated at 9000. Total British casualties were 1130 of which 202 were killed, 900 of these being from the Anzac Mounted Division.
'In the absence of orders co-ordinating evacuation from field ambulances of the divisions likely to be engaged, the Assistant-Directors of Medical Services of these made mutual arrangements.' '⦠as the result of [that] arrangement made by the A.D.M.S. Division with the A.Dâs M.S. of the other two divisions, a clearing station was formed from the medical units of the Anzac Mounted, the 42nd, and the 52nd Divisions. This arrangement was necessitated by a continued absence of orders from No. 3 Section Headquarters as to the method of evacuation of casualties of the three divisions.'
'The evacuation by train from Romani was carried out in a manner which caused much suffering and shock to the wounded. It was not effected till the night of August 6 - the transport of prisoners of war being given precedence over that of the wounded - and only open trucks without straw were available. The military exigencies necessitated shunting and much delay, so that five hours were occupied on the journey of twenty-five miles. It seemed a cruel shame to shunt a train full of wounded in open trucks, but it had to be done. Every bump in our springless train was extremely painful.
'The non-existence of proper arrangements for the care of their wounded created amongst all ranks of Anzac Mounted Division, the formation most concerned, a feeling of resentment and distrust towards the higher command which lasted for a long time.'
Based on the figures provided by Downes' note 14 above -
Total British casualties from two infantry divisions and one mounted brigade = 365
Total Australian casualties from three mounted brigades = 623
Total New Zealand casualties from one mounted brigade = 214
Aftermath
By 12 August the Ottoman Army had evacuated Bir el Abd and begun their retreat back to El Arish. It has been asserted that the tactics of the mounted troops helped the Ottoman Army withdrawal by concentrating on direct assaults rather than flank attacks. It has also been debated whether there was an opportunity on 5 August to encircle and annihilate the Ottoman Army as it retreated to its forward base and water at Katia, when the 52nd Division failed to advance promptly to coincide with the recapture of Wellington Ridge. However, the conditions were such that the infantry could only advance with great difficulty, even with adequate supplies of water and food. The New Zealand, and the exhausted and depleted 1st and 2nd Light Horse, Brigades' mounted charge with fixed bayonets at Katia on August 5 was unable to dislodge the enemy. And the desperate effort to encircle the enemy at Bir el Abd on 9 August could not hope to succeed because the enemy strength greatly exceeded that of the mounted force.
'The result of these operations was the complete defeat of an enemy force of some 18,000, of which in killed, wounded and prisoners, he lost 9000 men ⦠four heavy guns and several machine guns. We also captured a very large number of rifles and a camel-pack machine gun company complete, a mountain battery, quantities of stores and ammunition and two complete field Hospitals ⦠complete with all the instruments, fittings and drugs modern science could supply ⦠All the arms and equipment were of German manufacture and the camel-pack machine gun company's equipment had been especially designed for desert warfare. Many of the rifles were of the latest pattern and made of rustless steel.'
'That these operations and the attack upon the Canal in January, 1915 were not merely raids, but were genuine and determined attempts to conquer Egypt, was amply proved afterwards when our forces were able to see the great and thorough preparations in Palestine. A new railway had been built extending the Palestine system to the Wadi El Arish, and alongside it was constructed a fine motor road. Permanent works were constructed for the conservation of water along the route; and at the Wadi El Arish enormous rock cut reservoirs were being made.'
Acknowledgement of Troops' Great Victory
In a letter to his wife dated 13 August 1916, Lieutenant-General Sir Harry Chauvel wrote: "their pluck, dash and endurance is beyond all description. I don't mean only the Australians and New Zealanders but the Horse Artillery Territorials as well ⦠we have fought and won a great battle and my men put up a performance which is beyond all precedent, although worn out with watching and harassing an advancing enemy day and night for a fortnight ⦠The fighting in the early morning of the 4th was the weirdest thing I ever took on. It was over rolling sand dunes and the enemy who were in thousands, on foot, could see our horses before we could see them in the half light and it was awfully difficult to find cover for them ⦠Our losses have been heavy, of course, but absolutely nothing in comparison with what has been achieved. We are still pursuing but it has been perforce slow as the horses are done and the enemy, when advancing, entrenched himself at various points ⦠which has enabled him to fight a most masterly rearguard action ⦠As I am moving on, I must close this ⦠"
Elsewhere General Chauvel wrote: "Romani was the first decisive victory attained by British Land Forces and changed the whole face of the campaign in that theatre, wresting as it did from the enemy, the initiative which he never again obtained. It also made the clearing of his troops from Egyptian territory a feasible proposition."
Battle Honours
The Battles Nomenclature Committee described the operations as 'Eastern Frontier and Palestine; I Defence of Egypt; Defence of the Suez Canal (26 January, 1915 - 12 August, 1916); Battle of Rumani [sic] 4-5 August, 1916. The Committee identified the area of the battle as east of the Canal and north of Ismailia'
On reading the Commander in Chief, General Murray's description of the Romani operations in his official despatch, reprinted in a Paris edition of the 'Daily Mail', Chauvel wrote to his wife on 3 December 1916, "I am afraid my men will be very angry when they see it. I cannot understand why the old man cannot do justice to those to whom he owed so much and the whole thing is so absolutely inconsistent with what he had already cabled."
He was still preoccupied with this injustice just prior to the successful attack at Beersheba when Chauvel again took it up with Allenby's GHQ in a letter dated 28 September 1917. He acknowledged it was an old issue, 'going back to Murray's inexplicable failure to do justice to Anzac Mounted Division after the Romani operations. "The point is now that, during the period covered by Sir Archibald's Despatch of 1-3-17, the Australia and New Zealand Troops well know that, with the exception of the 5th Mounted Brigade and some Yeomanry Companies of the I.C.C., they were absolutely the only troops engaged with the enemy on this front and yet they see that they have again got a very small portion indeed of the hundreds of Honours and Rewards (including mentions in Despatches) that have been granted. My Lists when commanding the A. & N.Z. Mounted Division, were modest ones under all the circumstances and in that perhaps I am partly to blame but, as you will see by attached list, a good many of my recommendations were cut out and in some cases those recommended for decorations were not even mentioned in Despatches."'
Yet, the Battle occurring at a time when the Allied nations knew nothing but defeat in France, Salonika and Mesopotamia, has been widely acknowledged as a strategic victory; the first decisive victory by British forces of the war which resulted in the permanent gaining of territory, a turning point in the restoration of Egypt's territorial integrity, the end of the Ottoman Army's campaign against the Suez Canal and a fine achievement.
Sources
Battles Nomenclature Committee, Army, The Official Names of the Battles and Other Engagements Fought by the Military Forces of the British Empire during the Great War, 1914-1919, and the third Afghan War, 1919: Report of the Battles Nomenclature Committee as Approved by The Army Council Presented to Parliament by Command of His Majesty (London, 1922)
Bruce, Anthony. The Last Crusade The Palestine Campaign in the First World War (London: John Murray Ltd, 2002)
Carver, Field Marshal Lord. The National Army Museum Book of The Turkish Front 1914-1918 The Campaigns at Gallipoli, in Mesopotamia and in Palestine (London: Pan Macmillan, 2003)
Downes, R. M. The Campaign in Sinai and Palestine Part II in Volume 1 Gallipoli, Palestine and New Guinea of A. G. Butler, Official History of the Australian Army Medical Services, 1914-1918 (2nd edition 1938) p. 582. Accessed at Australian War Memorial; Official Histories web site
Erickson, Edward J., Ordered to Die A History of the Ottoman Army in the First World War Forward by General Hx¼seyiln Kivrikoglu Series: Contributions in Military Studies, No. 201 (Westport Connecticut: Greenwood Press, 2001)
Hill, A.J. Chauvel of the Light Horse A Biography of General Sir Harry Chauvel, GCMG, KCB (Melbourne: Melbourne University Press, 1978)
Keogh, E.G. Suez to Aleppo (Melbourne: Directorate of Military Training, 1955)
Moore, A. Briscoe. The Mounted Riflemen in Sinai & Palestine The Story of New Zealand's Crusaders (Christchurch: Whitcombe & Tombs Ltd, 1920?)
Powles, C. Guy. The New Zealanders in Sinai and Palestine Volume III Official History New Zealand's Effort in the Great War (Auckland, Christchurch, Dunedin and Wellington: Whitcombe & Tombs Ltd, 1922)
Woodward, David R. Hell in the Holy Land World War I in the Middle East (Lexington: The University Press of Kentucky, 2006)
The Turkish Rout at Romani - from a British illustrated magazine, published September 1916. Colorful but a bit biased.
The Australian Light Horse Studies Centre has transcribed the complete War Diary of the German 605th Machine Gun Company which was captured at Romani.
More aircraft.
Source: WikiPedia