


Battle of St. Quentin Canal - Picture
More about World War 1
|
|


Battle of St. Quentin Canal
Date
September 29 - October 10, 1918
Location
Hindenburg Line, France
Result
Decisive Allied victory
Date: September 29 - October 10, 1918
Location: Hindenburg Line, France
Result: Decisive Allied victory
Belligerents:
: United Kingdom
Australia
United States
Commanders and leaders:
: John Monash
Strength:
: 14 divisions (including 2 from the American Expeditionary Force)
Australia
United States
The Battle of St Quentin Canal was a pivotal battle of World War I that began on 29 September 1918 and involved British, Australian and American forces in the spearhead attack and as a single combined force against the German Siegfried Stellung of the Hindenburg Line. Under the command of Australian general Sir John Monash, the assault achieved all its objectives, resulting in the first full breach of the Hindenburg Line, in the face of heavy German resistance and, in concert with other attacks of The Great Offensive along the length of the line convinced the German high command that the writing was on the wall regarding any hope of German victory.
Prelude
After the German Spring Offensive, British, Commonwealth, French and American counter attacks (the Hundred Days Offensive) brought the Allies back up against the outposts of the Hindenburg Line close to the village of Bellicourt by the Autumn of 1918 (the Battle of xpehy).
American forces were ordered to attack on 27 September, to finish clearing German forces from outposts in front of the line. However, due to a shortage of American officers (there were only 18 officers in the 12 attacking companies - the remainder were absent receiving further training), the attack was unsuccessful. As a result of the confusion created by this attack (with the Corps command being unsure of where the American troops were), the attack on 29 September had to be started without the customary (and highly effective) artillery support - this was to have a large negative effect on the initial operations of the battle.
The battle
The British High Command had fully realised that any success against the formidable defences of the Hindenburg Line could only be achieved with the use of tanks.
On 29 September, the Australian Corps attacked, this time with the addition of two American Divisions from the American II Corps (the US 27th and 30th Divisions), supported by approximately 150 tanks of the 4th and 5th tank brigades (including the newly trained American 301st Heavy Tank Battalion). The US divisions launched the initial attack, with the Australian 3rd and 5th Divisions intended to "leapfrog" through the American forces. The inexperienced Americans did not clear German positions as effectively as they might have (due to the confusion created during the attack on 27 September). This forced the advancing Australians to fight for the ground that the Americans were planned to have already taken. In the confusion of battle, some American pockets that had been left without effective leadership willingly went along with the Australians as they advanced and there are documented accounts of soldiers from both nations fighting alongside each other in ad-hoc mixed outfits.
The British 46th Division crossed the St Quentin Canal (defended by fortified machine gun positions), capturing 4200 German prisoners (out of a total for the army of 5300).
This attack was supported to the south by the French First Army during the Battle of Saint Quentin (French: Bataille de Saint-Quentin). (However this attack was initially only a secondary attack, and did not manage to penetrate the German defenses until the Australians had penetrated the Beaurevoir Line on the 3rd of October.)
On 2 October the British 46th and 32nd Division supported by the Australian 2nd Division planned to capture the Beaurevoir Line (the 3rd line of defenses of the Hindenburg Line), the village of Beaurevoir and the heights overlooking the Beaurevoir Line. While the attack succeeded in widening the breach in the Beaurevoir Line, it was unable to seize the high ground further on. However, by October 2, the attack had resulted in a 17km breach in the Hindenburg Line. By any measure, and especially by World War I standards, it was a stunning and swift victory.
Continuing attacks from 3 October to 10 October (including the 2nd Division capturing Montbrehhain on 5 October) managed to clear the fortified villages behind the Beaurevoir Line, and capture the heights overlooking the Beaurevoir Line - resulting in a total break in the Hindenburg Line.
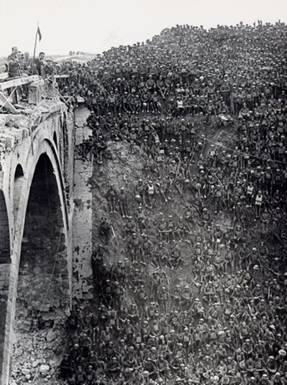
Picture - Brigadier General J V Campbell addressing troops of the 137th Brigade (46th Division) from the Riqueval Bridge over the St Quentin Canal
Military History Encyclopedia on the Web - Battle of Cambrai-St. Quentin
C.E.W. Bean, Volume VI - The Australian Imperial Force in France during the Allied Offensive, 1918 (1st edition, 1942)
More aircraft.
Source: WikiPedia