


Battle of the Somme - Picture
More about World War 1
|
|


Battle of the Somme
Date
1 July-18 November 1916
Location
Somme River, north-central Somme and southeastern Pas-de-Calais Départements, France
Result
Indecisive;
German Army withdraws 40 miles (64 km) to the Hindenburg Line in February-March 1917
Tactical and strategic effects favourable to Allies
Date: 1 July-18 November 1916
Location: Somme River, north-central Somme and southeastern Pas-de-Calais Départements, France
Result: Indecisive;
German Army withdraws 40 miles (64 km) to the Hindenburg Line in February-March 1917
Tactical and strategic effects favourable to Allies
Belligerents:
: United Kingdom
France
Canada
Australia
New Zealand
South Africa
India
Newfoundland
Commanders and leaders:
: Douglas Haig
Ferdinand Foch
Strength:
: 13 British and 11 French divisions (initial)
51 British and 48 French divisions (final)
Casualties and losses:
: 623,907 casualties
782 aircraft lost
German Army withdraws 40 miles (64 km) to the Hindenburg Line in February-March 1917
Tactical and strategic effects favourable to Allies
Main battles in small caps and other engagements below: Albert - Bazentin Ridge - Delville Wood - Pozix¨res Ridge - Guillemont - Ginchy - Flers-Courcelette - Morval - Thiepval Ridge - Transloy Ridges - Ancre Heights - Ancre
Montauban - Mametz - Fricourt - Contalmaison - la Boiselle - Gommecourt - Longueval - Trx´nes Wood - Ovillers - Fromelles - High Wood - Mouquet Farm - Martinpuich - Combles- Lesboeufs - Gueudecourt - Eaucourt l'Abbaye - le Sars - Butte de Warlencourt- Schwaben - Stuff Redoubts - Regina Trench - Beaumont Hamel
The Battle of the Somme (French: Bataille de la Somme), also known as the Somme Offensive, took place during the First World War between 1 July and 18 November 1916 in the Somme department of France, on both banks of the river of the same name. The battle consisted of an offensive by the British and French armies against the German Army, which, since invading France in August 1914, had occupied large areas of that country. The Battle of the Somme was one of the largest battles of the First World War: by the time fighting had petered out in late autumn 1916 the forces involved had suffered more than 1.5 million casualties, making it one of the bloodiest military operations ever recorded.
The plan for the Somme offensive evolved out of Allied strategic discussions at Chantilly, Oise in December 1915. Chaired by General Joseph Joffre, the commander-in-chief of the French Army, Allied representatives agreed on a concerted offensive against the Central Powers in 1916 by the French, British, Italian and Russian armies. The Somme offensive was to be the Anglo-French contribution to this general offensive, and was intended to create a rupture in the German line which could then be exploited with a decisive blow. With the German attack on Verdun on the River Meuse in February 1916, the Allies were forced to adapt their plans. The British Army took the lead on the Somme, though the French contribution remained significant.
The opening day of the battle on 1 July 1916 saw the British Army suffer the worst one-day combat losses in its history, with nearly 60,000 casualties. Because of the composition of the British Army, at this point a volunteer force with many battalions comprising men from specific local areas, these losses had a profound social impact and have given the battle a lasting cultural legacy in Britain. The casualties also had a tremendous social impact on the Dominion of Newfoundland, as a large percentage of the Newfoundland men that had volunteered to serve were lost that first day. The battle is also remembered for the first use of the tank. The conduct of the battle has been a source of historical controversy: senior officers such as General Sir Douglas Haig, the commander of the British Expeditionary Force, and Henry Rawlinson, the commander of Fourth Army, have been criticised for incurring very severe losses while failing to achieve their territorial objectives. Other historians have portrayed the Somme as a vital preliminary to the defeat of the German Army, and one which taught the British Army valuable tactical and operational lessons.
At the end of the battle, British and French forces had penetrated a total of 6 miles (9.7 km) into German occupied territory. The British Army was three miles from Bapaume and also did not capture Le Transloy or any other French town, failing to complete many objectives. The Germans were still occupying partially entrenched positions and were not as demoralised as the British High Command had anticipated.
Prelude
State of the armies
The original British Expeditionary Force, six divisions strong at the start of the war, had been wiped out by the battles of 1914 and 1915. The bulk of the army was now made up of volunteers of the Territorial Force and Lord Kitchener's New Army, which had begun forming in August 1914. The expansion demanded generals for the senior commands, so promotion came at a rapid pace and did not always reflect competence or ability. Haig started the war as the commanding officer of British I Corps, then was promoted to command the British First Army, and then the BEF, an army group comprising sixty divisions split between five armies. Yet this vast increase in raw numbers also diluted the overall troop quality and undermined the confidence commanders had in their men; this was especially true of Rawlinson.
Overall Allied war strategy before the Somme
The Allied war strategy for 1916 was largely formulated during a conference at Chantilly between 6-8 December 1915. It was decided that for the next year, simultaneous offensives would be mounted by the Russians in the east, the Italians (who had by now joined the Entente) in the Alps and the Anglo-French on the Western Front, thereby assailing the Central Powers from all sides.
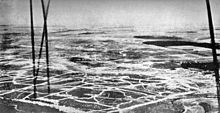
Picture - An overall view of the front in the region of the Somme before the battle.
By 19 December 1915, General Sir Douglas Haig had replaced General Sir John French as Commander-in-Chief of the British Expeditionary Force (BEF). Haig favoured a British offensive in Flanders- it was close to BEF supply routes via the Channel ports and had a strategic goal of driving the Germans from the North Sea coast of Belgium, from which their U-boats were menacing Britain. However, although there was no formal order of seniority, the British were still the "junior partner" on the Western Front and had to largely comply with French policy, even though Haig did not report to General Joseph Joffre, the French Commander. In January 1916, Joffre had agreed to the BEF making their main effort in Flanders, but after further discussions in February, the decision was reached to mount a combined offensive where the French and British armies were to launch their assault astride the Somme River in Picardy.
During February 1916, plans for the joint offensive on the Somme were still in the hands of the General Staff when the Germans launched concentrated attacks on the French at Verdun. As the French committed themselves to defending Verdun, their capacity to carry out their role on the Somme was significantly reduced and the burden shifted to the British. France would end up contributing three corps to the opening of the attack (the XX, I Colonial, and XXXV Corps of the 6th Army). As the Battle of Verdun dragged on, the aim of the Somme offensive changed from delivering a decisive blow against Germany, to relieving the pressure on the French army, the balance of forces changing to 13 French and 20 British divisions at the Somme.
Strategic differences of Haig and Rawlinson
There was a disagreement in the implementation of tactics between Sir Douglas Haig and his senior local commander, General Sir Henry Rawlinson, General Officer Commanding the British Fourth Army. Haig's overall belief was that there would be a clear breakthrough of a distance of 7 miles (11 km) to Bapaume. He prepared to do this by first bombarding the enemy relentlessly for a week with a million shells. Following up this massive display of artillery would be twenty-two British and French divisions, passing through the barriers, and occupying the trenches filled with stunned German soldiers so that his divisions could head off into the open. He wrote to the British General Staff that "the advance was to be pressed eastward far enough to enable our cavalry to push through into the open country beyond the enemy's prepared lines of defence."
Rawlinson, however, saw success in the form of "bites" into German-held territory along the trenches, followed up by continuous bites to expand further east. This "bite and hold" strategy of Rawlinson's was calculated based upon his own previous experiences, as in the Second Battle of Ypres where the Germans used 2,000 yards (1,800 m) worth of solid defence in the face of fire to achieve success. He perceived this to be a sort of siege warfare that would be limited but positive as in action in Messines in 1915. Rawlinson would soon fall victim to relenting to the Haig plan, despite his observations on the matter. He gradually changed his mind over the tactical approach offered by Haig, and even went so far as to tell his men that "the infantry would only have to walk over to take possession."
German preparation on the eve of battle
The German Army, on the defence, held the high ground and were aware of the intended attack; they had been practically unmolested since October 1914, which had allowed the time needed to construct extensive trench lines and deep shellproof bunkers. British intelligence had underestimated the strength of the German defences. The trenches that they had built were thirty feet wide, and in fact could and did hold up to any artillery barrage the British could muster. The wire that the Germans had constructed in front of their positions would require a lot more to break through, and any shells that happened to strike the wire had merely tangled it more, making it even more dangerous. A report from a senior British officer in the field, General Aylmer Hunter-Weston of the VIII Corps, added to the myth that the wire could be cut by bombardment when he wrote that "the troops could walk in". However, this directly contradicted a junior officer that was serving under his command, who saw that the wire had not been removed effectively, that he "could see it standing strong and well." Any wire that would remain on the front line in an offensive would mean certain death for attacking infantry.
Battle of Albert
First day
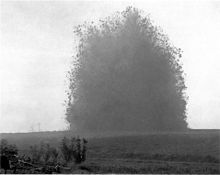
Picture - Explosion of the Hawthorn Ridge mine, 7:20 am, 1 July 1916. A still from one of the earliest examples of combat photography to remain unedited. Photo by Ernest Brooks.
Zero hour
Zero hour was officially set at 7:30 am for 1 July 1916. Ten minutes prior to zero hour, an officer detonated a 40,000-pound (18,000 kg) mine beneath Hawthorn Ridge Redoubt. Originally the mine was supposed to be set off at zero hour, but as the VIII Corps commander, Lt-Gen Hunter-Weston, remembered, both the 29th Division commander and the Brigade commander that were involved in the planning fought for ten minutes prior to zero hour. He said that they were concerned about large pieces harming the advancing British infantry. A Royal Engineer in the 252nd Tunnelling Company confirmed this, saying after the war that after he complained about the earlier time to the VIII Corps staff, they told him that the reason for the time was that they "feared the results of their men going across." Soon after, the remaining mines were set off, with the exception of one mine at Kasino Point, which detonated at 7:27 a.m. When zero hour came, there was a brief and unsettling silence as artillery shifted their aim to a new line of targets, and the time of the infantry to advance had come.
"Before the blackness of their burst had thinned or fallen the hand of time rested on the half-hour mark, and all along that old front line of the English there came a whistling and a crying. The men of the first wave climbed up the parapets, in tumult, darkness, and the presence of death, and having done with all pleasant things, advanced across No Man's Land to begin the Battle of the Somme."
The offensive begins
The attack was made by thirteen British divisions- eleven from the Fourth Army and two from the Third Army) north of the Somme River and eleven divisions of the French Sixth Army just to the south of the river. They were opposed by the German Second Army of General Fritz von Below. The axis of the advance was centred on the Roman road that ran from Albert in the west to Bapaume 12 miles (19 km) to the northeast.
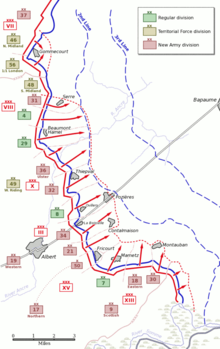
Picture - British infantry attack plan for 1 July. The only success came in the south at Mametz and Montauban and on the French sector.
Before the infantry moved, the artillery had been called into action. Barrages in the past had depended on surprise and poor German bunkers for success; however, these conditions did not exist in the area of the Somme. To add to the difficulties involved in penetrating the German defences, of 1,437 British guns, only 467 were heavies, and just 34 of those were of 9.2" (234 mm) or greater calibre. In the end, only 30 tons of explosive would fall per mile of British front. Of the 12,000 tons fired, two thirds of it was shrapnel and only 900 tons of it was capable of penetrating bunkers. To make matters worse, British gunners lacked the accuracy to bring fire in on close German trenches, keeping a safe separation of 300 yards (275 m), compared to the French gunners' 60 yards (55 m)-and British troops were often less than 300 yd (270 m) away, meaning German fortifications were untouched by the barrage. The infantry then crawled out into no man's land early so they could rush the front German trench as soon as the barrage lifted. Despite the heavy bombardment, many of the German defenders had survived, protected in deep dugouts and they were able to inflict a terrible toll on the infantry.
North of the Albert-Bapaume road, the advance was almost a complete failure. Communications were completely inadequate, as commanders were largely ignorant of the progress of the battle. A mistaken report by General Beauvoir De Lisle of the 29th Division proved to be fatal. By misinterpreting a German flare as success by the 87th Brigade at Beaumont Hamel, it led to the reserves being ordered forward.
Picture - A wounded man of the Newfoundland Regiment is brought in at Beaumont Hamel
The eight hundred and one men from the 1st Newfoundland Regiment marched onto the battlefield from the reserves and only 68 made it out unharmed with over 500 of 801 dead. This one day of fighting had snuffed out a major portion of an entire generation of Newfoundlanders. British attacks astride the Albert-Bapaume road also failed, despite the explosion of two mines at La Boisselle. Here another tragic advance was made by the Tyneside Irish Brigade of the 34th Division, which started nearly one mile from the German front line, in full view of German machine guns. The Irish Brigade was wiped out before it reached the front trench line.
In the sector south of the Albert-Bapaume road, the British and French divisions found greater success. Here the German defences were relatively weak, and the French artillery, which was superior in numbers and experience to the British, was highly effective. From the town of Montauban to the Somme River, all the first-day objectives were reached. Though the French XX Corps was to only act in a supporting role in this sector, in the event they would help lead the way. South of the Somme, French forces fared very well, surpassing their objectives. The I Colonial Corps departed their trenches at 9:30 am as part of a feint meant to lure the Germans opposite into a false sense of security. The feint was successful as, like the French divisions to the north, they advanced 5 miles (8.0 km). They had stormed Fay, Dompierre and Becquincourt, extending the capture of German lines along a fourteen mile front from Mametz to Fay. To the right of the Colonial Corps, the XXXV Corps also attacked at 9:30 am but, having only one division in the first line, had made less progress. The German trenches had been overwhelmed, and the enemy had been surprised by the attack. Over 3,000 German prisoners had been taken and the French had captured 80 German guns.
Overall, the first day on the Somme was a failure for the Allied forces. The British had suffered 19,240 dead, 35,493 wounded, 2,152 missing and 585 prisoners for a total loss of 57,470. This meant that in one day of fighting, 20% of the entire British fighting force had been killed, in addition to the complete loss of the Newfoundland Regiment as a fighting unit. Haig and Rawlinson did not know the enormity of the casualties and injuries from the battle and actually considered resuming the offensive as soon as possible. In fact, Haig, in his diary the next day, wrote that "...the total casualties are estimated at over 40,000 to date. This cannot be considered severe in view of the numbers engaged, and the length of front attacked."
Resumption of the attack: 2-13 July
Picture - An aerial view of the Somme battlefield in July, taken from a British balloon near Bécourt
German reaction by the General Staff to the first day's events was one of utter surprise; they did not expect such a large-scale attack by the British. General Erich von Falkenhayn, agitated by the additional losses in one sector of the Somme front, sacked the Chief of Staff of the Second Army and replaced him with then Colonel Fritz von Lossberg, his operations officer. He did not readily accept this promotion, as he vehemently disagreed with the conduct of the offensive at Verdun. He wanted it stopped, and Falkenhayn agreed to this condition. He ultimately took command of the Second Army, but Falkenhayn did not keep his promise, and attacks in the Verdun sector still went on. Von Lossberg contributed greatly to the German defence in his part of the front, scrapping the old ideas of front line defence with a new 'defence in depth' idea. Lines of German defenders would be held in reserve, poised at the ready while the thin front line would ensure a much smaller amount of casualties.
Assessments by Haig and Rawlinson on 2 July were lacking in the failure to secure objectives during the first day of the offensive. Despite this, planning for their next move was conducted between Haig, Rawlinson, and Joffre. Haig felt that gains in the south should be exploited where the advance had made the most gains. Rawlinson wanted to stick to the original plan by pressing along the entire front. Joffre not only firmly stood behind an assault to capture the heights of Thiepval Ridge, but he ordered Haig to follow this course. Haig would not agree to this despite the order, and Joffre then referred him to General Foch to settle the matter. Foch remembers that Haig was "upset with his losses... and that therefore he was not much inclined to attack again at Thiepval-Serre, but proposed to exploit the success farther south. This infuriated Joffre, who simply went for Haig, and was quite brutal."
The decisive issue of the war depends on the victory of the Second Army on the Somme. We must win this battle in spite of the enemy's temporary superiority in artillery and infantry. The important ground lost in certain places will be recaptured by our attack after the arrival of reinforcements. The vital thing is to hold on to our present positions at all costs and to improve them. I forbid the voluntary evacuation of trenches. The will to stand firm must be impressed on every man in the army. The enemy should have to carve his way over heaps of corpses..."
On the morning of 3 July, the northern part of the front bisected by the Albert-Bapaume road had been a problem for the British, as only a part of La Boisselle had been taken. The road to Contalmaison beyond La Boisselle was important to the British because the town of Contalmaison enjoyed a high position where the Germans protected their artillery, a focal point in the center of the front line. The position south of the Albert-Bapaume road proved to be much more favourable to the advancing British, where they had achieved partial success. The line from Fricourt to Mametz Wood and on to Delville Wood near Longueval was overrun in due course, however the line beyond was more difficult to navigate because of dense forests.
As the British struggled to jump-start their offensive, the French continued their rapid advance south of the Somme. By 3 July, only three of the twelve original divisions of the British slated for attack had been active since the first day. Since a period of stagnation had set in on the British part of the front, a simmering hostility rose up among the rank and file of the French army. Officers in the Sixth Army even went so far as to call the offensive that had taken place so far "for amateurs by amateurs." Despite the negative feelings, the I Colonial Corps pressed on, and by the end of the day, Méréaucourt Wood, Herbécourt, Buscourt, Chapitre Wood, Flaucourt, and Asseviller were all in French hands. The first town to be captured, Frise, held a 77-gun battery that was found completely intact by French soldiers. In so doing, 8,000 Germans had been made prisoner, while the taking of the Flaucourt plateau would allow Foch to move heavy artillery up to support the XX Corps on the north bank.
The French continued their attack on 5 July as Hem was taken. On 8 July, Hardecourt-aux-Bois and Monacu Farm (a veritable fortress, surrounded by hidden machine-gun nests in the nearby marsh) both fell, followed by Biaches, Maisonnette, and Fortress Biaches on 9 July and 10 July.
Result of the battle
Thus, in ten days of fighting, on nearly a 12½ mile (20 km) front, the French 6th Army had progressed as far as six miles (10 km) at points. It had occupied the entire Flaucourt plateau (which constituted the principal defence of Péronne) while taking 12,000 prisoners, 85 cannon, 26 minenwerfers, 100 machine guns, and other assorted materials, all with relatively minimal losses.
For the British, the first two weeks of the battle had degenerated into a series of disjointed, small-scale actions, ostensibly in preparation for making a major push. From 3 to 13 July, Rawlinson's Fourth Army carried out 46 "actions" resulting in 25,000 casualties, but no significant advance. This demonstrated a difference in strategy between Haig and his French counterparts and was a source of friction. Haig's purpose was to maintain continual pressure on the enemy, while Joffre and Foch preferred to conserve their strength in preparation for a single, heavy blow.
Battle of Bazentin Ridge
On 14 July, the Fourth Army was finally ready to resume the offensive in the southern sector. The attack was aimed at capturing the German second defensive position which ran along the crest of the ridge from Pozix¨res, on the Albert-Bapaume road, south-east towards the villages of Guillemont and Ginchy. The objectives were the villages of Bazentin le Petit, Bazentin le Grand and Longueval, which was adjacent to Delville Wood. Beyond this line, on the reverse slope of the ridge, lay High Wood.
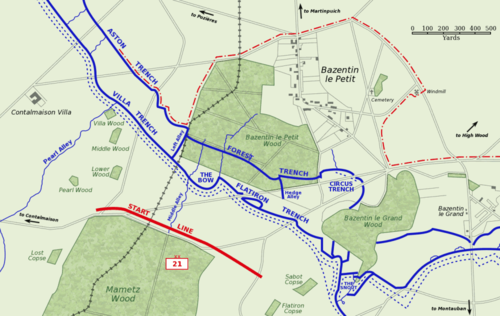
Picture - The British 21st Division attack on Bazentin le Petit, 14 July 1916. The area captured by 9.00 am is shown by the dashed red line.
The preparation and execution of this attack contrasts sharply with that of 1 July. The attack on Bazentin Ridge was made by four divisions on a front of 6,000 yards (5.5 km) with the troops going over before dawn at 3:25 am after a surprise five-minute artillery bombardment. The artillery laid down a creeping barrage, and the attacking waves pushed up close behind it in no man's land, leaving them only a short distance to cross when the barrage lifted from the German front trench.
By mid-morning the first phase of the attack was a success with nearly all objectives taken, a gap also being made in the German defences. However, the British were unable to successfully exploit it. Their attempt to do so created the most famous cavalry action of the Battle of the Somme, when the 7th Dragoon Guards and the 2nd Deccan Horse attempted to capture High Wood. It is likely the infantry could have captured the wood in the morning, but by the time the cavalry were in position to attack, the Germans had begun to recover. Though the cavalry held on in the wood through the night of 14 July, they had to withdraw the following day.
The British had a foothold in High Wood and would continue to fight over it as well as Delville Wood, neighbouring Longueval, for many days. Unfortunately for them, the successful opening attack of 14 July did not mean they had learnt how to conduct trench battles. On the night of 22 July, Rawlinson launched an attack using six divisions along the length of the Fourth Army front that failed completely. The Germans were learning; they had begun to move away from trench-based defences and towards a flexible defence in depth system of strongpoints that was difficult for the supporting artillery to suppress.
Pozix¨res and Mouquet Farm
23 July - 8 August 1916
No significant progress was made in the northern sector in the first few weeks of July. Ovillers, just north of the Albert-Bapaume road, was not captured until 16 July. Its capture, and the foothold the British had obtained in the German second position on 14 July, meant that the chance now existed for the German northern defences to be taken in the flank. The key to this was Pozix¨res. The village of Pozix¨res lay on the Albert-Bapaume road at the crest of the ridge. Just behind (east) the village ran the trenches of the German second position. The Fourth Army made three attempts to seize the village between 14 and 17 July before Haig relieved Rawlinson's army of responsibility for its northern flank. The capture of Pozix¨res became a task for Gough's Reserve Army, and the tool he would use was the two Australian and one New Zealand divisions of I Anzac Corps.
Picture - The ruins of Pozix¨res looking north, 28 August
Gough wanted the Australian 1st Division to attack immediately, but the division's British commander, Major General Harold Walker, refused to send his men in without adequate preparation. The attack was scheduled for the night of 23 July to coincide with the Fourth Army attack of 22-23 July.
Going in shortly after midnight, the attack on Pozix¨res was a success, largely thanks to Walker's insistence on careful preparation and an overwhelming supporting bombardment. Despite this success, however, an attempt to capture the neighbouring German second position failed, though two Australians were awarded the Victoria Cross in the attempt. The Germans, recognising the critical importance of the village to their defensive network, made three unsuccessful counter-attacks before beginning a prolonged and methodical bombardment of the village. The final German effort to reclaim Pozix¨res came before dawn on 7 August following a particularly heavy bombardment. The Germans overran the forward Anzac defences, and a wild mxªlée developed from which the Anzacs emerged victorious.
Gough planned to drive north along the ridge towards Mouquet Farm, allowing him to threaten the German bastion of Thiepval from the rear. However, the further the Australians and New Zealanders advanced, the deeper was the salient they created such that the German artillery could concentrate on them from three directions.
Picture - The plateau north and east of Pozix¨res, 28 August
On 8 August the Anzacs began pushing north along the ridge with the British II Corps advancing from Ovillers on their left. By 10 August a line had been established just south of the farm, which the Germans had turned into a fortress with deep dugouts and tunnels connecting to distant redoubts. The Anzacs made numerous attempts to capture the farm between 12 August and 3 September, inching closer with each attempt; however, the German garrison held out. The Anzacs were relieved by the Canadian Corps, who would briefly capture Mouquet Farm on 16 September, the day after the next major British offensive. The farm was finally overrun on 26 September, and the garrison surrendered the following day.
By the time New Zealand's artillery gunners were withdrawn from the line in October 1916, they had fired more than 500,000 shells at the Germans.
In the fighting at Pozix¨res and Mouquet Farm, the Australian divisions suffered over 23,000 casualties, of which 6,741 were killed. If the losses from Fromelles on 19 July are included, Australia had sustained more casualties in six weeks in France than they had in the eight months of the Battle of Gallipoli. The New Zealanders suffered 8,000 casualties in six weeks - nearly one per cent of their nation's population. These losses were about the same as New Zealand suffered in eight months at Gallipoli.
Attrition: August and September
Picture - Men from The Wiltshire Regiment attacking near Thiepval, 7 August. Photo by Ernest Brooks
By the start of August, Haig had accepted that the prospect of achieving a breakthrough was now unlikely; the Germans had "recovered to a great extent from the disorganisation" of July. For the next six weeks, the British would engage in a series of small-scale actions in preparation for the next major push. On 29 August the German Chief of the General Staff, Erich Falkenhayn, was replaced by General Paul von Hindenburg, with General Erich Ludendorff as his deputy, but in effect the operational commander. The immediate effect of this change was the introduction of a new defensive doctrine. On 23 September the Germans began constructing the Siegfried Stellung, called the Hindenburg Line by the British.
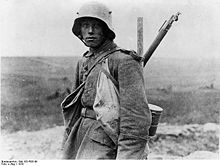
Picture - A young German Sommekx¤mpfer in 1916
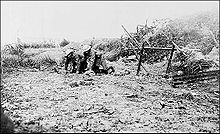
On the Fourth Army's front, the struggle for High Wood, Delville Wood and the Switch Line dragged on. The boundary between the British and French armies lay south-east of Delville Wood, beyond the villages of Guillemont and Ginchy. Here the British line had not progressed significantly since the first day of the battle, and the two armies were in echelon, making progress impossible until the villages were captured. The first British effort to seize Guillemont on 8 August was a debacle. On 18 August a larger effort began, involving three British corps as well as the French, but it took until 3 September before Guillemont was in British hands. Attention now turned to Ginchy, which was captured by the British 16th (Irish) Division on 9 September. The French had also made progress, and once Ginchy fell, the two armies were linked near Combles.
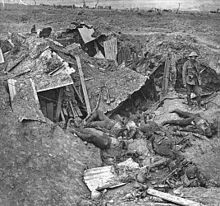
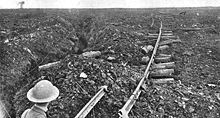
Picture - A demolished German trench and dugout near Guillemont
The British now had an almost straight front line from near Mouquet Farm in the north-west to Combles in the south-east, providing a suitable jumping-off position for another large-scale attack. In 1916 a straight front was considered necessary to enable the supporting artillery to lay down an effective creeping barrage behind which the infantry could advance.
This intermediate phase of the Battle of the Somme had been costly for the Fourth Army, despite there being no major offensive. Between 15 July and 14 September (the eve of the next battle), the Fourth Army made around 90 attacks of battalion strength or more with only four being general attacks across the length of the army's five miles (8 km) of front. The result was 82,000 casualties and an advance of approximately 1,000 yards (915 m)-a performance even worse than on 1 July.
Debut of the tank
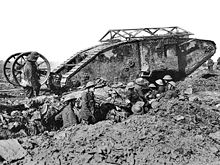
Picture - C-15, a British Mark I "male" tank, 25 September 1916. Photo by Ernest Brooks.
The last great Allied effort to achieve a breakthrough came on 15 September in the Battle of Flers-Courcelette with the initial advance made by 11 British divisions (nine from Fourth Army, two Canadian divisions on the Reserve Army sector) and a later attack by four French corps.
The battle is chiefly remembered today as the debut of the tank. The British had high hopes that this secret weapon would break the deadlock of the trenches. Early tanks were not weapons of mobile warfare-with a top speed of 2 mph (3.2 km/h), they were easily outpaced by the infantry-but were designed for trench warfare. They were untroubled by barbed wire obstacles and impervious to rifle and machine gun fire, though highly vulnerable to artillery. Additionally, the tanks were notoriously unreliable; of the 49 tanks available on 15 September, only 32 made it to the start line, and of these, only 21 made it into action. Mechanical breakdowns were common, and many others became bogged or ditched in the shell holes and trenches of the churned battlefield.
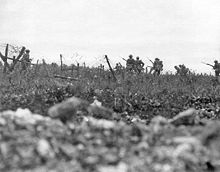
Picture - New Zealand infantry in the Switch Line
The British made gains across the length of their front, the greatest being in the centre at Flers with an advance of 3,500 yards (3.2 km), a feat achieved by the newest British division in France, the 41st Division, in their first action. They were supported by several tanks, including D-17 (known as Dinnaken) which smashed through the barbed wire protecting the village, crossed the main defensive trench and then drove up the main street, using its guns to destroy defenders in the houses. This gave rise to the optimistic press report: "A tank is walking up the High Street of Flers with the British Army cheering behind."
It was also the first major Western Front battle for the New Zealand Division, at the time part of the British XV Corps, which captured part of the Switch Line west of Flers. On the left flank, the Canadian 2nd Division particularly with the efforts of the French Canadian 22nd Battalion (the 'Van Doos') and the 25th Battalion (the Nova Scotia Rifles) captured the village of Courcelette after heavy fighting, with some assistance from two tanks. And finally after two months of fighting, the British captured all of High Wood, though not without another costly struggle. The plan was to use tanks in support of infantry from the 47th (1/2nd London) Division, but the wood was an impassable landscape of shattered stumps and shell holes, and only one tank managed to penetrate any distance. The German defenders were forced to abandon High Wood once British progress on the flanks threatened to encircle them.
Picture - British infantry advancing near Ginchy during the Battle of Morval, 25 September. Photo by Ernest Brooks.
The British had managed to advance during Flers-Courcelette, capturing 4,500 yards (4.1 km) of the German third position, but fell short of all their objectives, and once again the breakthrough eluded them. The tank had shown promise, but its lack of reliability limited its impact, and the military tactics of tank warfare were obviously in their infancy.
The least successful sector on 15 September had been east of Ginchy, where the Quadrilateral redoubt had held up the advance towards Morval-the Quadrilateral was not captured until 18 September. Another attack was planned for 25 September with the objectives of the villages of Thiepval; Gueudecourt, LesbÅufs and Morval. Like the Battle of Bazentin Ridge on 14 July, the limited objectives, concentrated artillery and weak German defences resulted in a successful attack and, although the number of tanks deployed was small, the tanks provided useful assistance in the destruction of machine gun positions.
Final phase
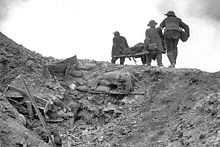
Picture - Stretcher bearers recovering wounded during the Battle of Thiepval Ridge, September 1916. Photo by Ernest Brooks.
On 26 September Gough's Reserve Army launched its first major offensive since the opening day of the battle in an attempt to capture the German fortress of Thiepval. The 18th (Eastern) Division, which had excelled on 1 July, once more demonstrated by capturing most of Thiepval on the first day that careful training, preparation and leadership could overcome the obstacles of trench warfare. Mouquet Farm finally fell to the 11th (Northern) Division, and the Canadians advanced 1,000 yards (915 m) from Courcelette.
There followed a period from 1 October to 11 November, known as the Battle of the Ancre Heights, of grinding attritional fighting for little gain. At the end of October, Gough's army was renamed the British Fifth Army.
Meanwhile on the Fourth Army's front, Haig was still under the illusion that a breakthrough was imminent. On 29 September he had outlined plans for Allenby's Third Army to rejoin the battle in the north around Gommecourt and for the Fourth Army to attack towards Cambrai. The first step required the capture of the German Transloy Line, effectively the German fourth defensive position that ran from the village of Le Transloy in the east to Le Sars on the Albert-Bapaume road.
Opening on 1 October, the Battle of Le Transloy became bogged down as the weather broke, and heavy rain turned the churned battlefield into a quagmire. Le Sars was captured on 7 October, but elsewhere there was little progress and a continual flow of casualties. The final throe came on 5 November with a failed attack on the Butte de Warlencourt. On the Fourth Army's front, major operations in the Battle of the Somme had now ceased.
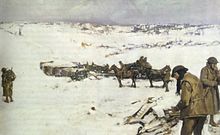
Picture - Mametz, Western Front, a winter scene by Frank Crozier
The final act of the Battle of the Somme was played out between 13 and 18 November along the Ancre River, north of Thiepval. Haig's purpose for the attack was more political than military-with winter setting in, there was no longer any prospect of a breakthrough. Instead, with another conference at Chantilly starting on 15 November, he hoped to be able to report a success to his French counterparts.
The opening moves were almost a replay of 1 July, even down to another mine being detonated beneath Hawthorn Ridge Redoubt west of Beaumont Hamel. The 31st Division had attacked Serre on 1 July and four and a half months later, was called on to do it again; the results were similar. South of Serre, the British, with the benefit of their hard-earned experience, succeeded in capturing most of their objectives. The 51st (Highland) Division took Beaumont Hamel, while on their right the 63rd (Royal Naval) Division captured Beaucourt-sur-l'Ancre, Lieutenant Colonel Bernard Freyberg winning the Victoria Cross in the process. South of the Ancre, II Corps had also made progress. After five weeks of attacking, the Canadian 4th Division finally took the formidable Regina Trench north of Courcelette on 11 November, and Desire Trench 400 yards beyond a week later.
Haig was satisfied with the result, but Gough argued for a final effort, which was made on 18 November with an attack on the Munich and Frankfurt Trenches and a push towards Grandcourt. Ninety men of the 16th Battalion, Highland Light Infantry (the "Glasgow Boys Brigade" Pals battalion) were cut off in Frankfurt Trench, where they held out until 21 November when the 45 survivors- thirty of them wounded-surrendered. So ended the Battle of the Ancre, and with it the Battle of the Somme.
Conclusion
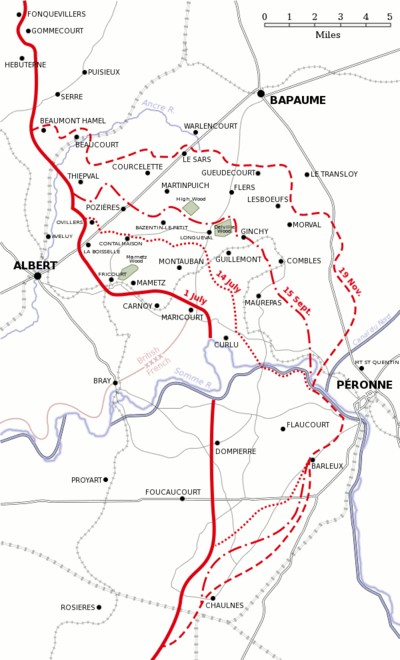
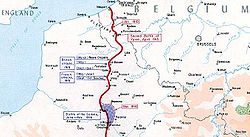
Picture - Progress of the Battle of the Somme between 1 July and 18 November
It is difficult to declare the Battle of the Somme a victory for either side. The British and French captured little more than 7-mile (11 km) at the deepest point of penetration-well short of their original objectives. The British themselves had gained approximately only two miles and lost about 420,000 soldiers in the process, meaning that a centimetre cost about two men. A group of British and Commonwealth historians have since the 1960s argued against the long-held consensus that the battle was a disaster; arguing that the Battle of the Somme delivered more benefits for the British than it did for the Germans. As British historian Gary Sheffield said, "The battle of the Somme was not a victory in itself, but without it the Entente would not have emerged victorious in 1918".
Strategic effects
Prior to the battle, Germany had regarded Britain as a naval power and discounted her as a military force to be reckoned with, believing Germany's major enemies were France and Russia. According to some historians, starting with the Somme, Britain began to gain influence in the coalition. In recognition of the growing threat she posed, on 31 January 1917, Germany adopted the policy of unrestricted submarine warfare in an attempt to starve the island nation of supplies. Other historians would argue Britain's growing influence in the war had nothing to do with the battle and everything to do with her great financial and industrial strength, which inevitably increased in importance in a stalemate war.
At the start of 1916, the British Army had been a largely inexperienced, but well trained mass of volunteers. The Somme was the first real test of this newly raised "citizen army" created following Lord Kitchener's call for recruits at the start of the war. It is accurate to observe that many British soldiers who were killed on the Somme lacked experience, but unwise to conclude, as some historians may have done, that their loss was of little military significance. These soldiers had been the first to volunteer and so were often the fittest, most enthusiastic and best educated citizen soldiers. For Germany, which had entered the war with a trained force of regulars and reservists, each casualty was sapping the experience and effectiveness of the German army. The German Army Group Commander Crown Prince Rupprecht of Bavaria stated: "What remained of the old first-class peace-trained German infantry had been expended on the battlefield". Despite being promoted to Field-Marshal, Rupprecht infuriated the new German High Command (Hindenburg and Ludendorff) by advising them to make peace. A war of attrition was better for Britain with her population of some fifty million than Germany whose population of some seventy million also had to sustain operations against the French and Russians.
One line of historial thought, held by William Philpott for example, holds that the Battle of the Somme placed unprecedented stresses on the German Army's manpower reserves, so much so that after battle it was unable to adequately replace casualties with the same calibre of soldier. This had the strategic implication that, by the end of the battle, the Allied and German armies were more evenly matched. However, whatever the strategic difficulties the German Army now found itself in, it had managed to prevent a complete rupture of its defences and had survived the battle as an effective fighting force. Moreover, it had done so despite facing significant strategic pressure from Russia and whilst conducting a concurrent invasion of Romania. Importantly, in 1917, the Germans were still able to defend effectively against British and French attacks at Arras, Champagne (the Nivelle Offensive), and Passchendaele.
On 24 February 1917, the German army made a strategic scorched earth withdrawal from the Somme battlefield to the prepared fortifications of the Hindenburg Line, thereby shortening the front line they had to occupy. The purpose of military commanders is not to test their army to destruction, and it has been suggested German commanders did not believe the army could endure continual battles of attrition like the Somme. Loss of German territory was repaid many times over in the strengthening of defensive lines, an option which was not open to the Allies because of the political impossibility of surrendering French or Belgian territory (despite Napoleon's commonsense dictum about the advantages of sacrificing ground).
The strategic effects of the Battle of the Somme cannot obscure the fact it was one of the costliest battles of the First World War. A German officer, Friedrich Steinbrecher, wrote:
-Friedrich Steinbrecher
Another, Captain von Hentig, described the Battle of the Somme as "the muddy grave of the German Field Army".
Commemoration of the Battle of the Somme
For their efforts on the first day of the battle, The 1st Newfoundland Regiment was given the name "The Royal Newfoundland Regiment" by George V on 28 November 1917. Because of the slaughter, the first day of the Battle of the Somme is still commemorated in Newfoundland, remembering the "Best of the Best" at 11 am on the Sunday nearest to 1 July.
The Somme has iconic status in Northern Ireland due to the participation of the 36th (Ulster) Division. Since 1916 the first of July has been marked in commemoration by veterans' groups and also by unionist/Protestant groups such as the Orange Order. Since the start of the Northern Irish Troubles the date has become associated primarily with the Orange Order and is regarded by some as simply a part of the 'marching season', with no particular connection to the Somme. However the British Legion and others still commemorate the battle on July first.
Casualties
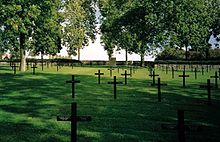
Picture - Fricourt German war cemetery has 10,000 dead from the Somme battle
The original Allied estimate of casualties on the Somme, made at the Chantilly conference on 15 November, was 485,000 British and French casualties versus 630,000 German. These figures were used to support the argument that the Somme was a successful battle of attrition for the Allies. However, there was considerable scepticism at the time of the accuracy of the counts. After the war a final tally showed that 419,654 British and 204,253 French were killed, wounded, or taken prisoner; of the 623,907 total casualties, 146,431 were either killed or missing. According to newer sources (and to Winston Churchill) German losses in the categories dead, missed, wounded were astoundingly low (237,009). The Somme meant attrition on the Allied side. (The Somme, Prior and Wilson, Yale University Press 2005)
The British official historian Sir James Edmonds maintained that German losses were 680,000, but this figure has been discredited. A separate statistical report by the British War Office concluded that German casualties on the British sector could be as low as 180,000 during the battle. In compiling his biography of General Rawlinson, Major-General Sir Frederick Maurice was supplied by the Reichsarchiv with a figure of 164,055 for the German killed or missing.
The average casualties per division (consisting of circa 10,000 soldiers) on the British sector up until 19 November was 8,026-6,329 for the four Canadian divisions, 7,408 for the New Zealand Division, 8,133 for the 43 British divisions and 8,960 for the three Australian divisions. The British daily loss rate during the Battle of the Somme was 2,943 men, which exceeded the loss rate during the Third Battle of Ypres but was not as severe as the two months of the Battle of Arras (1917) (4,076 per day) or the final Hundred Days offensive in 1918 (3,685 per day).
The Royal Flying Corps lost 782 aircraft and 576 pilots during the battle.
Also killed was an American-born soldier, Harry Butters, serving in the British Royal Artillery - the first American casualty in the First World War.
Adolf Hitler, then a member of the 6th Bavarian Reserve Division, fought in the Battle of the Somme and was wounded, taking a bullet to the leg on 7 October 1916.
Notable deaths
Augustin Cochin (French historian)
Alan Seeger (American poet, volunteered in the French Foreign Legion)
Alban Arnold (British cricketer)
Raymond Asquith (British barrister and son of the then Prime Minister)
William Baker (British footballer)
Guy Baring (British politician)
Donald Simpson Bell (British footballer)
Major Booth (British cricketer)
William Buckingham (British recipient of the Victoria Cross)
William Burns (British cricketer)
George Butterworth (British composer)
Geoffrey Cather (British recipient of the Victoria Cross)
Cecil Christmas (British footballer)
Christopher Collier (British cricketer)
Billy Congreve (British recipient of the Victoria Cross)
William Crozier (Irish cricketer)
Bernard Donaghy (Irish footballer)
Edward Dwyer (British recipient of the Victoria Cross)
Charles Duncombe, 2nd Earl of Feversham (British politician)
Alfred Flaxman (British athlete)
Alan Foster (British footballer)
Rowland Fraser (British rugby union player)
Albert Gill (British recipient of the Victoria Cross)
Duncan Glasfurd (British army officer)
John Leslie Green (British recipient of the Victoria Cross)
Billy McFadzean (Irish recipient of the Victoria Cross)
Order of battle
See: Battle of the Somme: order of battle
List of Canadian battles during World War I
Buchan, John (1917). The Battle of the Somme. New York: George H. Doran Company.
Nomenclature Committee as approved by Army Council (1922). Cmnd 1138. ed. Report of the Battles of the Somme. London: HMSO.
Duffy, Christopher (2006). Through German eyes: The British and the Somme 1916. London: Weidenfeld & Nicholson.
Gilbert, Martin, Sir (2006). The Somme: Heroism and Horror in the First World War. Henry Holt and Company. ISBN 0-8050-8127-5.
Griffith, Paddy (1994). Battle Tactics of the Western Front; The British Army's Art of Attack 1916-1918. Yale University Press. ISBN 0-300-05910-8.
Hart, Peter (2006). The Somme. London: Cassell. ISBN 9780304367351.
Keegan, John (1998). The First World War. London: Random House. ISBN 0091801788.
Liddell-Hart, B. H. (1932). Foch: The Man of Orleans. Boston, Little, Brown & Company.
Liddell-Hart, B. H. (1970). History of the First World War (3rd (1973) ed.). Trowbridge: Redwood Burn Ltd..
Liddle, Peter, H. (2001). The 1916 Battle of the Somme: A Reappraisal. Hertfordshire: Wordsworth. ISBN 1840222409.
MacDonald, Lyn (1983). Somme 1916. Penguin Books. ISBN 0-14-017867-8.
Middlebrook, Martin (1971). The First Day on the Somme'. Penguin Books. ISBN 0-14-139071-9.
Neillands, Robin (2004). 'The Great War Generals on the Western Front 1914-1918. Magpie Books. ISBN 1-84119-863-3.
Nicholson, G. W. L. (1964). Canadian Expeditionary Force: 1915-1919. Queen's Printer and Controller of Stationery.
Philpott, William (2009). Bloody Victory: The sacrifice on the Somme and the making of the Twentieth Century (1st ed.). London: Little, Brown. ISBN 978-1-4087-0108-9.
Philpott, William (2010). Bloody Victory: The sacrifice on the Somme and the making of the Twentieth Century (paperback ed.). London: Abacus. ISBN 978-0-3491-2004-1.
Prior, Robin and; Wilson, Trevor (2005). The Somme (1st ed.). New Haven: Yale University Press. ISBN 0-300-10694-7.
Prior, Robin; Wilson, Trevor (2006). The Somme. Yale University Press.
Recouly, Raymond (1920). Jones, Mary Cadwalader. ed. Foch, The Winner of The War. Charles Scribner's Sons.
Reynolds, Francis Joseph; Churchill, Allen L.; Miller, Francis Trevelyan, eds (1916). The Story of the Great War: History of the European War from Official Sources. New York City: P. F. Collier & Son.
Sheffield, Gary (2003). The Somme. Cassell. ISBN 0304366498.
Robertshaw, Andrew (2006). Somme 1 July 1916: Tragedy and Triumph. Osprey Publishing.
Youel, Duncan (2006). The Somme: Then and Now-A Visual History. New York: Dorling Kindersley.
"The South African Military History Society". The South Africans at Delville Wood. pp. Military History Journal (S Afr MHJ) - Vol 7 No 2. Archived from the original on 25 July 2009. http://www.webcitation.org/5iXU0fHWz. Retrieved 23 July 2009.
"The Somme in Oral Histories of the First World War: Veterans 1914-1918". http://www.collectionscanada.ca/first-world-war/interviews/025015-1400-e.html. Retrieved 9 September 2009.
"Germany in World War 1". http://www.vlib.us/wwi/resources/germanarmywwi.html. Retrieved 9 September 2009.
"South African War Museum: Delville Wood". http://www.delvillewood.com/premiereguerre2.htm. Retrieved 9 September 2009.
More aircraft.
Source: WikiPedia