


First Battle of Gaza - Picture
More about World War 1

|
|

First Battle of Gaza
Date
26 March 1917
Location
Gaza, southern Palestine
Result
Ottoman victory
Date: 26 March 1917
Location: Gaza, southern Palestine
Result: Ottoman victory
Belligerents:
: Australia
United Kingdom
New Zealand
Commanders and leaders:
: Archibald Murray
Suez - Romani - Magdhaba - Rafa - 1st Gaza - 2nd Gaza - El Buggar - Beersheba - 3rd Gaza - Mughar Ridge - Jerusalem - Abu Tellul - Arara - Megiddo
The First Battle of Gaza was fought in and around the town of Gaza on the Mediterranean coast in the southern region of Ottoman Palestine on 26 March 1917 during World War I. Attacking the town was the British Empire's Egyptian Expeditionary Force which had won the Battle of Romani which secured the Suez Canal, the Battle of Magdhaba which secured the Mediterranean port of El Arish and the Battle of Rafa which completed the recapture of the Egyptian Sinai Peninsula and secured the Allied supply route, water pipeline and railway stretching from the canal.
Britain's three major war objectives were to maintain maritime supremacy, preserve the balance of power in Europe, and the security of Egypt, India, and the Persian Gulf. The latter could be secured by an advance into the Ottoman Empire to capture Jerusalem and ultimately cut off the Ottoman forces in Mesopotamia and on the Arabian Peninsula. As a first step, they needed to capture the Ottoman Army stronghold of Gaza which dominated the southern coastal route and encouragingly, the Ottoman Army just prior to the Gaza battle, on March 20 was considered to be "steadily deteriorating."
The attacking force of one infantry division, reinforced by one infantry brigade augmented by two mounted divisions to act as a screen and reinforcement to the infantry if necessary, was defeated.
Prelude
Allied operations in the Middle East during the war had always been secondary to the Western Front and General Sir Archibald Murray, commander of the Egyptian Expeditionary Force covering all troops in Egypt and the Mediterranean, was frequently required to send infantry divisions to France. In January 1917, Murray was required to send the British 42nd Division to France, leaving him with the 52nd (Lowland), 53rd (Welsh), 54th (East Anglian) and the newly formed 74th Infantry Divisions of dismounted yeomanry already in Egypt. These four infantry divisions and the Anzac and Imperial Mounted Divisions made up Murray's Eastern Force under the command of Lieutenant General Sir Charles Dobell. General Philip Chetwode, commanded Desert Column which included the two mounted divisions and 53rd (Welsh) Infantry Division. It was this latter infantry division which was required to make the attack on Gaza with the reinforcement of one brigade of Eastern Force's 54th Infantry Division.
Desert Column and the remainder of Eastern Force's 54th (East Anglian) Infantry Division were to defend the battleground from incursions and if necessary the mounted divisions were to reinforce the infantry attack. Since the Defence of the Suez Canal and the Battle of Romani, this was the first time infantry took a prominent part in battle; being responsible for the main attack on the town with its adjoining hill of Ali Muntar.
Ottoman Army Positions
For millennia the town of Gaza had been the gateway for invading armies traveling the coastal route to and from Egypt and the Levant. To prevent a modern, mobile army from out-flanking the fortress, the Ottomans held their main forces totaling 2 ½ to 3 divisions estimated to be between 6,000 and 16,000 rifles at Tel el Negile and HUJ with detachments at Gaza, Tel el Sheria, Jemmameh, Hareira and Beersheba. By the eve of this first Battle of Gaza there were probably 4,000 rifles defending the town, supported by two Austrian howitzer batteries (12 howitzers) and a German 10 cm battery (2 guns) with up to 50 guns in the surrounding area, 2000 rifles remained at Beersheba.
Picture - Ottoman Gun among the hedges near Gaza
Gaza and the surrounding areas strongly favoured defence. The town was separated from the Mediterranean Sea by about 2 miles (3.2 km) of sand hills to the west, and to the north, west and south stretching from a plateau about 200 feet (61 m) high down in to a hollow were orchards surrounded by impenetrable pickly pear hedges extended out for some three or four miles with the exception of the ridge extending southwards which culminated in the 300 feet (91 m) high Ali Muntar dominating the whole area.
In addition to these natural defences the Ottoman Army had constructed trenches and redoubts extending from the south west of the town virtually all the way round the town except for a gap to the north east, with additional defences on the ridge to the south of the town which incorporated Ali Muntar into the town entrenchments.
Attacking force
For the engagement General Dobell organised Eastern Force as follows : -
Desert Column - Lieutenant General Chetwode
53rd (Welsh) Infantry Division - Major General Dallas
158th Infantry Brigade
159th Infantry Brigade
160th Infantry Brigade
Anzac Mounted Division (less 1 ALH Brigade) - Major General Chauvel
2nd Light Horse Brigade - Brigadier General Ryrie
5th Light Horse Regiment
6th Light Horse Regiment
7th Light Horse Regiment
3rd Light Horse Brigade - Brigadier General Royston
8th Light Horse Regiment
9th Light Horse Regiment
10th Light Horse Regiment
New Zealand Mounted Rifles Brigade - Brigadier General Chaytor
Auckland Mounted Rifle Regiment
Canterbury Mounted Rifle Regiment
Wellington Mounted Rifle Regiment
22nd Mounted Yeomanry Brigade
1/1st Lincolnshire Yeomanry
Imperial Mounted Division (less 4 ALH Brigade) - Major General Hodgson
3rd Light Horse Brigade
5th Mounted Yeomanry Brigade
6th Mounted Yeomanry Brigade
Queen's Own Dorset Yeomanry
158th Infantry Brigade
159th Infantry Brigade
160th Infantry Brigade
2nd Light Horse Brigade - Brigadier General Ryrie
5th Light Horse Regiment
6th Light Horse Regiment
7th Light Horse Regiment
3rd Light Horse Brigade - Brigadier General Royston
8th Light Horse Regiment
9th Light Horse Regiment
10th Light Horse Regiment
New Zealand Mounted Rifles Brigade - Brigadier General Chaytor
Auckland Mounted Rifle Regiment
Canterbury Mounted Rifle Regiment
Wellington Mounted Rifle Regiment
22nd Mounted Yeomanry Brigade
1/1st Lincolnshire Yeomanry
5th Light Horse Regiment 6th Light Horse Regiment 7th Light Horse Regiment
8th Light Horse Regiment 9th Light Horse Regiment 10th Light Horse Regiment
Auckland Mounted Rifle Regiment Canterbury Mounted Rifle Regiment Wellington Mounted Rifle Regiment
1/1st Lincolnshire Yeomanry
3rd Light Horse Brigade
5th Mounted Yeomanry Brigade
6th Mounted Yeomanry Brigade
Queen's Own Dorset Yeomanry
Queen's Own Dorset Yeomanry
Eastern Force Troops
Imperial Camel Corps Brigade
52nd (Lowland) Infantry Division - Major General W.E.B. Smith
155th Infantry Brigade
156th Infantry Brigade
157th Infantry Brigade
54th (East Anglian) Infantry Division - Major General S.W. Hare
161st Infantry Brigade
162nd Infantry Brigade
163rd Infantry Brigade
155th Infantry Brigade
156th Infantry Brigade
157th Infantry Brigade
161st Infantry Brigade
162nd Infantry Brigade
163rd Infantry Brigade
Artillery
A. & N.Z. Mounted Division 4 Batteries RHA of 4 18-pdrs = 16 guns
Imperial Mounted Division 4 Batteries RHA of 4 18-pdrs = 16 guns
Imperial Camel Brigade 1 Camel Pack Battery of 6 2.75-inch = 6 guns
53rd Division (3 Brigades RFA 12 18-pdrs=24 guns) 4 of each battery only = 16 guns; 4 4.5-inch howitzers = 8 howitzer
54th Division (3 Brigades RFA 12 18-pdrs=24 guns) 4 of each battery only = 16 guns; 4 4.5-inch howitzers = 8 howitzer
Army Troops (3 Batteries of 4 60-pdrs=12 guns) one section only = 6 guns.
Desert Column force was supported by Eastern Force's Imperial Camel Corps Brigade, the 54th Infantry Division, less one brigade back on the Suez Canal Defences, No. 7 Light Car Patrol and 5th Wing Royal Flying Corps. One brigade of 74th Infantry Division (only partly established) and Nos 11 and 12 Armoured Motor Batteries remained directly under the command of General Dobell.
This large force of 22,000 consisted of the attack force of 12,000 infantry with between 36 and 96 field guns and 16 howitzers, supported by 11,000 mounted troops which were required to cut off Gaza from Ottoman Army reinforcements located nearby at Tel el Sheria, Jemmameh, Hareira, Negile, Huj and Beersheba. The 52nd (Lowland) Infantry Division remained at Rafa providing 8,000 men to protect the lines of communication, the Wadi el Arish crossing and covering Khan Yunus from an attack on the flank. This Division had seen action at the Battle of Romani but was too far away from Gaza to take any part in the attack.
Defending force

Picture - Regimental Officers who successfully defended Gaza
Defending Gaza (Group Tiller)
79th Infantry Regiment
81st Infantry Regiment
125th Infantry Regiment
79th Infantry Regiment
81st Infantry Regiment
125th Infantry Regiment
Reinforcements (10,000 to 12,000)
3rd Infantry Division
16th Infantry Division
47th Infantry Regiment
48th Infantry Regiment.
3rd Infantry Division
16th Infantry Division
47th Infantry Regiment
48th Infantry Regiment.
47th Infantry Regiment
48th Infantry Regiment.
Plan of attack
The plan produced by General Dobell and his staff was similar to those which were successfully implemented at Magdhaba by Major General Chauvel and at Rafa by Lieutenant General Chetwode; Gaza was to be surrounded and stormed before the Ottoman Army could bring up reinforcements. Once more the attackers could expect a determined defence from Ottoman soldiers established in formidable fortified entrenchments and redoubts but on a larger scale.
The main attack on Gaza would come from the south by the 53rd Infantry Division supported by one brigade of 54th Infantry Division. The remaining brigade of 54th Infantry Division would protect the battleground from incursion to the south east at the southern end of the mounted screen. Formed by the two mounted divisions which would circle around Gaza to the north and east to isolate the garrison, this screen would cut the main roads to the north and east to stop Ottoman reinforcements reaching the town from nearby garrisons.
Plan of defence
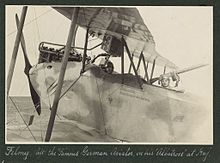
Picture - Felmy in his Albatros at Huj
Kress von Kressenstein, commander of the Ottoman First Expeditionary Force, was aware of the British concentration from aerial reconnaissance and deployed most of his force away from Gaza. British intelligence had assessed that they would not fight hard for Gaza because Kress's plan was to use the 3rd and 16th Infantry Divisions and the 3rd Cavalry Division to encircle the attacking force and cut the Sinai railway and water pipeline in the rear of the attacking force. A total of 12,000 out of the available 16,000 Ottoman soldiers were moving west to attack the British right flank by nightfall on the day of battle.
Preparations
On 25 March Anzac Mounted Division left their bivouacs in two columns; New Zealand Mounted Rifles and 22nd Mounted Yeomanry Brigades marched from Bir Abu Shunnar at 0230 up the beach and went out in front to hold a line just south of the Wadi Ghuzzeh - to cover reconnaissances to be made by the Staff in order to determine the best place at which to cross the deep dry wadi; a formidable obstacle for both infantry and mounted troops in their advance on Gaza. The second column consisting of Anzac Mounted Division Headquarters, Signal Squadron, Field Artillery and 2nd Light Horse Brigade arrived half a mile south west of Deir el Belah at 0830 when 2nd Light Horse Brigade (Divisional Reserve) and remainder of the column moved to Hill 130 and bivouaced. Divisional and Desert Column Headquarters were established on Hill 310 and a crossing over the Wadi Ghuzzee chosen near Wadi Sharta and marked.

Picture - Von Kress and Colonel Gott at Huj, 1916
At 1530 the Imperial Mounted Division led by the 3rd Light Horse Brigade marched out of camp at Marakeb heading for Deir el Belah about 6 hours or 18 miles (29 km) away. The brigades and their Machine Gun Squadrons were accompanied by their Mobile Veterinary Sections and the 3rd Light Horse Field Ambulance. Expecting to be away 5 days, the troops had already received their rations for the 25 March and the rations for 26 and 27 March were to be brought forward during the night of 25/26 March by the first line transport of camels and horse or mule drawn wagons. Accompanying the Division as it marched out for Deir el Belah, additional rations were carried on improvised packs which were not to be touched without direct orders.
The Anzac and Imperial Mounted and the 54th Infantry Divisions' orders were handed to divisional commanders at 1700. They were to isolate Gaza by stopping the garrison retiring and stopping any reinforcements from Huj and Hareira areas attempting to reach Gaza. They were to pursue any force that showed signs of retiring and if necessary to support the main assault by the 53rd Infantry Division, under the command of Major General A.G. Dallas in capturing Gaza. This infantry division was to be reinforced with the 161st Brigade of the 54th Infantry Division.
The march for Gaza was begun on the following morning (26 March 1917) by Desert Column from Deir el Belah, the 54th Division from In Seirat and the Camel Corps Brigade from Abasan el Kebir. At 0230 the Anzac Mounted Division left Deir el Belah with the Imperial Mounted Division following at 0300, heading for the Wadi Ghazze with the mobile sections of field ambulances followed by the immobile sections and ambulance camel transport towards their outpost positions north east and east of Gaza.
Thick fog began to develop and from about 0350 became very thick, remaining for about four hours when it began to lift. By 0755 the fog had lifted sufficiently to be able to use the helio to communicate with headquarters. But it was so heavy that all aircraft in No. 1 Squadron which had moved forward to a new landing-ground at Rafa and were to have assisted the opening attack, had to turn back as nothing of the ground could be seen from the air before 9 oâclock.
Infantry move into position
Despite the fog the initial attack, the 53rd (Welsh) Infantry Division, commanded by Major General A.G. Dallas under the orders of Desert Column was moving forward to make a direct assault on Gaza. At 0520 the 158th and 160th Infantry Brigades of 53rd Division were crossing the Wadi Ghuzze with 159th Brigade in reserve. By 0650 the 160th Brigade had moved towards Shaluf and the 158th Brigade towards Mansura but owing to the difficulty of giving artillery support in case the fog should suddenly lift, they were ordered to move more slowly. They had not reached Shaluf and Mansura by 0750, at which time the leading troops were approaching Sheikh Seehan without touch having been made with any Ottoman force. By 0827 the 160th Brigade was about 2400 yards south west of Ali Muntar and the 158th Brigade had reached Mansura. Between 0815 and 0855 hostile planes flew over attacking with machine guns, but by 0830 when the higher ground was clear, the leading troops of one brigade were only 2 miles (3.2 km) from their main objective, the commanding height called Ali Muntar. By 0930 advanced troops were â4 miles (1.2 km) north of 53rd Divisional Headquarters established at Mansura. The 53rd Infantry Division's Commander ordered the attack on Gaza at 10.15am and the attack commenced at 10.30.
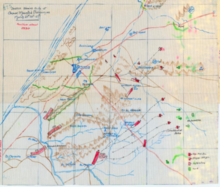
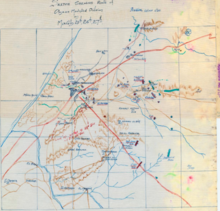
Picture - Positions of attacking infantry and mounted divisions at about 0930. Ottoman defences shown in green
The mounted screen moves into position
While the fog made navigation difficult, it also shielded the movement of large bodies of troops so the Anzac Mounted Division, the Imperial Mounted Division and the Imperial Camel Corps Brigade under the command of Philip Chetwode, GOC Desert Column, rapidly intercepted the roads leading to Gaza from the north, east, to isolate the garrison in a 15 mile long cavalry screen.
At 0930 four Officers Patrols were sent out towards Huj, Abu Hareira, Tel el Sheria and the Ottoman railway. The Anzac Mounted Division headquarters were established at Beit Durdis and by 1010 communications were established with Desert Column, Imperial Mounted Division and 2nd Light Horse Brigade by cable. Helio stations were also set up and wireless established, but the wireless was blocked by a more powerful Ottoman apparatus at Gaza. And by 1130 the 7th Light Horse Regimen (after the capture of Jebalieh by the 2nd Light Horse Brigade) had reached the Mediterranean Sea completing the screen around Gaza and capturing a Colonel and his staff on their way to Gaza.
Battle
Gaza was now completely invested and following Desert Column's orders 53rd Infantry Division made a direct attack from the south and east towards Ali Muntar. They met with stubborn opposition from a determined defence, put up by the Ottoman Army garrison from strong entrenchments with the line of advance over completely open ground. In these conditions, the attacking infantry's artillery support proved inadequate and very high numbers of casualties were suffered. They were reinforced by one brigade of the 54th Infantry Division commanded by Eastern Force; the other brigade remaining in position at Sheikh Abbas to secure the southern end of the 15 miles (24 km) long mounted screen.
At 1130 Desert Column staff were of the opinion that the 53rd Division was practically stationary, and the following message was sent to Dallas: "I am directed to observe that (1) you have been out of touch with Desert Column and your own headquarters for over two hours; (2) no gun registration appears to have been carried out; (3) that time is passing, and that you are still far from your objective; (4) that the Army and Column Commanders are exercised at the loss of time, which is vital; (5) you must keep a general staff officer at your headquarters who can communicate with you immediately; (6) you must launch your attack forthwith." A similar message was sent gain at 1200.
The Imperial Mounted Division which had followed behind the Anzac Mounted Division was now in position due east of Gaza watching Huj. Between 1100 and 1135 Ottoman Army planes flew over Beit Durdis, a long range gun and a gun opened fire on the mounted column so that all mounted troops were more or less under shell fire from Gaza. The Battery of 5th Mounted Yeomanry Brigade opened on small groups of Ottoman infantry but the long range gun accurately returned fire causing the Battery to change position. Very little fighting had yet taken place so far as they were concerned; and the infantry attack was not making much progress. But news was beginning to come in from the watching patrols of both mounted divisions, describing movements in the direction of Huj and the Beersheba railway and columns of dust in the direction of Tel el Sharia showed where large scale Ottoman Army movements were in progress.
At 1230 the 5th Light Horse Regiment (2nd Light Horse Brigade) and half their Machine Gun Squadron attacked a company of Ottoman soldiers on a road moving north east from Gaza; they captured and wounded many while others escaped in the cactus hedges. And for the next 50 minutes the 5th Light Horse Regiment encountered and opposed other parties of Ottoman soldiers moving north east as they worked their way through the cactus hedges.
About 1330 the Imperial Mounted Division was established north of the Gaza to Beersheba road near Kh er Reseim with the 5th Mounted Brigade on their right. The Yeomanry reported Ottoman patrols visible from Huj to Tel el Sheria, 150 Ottoman soldiers holding the ridge along the 400 contour, a column of smoke towards Abu Hareira and dust moving south from Tel el Sheria.
At 1310 the CO 53rd Infantry Division requested the support of the 54th Infantry Division's 161 Brigade, which had been waiting at Sheikh Nebhan since 1115 to reinforce the 53rd Division. Just 35 minutes after the 161 Brigade joined the infantry battle, the 53rd Division reported the capture of Yellow Clay Hill within 600 yards of Ali Muntar by 160th Brigade.
All arms attack
At 1333 Lieutenant General Chetwode ordered both mounted divisions to supply one brigade each to reconnoiter towards Gaza to assist the infantry attack. At this time planes reported no signs of Ottoman reinforcements moving towards Gaza from any direction, nor were there any reports half an hour later when, at 1400 the Anzac Mounted Division was ordered to attack Gaza from the north. At this time Lieutenant General Chetwode placed Major General Chauvel in command of both mounted divisions for the remainder of the operations; the Imperial Mounted Division and Imperial Camel Corps Brigade supported by Nos 11 and 12 LAM Batteries and No. 7 Light Car Patrol took over the outpost line and all observations.
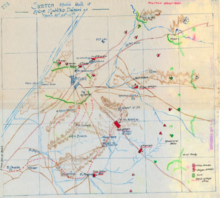
Picture - Position at about 1400
At 1510 the Labyrinth was captured by 53rd Infantry Division with 54th Infantry Division's 161 Brigade attached. Major General Chauvel met all brigadiers at 1515 to issue orders; Anzac Mounted Division was to deploy for the attack from the north with the 2nd Light Horse Brigade on a front extending from the Mediterranean Sea to the Gaza Jebalieh road, the New Zealand Mounted Rifle Brigade covering the front from the Gaza - Jebalieh road to the top of the ridge running north east and two regiments of 22nd Mounted Brigade (Lincolnshire & Sherwood Rangers Yeomanry Regiments) took over the front from the right of the New Zealand Mounted Brigade to the track leading to Beit Durdis. Without waiting to complete the relief of all patrols the attack, due to begin at 1600 began at 1540 supported by the Leicester and Ayrshire Batteries coming into action at 300 and 4500 yards respectively.
The attack of the Anzac Mounted Division soon developed and in spite of the prickly pear hedges necessitating dismounted attack, progress was rapid. Shortly after the attack began Lieutenant General Chetwode, Desert Column sent messages emphasising the importance of this attack, warning that the trench line north west of Gaza between El Meshaheran and El Mineh on the sea was strong and offering another brigade from the Imperial Mounted Division, which Major General Chauvel accepted.
But ten minutes after the attack began, at 1550 news came that Ottoman reinforcements were advancing towards Gaza. Some 300 had been seen marching from the north towards Gaza and a little later 3 Ottoman columns were reported moving from the same direction another 300 Ottoman soldiers had moved into the sand hills west of Deir Sineid. A squadron of 22nd Mounted Brigade was sent to oppose this advance towards Gaza.
And at 1610 the 159th Brigade, 53rd Infantry Division took a redoubt north by east of Ali Muntar. Five minutes later the attack on Gaza from the north by the 2nd Light Horse Brigade, supported by the Somerset Battery began to develop with the New Zealand Mounted Rifles Brigade also moving forward; the Canterbury Mounted Rifles in the advance with the Wellington Mounted Rifles in support and extended on their right. Only three troops of the Auckland Mounted Rifles Regiment were available as the others were delayed in the mounted screen by strong Ottoman advances from Huj and Nejed.
At 1623 the high ridge east of Gaza was captured by the New Zealand Mounted Rifles Brigade and the 22nd Mounted Brigade on their left captured the knoll running west from the ridge. The New Zealand Mounted Rifles Brigade Headquarters took up a position on the ridge, on a knob later called 'Chaytor's Hill', and the Wellington and Canterbury Regiments pressed on towards Gaza. Four machine guns were attached to each of these regiments; the remaining four were held in reserve.
Between 1630 and 1700 Ali Muntar was captured by infantry brigades and dismounted New Zealanders. The Canterbury Mounted Rifles Regiment pushed along 'The Ridge' to assist in the attack on Ali Muntar practically from the rear; one squadron entering the hostile trenches just after the 53rd Infantry Division's attack from the south entered this strong position about dusk.
Mounted units' attack on Gaza continues
The dismounted advance by New Zealand Mounted Rifle Brigade continued after the capture of Ali Muntar through very enclosed country intersected with cactus hedges, buildings and pits occupied by Ottoman riflemen. Despite considerable opposition they continued to slowly advance through the orchards and cactus hedges to the outskirts of the town. Two Ottoman guns with limbers and ammunition, were captured by the Wellington Mounted Rifle Regiment and when their progress was stopped by Ottoman snipers in several houses on the eastern outskirts of the town, they turned the captured Krupp guns on to the buildings, firing 4 rounds point blank, causing the surrender of 20 Ottoman soldiers.

Picture - Two Krupp Guns captured by the Wellington Mounted Rifle Regiment
While the attack in the centre by Brigadier General Chaytor's New Zealand Mounted Rifle Brigade was progressing the 22nd Mounted Yeomanry Brigade came up on the New Zealand Mounted Rifle Brigade's left. The attacking force had entered the town but Brigadier General Granville Ryrie's 2nd Light Horse Brigade had been meeting with stiff resistance from Ottoman infantry among the sandhills to the north west of the town. The 7th Light Horse Regiment on the extreme right (closest to the Mediterranean Sea) met considerable opposition but was eventually established close up to the town. By nightfall, they had fought their way into the streets of Gaza; the Anzac Mounted Division suffering very few casualties.
By 1800, the position of the attacking force was most satisfactory; the Wellington Mounted Rifle Regiment and the 2nd Light Horse Brigade were well into the northern outskirts of the town; and the Canterbury Mounted Rifle Regiment, with part of the 53rd Infantry Division were in Ali el Muntar; and the trenches south of the town were held by part of the 53rd Infantry Division.
Picture - Position at about 1800
Position of the mounted screen
Ariel reconnaissance of the battlefield during the day reported progress of the attack to divisional headquarters and monitored the Ottoman Army reinforcements from Mejdel, Huj, Tel el Sheria, and Beersheba as they approached Gaza; providing strengths and dispositions of the columns.
While the relief of the Anzac Mounted Division by the Imperial Mounted Division was being carried out, an advance by units of the Ottoman Army from Jemamah became apparent. Lieutenant Colonel Wigan with 2 squadrons and 1 troop of Berkshire Yeomanry took command of the front and sent back information about the attack by infantry, mounted troops and some machine guns. He brought his own regiment into the line to delay the attack on Hill 405 but as the front became critical Major General Hodgson ordered up the 6th Mounted Brigade with the Berkshire Battery. But they were watering and there was a small in starting.
At 1700 at the request of the Imperial Mounted Division Major General Chauvel sent back from the attack on Gaza, Brigadier General J. R. Royston's 3rd Light Horse Brigade less, the 10th Light Horse Regiment. This brigade was needed to reinforce the 6th Mounted Yeomanry Brigade about Hill 405 where an Ottoman attack threatened their position. After determined fighting and a staunch defence, Lieutenant Colonel Wigan's small force were finally pushed off Hill 405 at 1715 before reinforcements could arrive. The 3rd Light Horse Brigade moved back quickly and seized a high hill north west of Hill 405 enabling the 6th Mounted Yeomanry Brigade to hold on where they were. The 8th and 9th Light Horse Regiments (3rd Light Horse Brigade) with the 1/1st Queen's Own Dorset Yeomanry (6th Mounted Yeomanry Brigade) on their right and Notts Battery RHA on the left of the 6th Mounted Brigade and Berks Battery in the centre enfiladed the advancing Ottoman formations. Despite considerable damage being done, more Ottoman guns in addition to the 6 already in action were brought into action, enfilading the Berks Battery which had to withdraw.
At 1715 No. 7 Light Car Patrol was sent up the road towards Deir Sineid and together with Nos 11 and 12 LAM Batteries opposed an Ottoman advance from Huj where units of the Ottoman Army were now reported to have 4000 soldiers. The cars reported to Brigadier General Royston and engaged the Ottoman Army until dark.
It was nearly dark when, at 1730 a gap occurred in the line between 6th Mounted Brigade and 1st Imperial Camel Corps Brigade. Fortunately Ottoman troops did not attempt to follow it up and General Hodgson commander of the Imperial Mounted Division, requested Chauvel to send back the 10th Light Horse Regiment still in reserve at Divisional Headquarters; this was done.
Withdrawal
At 1810 the GOC Desert Column decided to withdraw the mounted troops due to the extreme difficulty of continuing the attack in the dark. The strength and positions of the Ottoman Army forces pressing in from the north and east, and the difficulty of continuing the attack in the numerous gardens that extended north, west and south for three or four miles, all bordered by huge cactus hedges about the town meant any further progress in the dark would be extremely difficult, if not impossible. Orders were received to break off the action after dark and withdraw; the two mounted divisions to Deir el Belah and the Imperial Camel Corps Brigade to a position extending from the right of the 54th Infantry Division to the Wadi Ghuzzee.
The decision was puzzling to many of those fighting in and near the town, the infantry held Ali Muntar and 462 German and Ottoman army prisoners, including a general who was a divisional commander and a fine Austrian battery of 2 Krupp 77 field guns were captured, along with a convoy and animals. But despite firing some 304 shells and 1500,000 rounds of SAA, some of the well designed trenches and redoubts of the Ottoman Army were still held and the British infantry casualties were very substantial.
The first units to withdraw were all slow moving wheels and camels ordered at 1700 by Desert Column, to move back to Hill 310 via Sheikh Abbas while as late at 2112, the 53rd Infantry Division still held Ali Muntar. At that time they advised Desert Column they would have to evacuate towards Sheikh Abbas due to withdrawal occurring on their right. There have been claims that the infantry were the first to retire and that due to a communication debacle the 53rd Infantry Division made a complete and premature retirement. When the commander of Desert Column Lieutenant General Chetwode learned about this withdrawal at 0500 on 27 March, he ordered the 53rd Infantry Division back to Ali Muntar.
No. 7 Light Car Patrol reported to headquarters Anzac Mounted Division on return at 1840 and was ordered to return to base while Nos. 11 and 12 LAM Batteries camped in the vicinity of Kh er Reseim. At 1905 Anzac Mounted Division's artillery began its retirement from divisional headquarters under escort and the 43 wounded from Anzac Mounted Division and 37 wounded from Imperial Mounted Division were collected and brought to the ambulances and prisoners sent back under escort. At 1930 the 22nd Mounted Brigade was moving toward Divisional Headquarters while the 6th Mounted Division drew back to a better position while Ottoman soldiers dug in on Hill 405.
The 2nd Light Horse Brigade and 7th Light Horse Regiment had ceased their advance and began collecting wounded although sniping continued. They were about 4 miles (6.4 km) away from their horses in the labyrinth of cactus hedges and lanes in which they had been fighting. Until the Anzac Mounted Division was clear of the battlefield; at about midnight, the advancing Ottoman reinforcements were held off by the Imperial Mounted Division, the Imperial Camel Corps Brigade and armoured motor car patrols.
I wish to draw special attention to the excellent service rendered by the Imperial Mtd Div under Major General H.W. Hodgson CB CVO, in holding off greatly superior forces of the enemy during the afternoon of the 26th and the night of 26/27th thus enabling the A & NZ Mtd Div to assist in the Infantry attack on Gaza and subsequently to withdraw after dark. Had the work of this Division been less efficiently carried out it would have been quite impossible to extricate the A & NZ Mtd Div without very serious losses.
At 0200 when the guns of Anzac Mounted Division had reached Dier el Belah and the Division was just passed Beit Dundis, General Hodgson gave orders for the concentration of the Imperial Mounted Division's 3rd Light Horse, 5th and 6th Mounted Brigades while the Imperial Camel Corps Brigade took up a line from the Wadi Guzzee to the left of the 54th Infantry Division's headquarters.
At 0430 the LAM Batteries broke camp near Kh er Reseim and as they moved to the south they encountered opposition from Ottoman Army units. After 2 hours of stiff fighting they managed to retire while at 0450 No. 7 Light Car Patrol was moving along the Gaza to Beersheba road. At 0530 they came up on the rear of the 3rd Light Horse Brigade and became heavily engaged with the Ottoman Army advancing from Huj. The Ottoman advance was beaten off and the armoured cars covered General Royston's retirement to the Imperial Camel Corps Brigade at 0700 on the morning of 27 March 1917.
By 0810 the Imperial Mounted Division was at Deir el Belah and the Anzac Mounted Division was marching via Abu Thirig past Hill 310 where Major General Chauvel met Lieutenant General Chetwode. Chetwode ordered the horses of both divisions and to then return to a position near El Dameita to support the attempt by the infantry to retake Ali Muntar. At 0830 Lieutenant General Chetwode took over command of the two mounted divisions from Major General Chauvel.
The Anzac Mounted Division remained near El Dameita until 1600 and the 54th Infantry Division remained near Sheikh Abbas engaging the advancing Ottoman units from Beersheba.
Between 27 and 28 March the whole British force was withdrawn to Deir el Belah and Khan Yunus; the Anzac Mounted Division reaching Belah at 0830 on 27 March.
Aftermath
The British lost 2,400 / 2967 / 3967 casualties 2,932 wounded and 512 missing; almost all of them from 53rd Infantry Division and 161st Infantry Brigade). The Anzac Mounted Division lost 6 killed, 46 wounded and 2 missing. Ottoman Army casualties have been stated as 301 men killed, 750 / 1,075 wounded and 600 / 1,061 missing, and 2437 casualties.
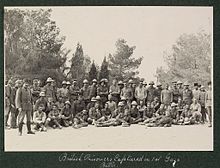
Picture - British prisoners
During an aerial reconnaissance on the morning of 28 March when it was reported that no Ottoman units were within range of the British guns, the first serious attack by an Aviatik, was made in the air on No. 1 Squadron.
"In itself the engagement was a severe blow to the British Army, since it affected the troops on both sides to a degree out of all proportion to the casualties suffered, or to the negative victory gained by the Turks. There was not a single private in the British infantry, or a trooper in the mounted brigades, who did not believe that failure was due to staff bungling and to nothing else."
Both Dobell and his superior, General Murray, portrayed the battle as a success; on 28 March General Murray sent the following message to the War Office -
"We have advanced our troops a distance of fifteen miles from Rafa to the Wadi Ghuzzee, five miles west of Gaza, to cover the construction of the railway. On the 26th and 27th we were heavily engaged east of Gaza with a force of about 20,000 of the enemy. We inflicted very heavy losses upon him. It is estimated that his losses were between 6,000 and 7,000. We have in addition 900 prisoners, including the GOC and the whole of the staff of 53 Ottoman Division. This figure includes four Austrian officers and 32 Austrian and five German other ranks. We captured two Austrian guns. All troops behaved splendidly." And General Dobell: "This action has had the result of bringing the enemy to battle, and he will now undoubtedly stand with all his available force in order to fight us when we are prepared to attack. It has also given our troops an opportunity of displaying the splendid fighting qualities they possess. So far as all ranks of the troops engaged were concerned, it was a brilliant victory, and had the early part of the day been normal victory would have been secured. Two more hours of daylight would have sufficed to finish the work which the troops so magnificently executed after a period of severe hardship and long marches, and in the face of most stubborn resistance."
The battle was reported in the British press as a success but afterwards an Ottoman plane dropped a message which said, âYou beat us at communiqués, but we beat you at Gaza.â
The Second Battle of Gaza began on 19 April 1917.
Footnotes
Citations
Bibliography
Anzac Mounted Division (1917), War Diary March 1917, Canberra: Australian War Memorial AWM4-1-60-13
Desert Column (1917), War Diary March 1917, Canberra: Australian War Memorial AWM4-1-64-3part1-1
3rd Light Horse Brigade (1917), War Diary March 1917, Canberra: Australian War Memorial AWM4-10-3-26
22nd Mounted Brigade (1917), War Diary March 1917, Canberra: Australian War Memorial AWM4-9-2-1part1
Blenkinsop, L. J., ed (1925). History of the Great War Based on Official Documents Veterinary Services. J. W. Rainey. London: H. M. Stationers.
Bou, Jean (2009). Light Horse: A History of Australia's Mounted Arm. Australian Army History. Port Melbourne: Cambridge University Press. ISBN 978-0-521-19708-3. http://books.google.com/books?id=Zkg9qyH1jbUC&printsec=frontcover&source=gbs_ge_summary_r&cad=0#v=onepage&q&f=false.
Bruce, Anthony (2002). The Last Crusade The Palestine Campaign in the First World War. London: John Murray Ltd.
F. M. Cutlack (1941). "The Australian Flying Corps in the Western and Eastern Theatres of War, 1914-1918". Official History of Australia in the War of 1914-1918 Volume VIII. Canberra: Australian War Memorial. http://www.awm.gov.au/histories/first_world_war/volume.asp?levelID=67894.
Dennis, Peter; Jeffrey Grey, Ewan Morris, Robin Prior with Jean Bou (2008). The Oxford Companion to Australian Military History. Melbourne: Oxford University Press, Australia & New Zealand.
R. M. Downes; A. G. Butler (1938). "The Campaign in Sinai and Palestine". Official History of the Australian Army Medical Services, 1914-1918 Part II in Volume 1 Gallipoli, Palestine and New Guinea. Canberra: Australian War Memorial. http://www.awm.gov.au/histories/first_world_war/volume.asp?levelID=67898.
Erickson, Edward J. (2001). Ordered to Die A History of the Ottoman Army in the First World War. Contributions in Military Studies, No. 201. Westport Connecticut: Greenwood Press.
Erickson, Edward J. (2007). John Gooch and Brian Holden Reid. ed. Ottoman Army Effectiveness in World War I A comparative study. Cass No. 26 Military History and Policy. Milton Park, Abingdon, Oxon: Routledge.
Grainger, John D. (2006). The Battle for Palestine, 1917. Woodbridge: Boydell Press. ISBN 1-84383-263-1. http://books.google.com/books?id=3SVvryoR2A0C&printsec=frontcover&source=gbs_ge_summary_r&cad=0#v=onepage&q&f=false.
Gullett, H. S. (1939). Official History of Australia in the War of 1914-18, Vol VII Sinai and Palestine. Angus and Robertson.
Hill, A. J. (1978). Chauvel of the Light Horse A Biography of General Sir Harry Chauvel, GCMG, KCB. Melbourne: Melbourne University Press.
Keogh, E. G. (1955). Suez to Aleppo. Melbourne: Directorate of Military Training.
McPherson, J. W.; Barry Carman, John McPherson (1985). The man who loved Egypt : Bimbashi McPherson. London: British Broadcasting Corp.
Moore, A. Briscoe (1920?). The Mounted Riflemen in Sinai & Palestine The Story of New Zealand's Crusaders. Christchurch: Whitcombe & Tombs Ltd.
Powles, C. Guy (1922). The New Zealanders in Sinai and Palestine Volume III Official History New Zealand's Effort in the Great War. Auckland: Whitcombe & Tombs Ltd.
Pugsley, Christoper (2004). The Anzac Experience New Zealand, Australia and Empire in the First World War. Auckland: Reed Books.
Wavell, Field Marshal Earl (1968). The Palestine Campaigns. A Short History of the British Army (3 ed.). London: Constable & Co.
Woodward, David R. (2006). Hell in the Holy Land: World War I in the Middle East. Lexington: The University Press of Kentucky. ISBN 978-0-8131-2383-7. http://books.google.com/books?id=uI5Osq9_WKkC&printsec=frontcover&source=gbs_ge_summary_r&cad=0#v=onepage&q&f=false.
More aircraft.
Source: WikiPedia