


Second Battle of Krithia - Picture
More about World War 1
|
|
Second Battle of Krithia
Date: Date
6-8 May 1915
Location
Helles, Gallipoli, Ottoman Empire
Result
Ottoman victory
Date: 6-8 May 1915
Helles, Gallipoli, Ottoman Empire
Result: Ottoman victory
Belligerents:
: United Kingdom
Australia
New Zealand
France
Commanders and leaders:
: Aylmer Hunter-Weston
Strength:
: 25,000
72 guns
Casualties and losses:
: 6,300
The Second Battle of Krithia continued the Allies' attempts to advance on the Helles battlefield during the Battle of Gallipoli of the First World War. The village of Krithia and neighbouring hill of Achi Baba had to be captured in order for the British to advance up the Gallipoli peninsula to the forts that controlled passage of the Dardanelles straits. A small amount of ground was captured after two days of costly fighting but the objectives remained out of reach.
Prelude
Following the failure of the First Battle of Krithia, the exhausted soldiers of the British 29th Division halted to consolidate their positions. They had to endure a number of Ottoman counter-attacks on 1 and 4 May. Similar counter-attacks were repulsed at the Anzac landing on 2 May so that General William Birdwood, commander of the Australian and New Zealand Army Corps deemed his front sufficiently secure to enable two brigades to be moved to Helles for the next assault on Krithia. These were the Australian 2nd Infantry Brigade and the New Zealand Infantry Brigade, around 5,000 men.
Other British reinforcements included brigades from the Royal Naval Division and the 125th Brigade from the British 42nd (East Lancashire) Division. The 87th and 88th Brigades of the 29th Division would once again be at the forefront of the attack. The Anzac brigades and General Vaughn Cox's 29th Indian Brigade would be in reserve.
The commander at Helles, Major General Aylmer Hunter-Weston, was woefully lacking in shells for his artillery and those he did have were shrapnel shells which was ineffective against entrenched positions. The navy were somewhat ambitiously still hoarding shells for the anticipated assault on Constantinople.
The Ottomans had also been reinforcing their defences around Krithia. According to Kiazim Pasha the following units were responsible for the defence of Krithia
1/ and 2/29th Regt (10th Div),
2/56th Regt. (15th Div),
2/19th Regt. (7th Div),
1/ and 4/26th Regt. (9th Div), and
15th Regt. (5th Div)
The infantry actually in front of Krithia on May 8 comprised
2/25th Regt. (9th Div),
1/20th Regt. (7th Div), and
2/56th Regt. (15th Div)
The Ottomans had seven field-batteries positioned on either side of Achi Baba, as well as a six-gun battery of 4.7 in (120 mm) howitzers.
The terrain
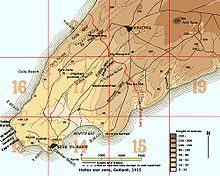
Picture - Map of Helles war zone
While Cape Helles is more forgiving than the wild terrain at Anzac Cove, the battlefield still presented difficulties to the attacking force. The ground looked flat but was riven by four large gullies, or deres, running from Achi Baba towards the Cape. On the west was Gully Ravine which was separated from the Aegean shore by Gully Spur. Moving east was Fir Tree Spur then Krithia Valley (also known as Krithia Nullah or Kirte Dere) then Krithia Spur then Kanli Dere then Kereves Spur then Kereves Dere which flows into the Dardanelles at Morto Bay.
Krithia Spur was bare and exposed so was not favoured for attacks. Gully Spur and Fir Tree Spur offered some cover and so the majority of the British advances were made on these spurs and in the shelter of the gullies.
The plan
Like the first battle, the plan was for a general advance on a broad front across the peninsula. The attack was divided into three phases. The first phase involved a general advance of one mile across the entire front which would place the French, on the right of the line, astride Kereves Spur where they were to dig in. In the second phase, the British in the centre and on the left would pivot on the French position and sweep up Fir Tree Spur and Gully Spur then capture Krithia village. The third phase would be the capture of Achi Baba.
In the end, after three days of fighting, the Allies would abandon the battle without even completing the first phase. In fact, the greatest advance achieved was a mere 600 yd (550 m).
The plan was made despite the fact that the British had no clear idea where the Ottoman fortifications were. There was as yet no continuous system of trenches and aerial reconnaissance had failed to locate the defences. Consequently, the preliminary bombardments that were made before each advance were utterly ineffectual.
Hunter-Weston also insisted that the attacks be made in broad daylight, fearing that an attack under the cover of darkness would become confused.
Having failed with this approach once during the first battle did not deter Hunter-Weston, and as the second battle progressed he would remain undeterred.
The battle
The Allied advance began later than scheduled, around 11:00 on 6 May but was swiftly halted by strong Ottoman resistance. The 88th Brigade of the 29th Division advancing on Fir Tree Spur managed to capture Fir Tree Wood and the 6th (Hood) Battalion of the British 63rd (Royal Naval) Division advanced strongly along Kanli Dere but at all points on the line the gains were never more than 400 yd (370 m). At no point were the Ottoman defences reached.
The attack was resumed on 7 May; it used the same plan and produced largely the same results.
On the morning of 8 May, the 88th Brigade in front of Krithia on Fir Tree Spur was relieved by the New Zealanders who made yet another attempt which failed with huge losses. The Wellington, Canterbury and Auckland Battalions gained another 400 yd (370 m) through Fir Tree Wood to a place called the 'Daisy Patch' before they became pinned down. Enfiladed on the left from Ottoman machine guns in Gully Ravine, they could neither advance nor withdraw and still had no sight of the Ottoman positions.
Despite their predicament, Hunter-Weston ordered the New Zealanders, including the Otago Battalion in reserve, to resume that attack at 17:30. The brigade commander, Colonel Francis Johnston, protested but Hunter-Weston insisted the attack proceed. However, General Sir Ian Hamilton, commander of the Mediterranean Expeditionary Force, who had landed at Helles to oversee the battle, ordered a general advance to be made at 17:30. along the entire front with the aim of capturing Krithia and Achi Baba.
The Australian 2nd Infantry Brigade, under the command of Brigadier-General M'Cay, was given 35 minutes warning that it was about to join the attack. The Australians were to advance along Fir Tree Spur between the right flank of the New Zealand brigade and the edge of Krithia Nullah, and had to travel up to 800 yd (730 m) from their reserve position just to reach the start line at "Tommy's Trench". The brigade managed to advance a further 500 yd (460 m) beyond the start line, suffering 50% casualties in the process.
The New Zealand brigade made another attempt to cross the Daisy Patch, and some troops managed to actually sight the Ottoman trenches. On the right, the French resumed their advance at 18:00 and made good progress, reaching the Ottoman trenches on Kereves Dere. They managed to capture and hold Bouchet Redoubt but were forced back everywhere else.
Aftermath
About â of the Allied soldiers who fought in the battle became casualties. General Hamilton could ill-afford such losses as they made it difficult enough to hold the little ground he had, let alone continue to capture more. The poor planning of the battle extended to the medical provisions for the wounded which were woeful. The few stretcher bearers that were available often had to carry their burdens all the way to the beach as there was no intermediate collecting station with wagon transport. The hospital ship arrangements were also inadequate so that once the wounded were taken off the beach they would have trouble finding a ship prepared to take them on board.
With the failure of the second battle, Hamilton made a request to the British Secretary of State for War, Lord Kitchener, for an additional four divisions. He was promised the British 52nd (Lowland) Division but would not receive any more until August. Another attempt to capture Krithia would not be made until early June.
Bean, Charles (1941). Official History of Australia in the War of 1914-1918 - Volume II: The Story of ANZAC from 4 May, 1915, to the evacuation of the Gallipoli Peninsula (11th ed.). http://www.awm.gov.au/histories/first_world_war/volume.asp?levelID=67888.
Further reading
Austin, Ronald (1989). The White Gurkhas: the 2nd Australian Infantry Brigade at Krithia, Gallipoli. ISBN 0731653238.
More aircraft.
Source: WikiPedia