Third Battle of Gaza - Picture
More about World War 1

|
|
Third Battle of Gaza
Date: Date
31 October - 7 November, 1917
Location
Gaza, southern Palestine
Result
British victory
Date: 31 October - 7 November, 1917
Location: Gaza, southern Palestine
Result: British victory
Belligerents:
: United Kingdom
Australia
New Zealand
Commanders and leaders:
: Edmund Allenby
Strength:
: 7 infantry divisions
3 mounted divisions
Casualties and losses:
: 18,000 killed, wounded, missing.
Australia
New Zealand
Suez - Romani - Magdhaba - Rafa - 1st Gaza - 2nd Gaza - El Buggar - Beersheba - 3rd Gaza - Mughar Ridge - Jerusalem - Abu Tellul - Arara - Megiddo
The Third Battle of Gaza was fought in 1917 in southern Palestine during World War I. The British Empire forces under the command of General Edmund Allenby successfully broke the Ottoman defensive Gaza-Beersheba line. The critical moment of the battle was the capture of the town of Beersheba on the first day by Australian Light Horse units.
Prelude
Since January 1916, the British campaign in Egypt and Palestine had been the responsibility of General Sir Archibald Murray, commander of the Egyptian Expeditionary Force (EEF). He had pushed his forces across the Sinai desert and constructed a railway and freshwater pipeline from the Suez Canal to support a base of operations on the southern edge of Palestine, south of Gaza. Under the direction of his subordinate, General Charles Dobell, two attempts were made to capture Gaza, on 26 March (First Battle of Gaza) and 19 April (Second Battle of Gaza). Both ended as costly failures and the two sides had reached a stalemate.
Murray had been an enthusiastic advocate of the offensive in Palestine; a stance that contributed to his downfall because the British War Office, who previously were unwilling to commit resources to a minor theatre of war, were now eager for results. The failure of Murray and Dobell to deliver on their promises in the second Gaza fight motivated the War Office to change the command of the EEF. On 28 June 1917 General Edmund Allenby, formerly commander of the British Third Army in France, took over command from Murray. Dobell was removed but not replaced and Allenby assumed direct control over all future operations.
Order of battle
British
The forces at Allenby's disposal were also expanded and the ad-hoc nature of Murray's army structure was replaced with a more conventional arrangement. In place of Dobell's Eastern Force (a corps-like structure) were two infantry and one mounted corps:
XX Corps (commanded by Lieutenant General Philip Chetwode)
10th (Irish) Division
53rd (Welsh) Division
60th (2/2nd London) Division
74th (Yeomanry) Division
XXI Corps (commanded by Lieutenant General Edward Bulfin)
52nd (Lowland) Division
54th (East Anglian) Division
75th (Territorial & Indian) Division
Desert Mounted Corps (commanded by Lieutenant General Henry Chauvel)
Anzac Mounted Division
Australian Mounted Division
Yeomanry Mounted Division
Imperial Camel Corps brigade
While some of the infantry divisions (such as the 60th Division which was a 2nd-line Territorial Force unit) were raw and inexperienced, the mounted divisions were battle-hardened and confident.
Ottoman
The defence of Palestine was the responsibility of the Ottoman Fourth Army under the command of German General Friedrich Freiherr Kress von Kressenstein. Despite the earlier victories over the British, the morale and condition of the Ottoman troops were poor. There were shortages of rations, ammunition, transport and fodder for the animals, and desertion was rife. The main Ottoman front at this time was in Mesopotamia where a German-led force under the command of the former Chief of the German General Staff (and architect of the Battle of Verdun), General Erich von Falkenhayn, was undertaking an expedition to recapture Baghdad from the British.
Just prior to the renewed British offensive, Ottoman forces underwent a reorganisation with the formation of the Ottoman Eighth Army to operate in southern Palestine. The Eighth Army was divided into two corps and contained 9 infantry divisions and one cavalry division. One more division, the 20th, had not yet arrived at the time of the battle.
XX Corps
3rd Division
7th Division
19th Division
53rd Division
54th Division
XXII Corps
3rd Cavalry Division
16th Division
24th Division
26th Division
27th Division
The defence of Gaza was the responsibility of XX Corps which had three divisions in the front line (53rd, 3rd and 54th from west to east) and two in reserve (7th and 19th). East of Gaza, the XXII Corps was more thinly spread with the 26th and 16th divisions stretched from Atawineh to Hareira and the 27th Division defending Beersheba on the extreme left (east) flank.
Chetwode's plan
In May 1917, Lieutenant General Chetwode, who had succeeded Dobell, wrote his Notes on the Palestine Campaign which became the blueprint for the eventual British offensive and was fundamental to its success. On assuming battlefield command in July, Allenby set about implementing many of the recommendations made in the report.
There was virtual parity in numbers between the British and Ottoman forces. The British had superior artillery plus naval support whereas the Ottoman forces held a supremely defensible position. Critically the British were superior in both quantity and quality of mounted troops. Consequently Chetwode rejected the suggestion of renewing the frontal infantry assaults on Gaza. Even if it were captured, any advance north would be threatened by Ottoman forces on the eastern flank.
The weakest point in the Ottoman line was at their extreme left (east) flank at Beersheba, some 30 miles (48 km) from the coast. The Ottomans believed that it would be impossible to mount large scale operations on that flank because of the scarcity of water in the region, so one division was deemed sufficient for its defense. Chetwode, however, saw its military value; lightly held, it was the only sector that offered a good chance of a breakthrough and, by operating on the Ottoman flank, the British could threaten to encircle the Ottoman forces at Gaza by striking west towards the coast, cutting off the rail and road supply routes. Therefore, the problem became how to supply an attack in the east. The railway was to be driven eastwards from the coast. Water supplies were carried forward to dumps or to fill ancient Roman cisterns. Wells that had been destroyed by the Ottoman forces were repaired and engineers worked to develop water flow from marginal wells.
Meanwhile, every effort was made to ensure the Ottomans believed the blow would fall once more against Gaza. While preparations in the east were kept as quiet as possible, overt preparations were made in the west. The British XXI Corps would "demonstrate" against Gaza without resorting to an all out assault. The Ottoman forces were completely fooled by the various British ruses. Even when the two corps assaulting Beersheba (the XX Corps and Desert Mounted Corps) began open movements on 29 October, the Ottoman forces remained convinced this was a minor outflanking movement of one infantry and one mounted division and that the main attack would still fall on Gaza.
Further infantry attacks were to be made by XXI Corps on 2 November at Gaza and by XX Corps on 4 November at Sheria on the western end of the main fortified line, about halfway between Gaza and Beersheba. By this time pressure in the Beersheba region should have forced the Ottoman forces to move their reserves from Gaza.
Beersheba

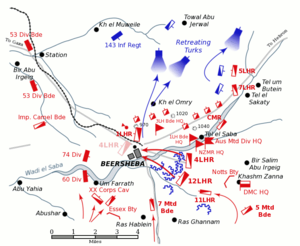
Picture - Positions at Beersheba, dusk on 31 October
The success of the British offensive hinged on the capture of Beersheba on the first day. In a combined assault, the infantry of XX Corps attacked the town from the west while the mounted troops of the Desert Mounted Corps encircled the town and attacked from the south, east and north. The first phase of the infantry assault, to capture outposts on the edge of town, was carried off without a hitch. The British had overwhelming superiority in artillery which was used to engage both the Ottoman trenches and in counter-battery work against the Austrian guns supporting the Ottoman forces.
The mounted attack began with attempts to capture Ottoman outposts to the east of Beersheba. The advance of the Anzac Mounted Division was held up at the Tel el Saba redoubt. By the time the redoubt was captured, the attack was running many hours behind schedule and the possibility of launching the combined infantry and mounted assault on the town before nightfall looked slim.
With time running out, the commander of the Desert Mounted Corps, Lieutenant General Chauvel, ordered the Australian 4th Light Horse Brigade to make a mounted attack. The 4th (Victorian) and 12th (New South Wales) Regiments of the brigade formed up in three waves and charged across 4 miles (6.4 km) of open terrain through shrapnel and machine gun fire. The audacity of their charge confused the Ottoman defenders who failed to adjust their rifles' sights and so fired too high. As a consequence, the charge was incredibly successful and few casualties were incurred.
Ottoman resistance in Beersheba quickly collapsed and they began to abandon the town in a panic. Many of the garrison were taken prisoner and most importantly the Ottoman forces succeeded in destroying only two out of the 17 wells. Furthermore, two reservoirs containing 90,000 gallons each were captured intact. Immediate relief for the horses was fortuitously provided by a torrential downpour that had preceded the battle and left pools of standing water.
By 4 November, engineers had managed to produce a water flow of 390,000 gallons a day at Beersheba, enough to support the British mounted forces. However, the Ottoman forces still held the water supplies to the north, at Khulweilfe, Jemmameh and Huj, so the mounted brigades could operate away from Beersheba for only one day at a time until these supplies were captured.
Gaza and Tel el Khuweilfe
The shortage of water north of Beersheba compelled Allenby, on the advice of Chetwode and Chauvel, to delay launching the next phase of the battle until 6 November. In the meantime, pressure would be maintained on the Ottoman forces in the east in an effort to draw their reserves from Gaza.
While the Ottoman forces had been driven from Beersheba, they had not been dislodged from the rest of the defensive line. The Ottoman left flank had pivoted on their strong defences at Hareira and swung back northwards from Beersheba to a new strong point at Tel El Khuweilfe which commanded the road to the east leading to Hebron, as well as the passage to the north-west leading to the coast. On the day after the capture of Beersheba, the British 7th Mounted Brigade (with the Australian 8th Light Horse Regiment attached) raced to Khuweilfe to try to take it before the Ottoman forces strengthened the position, but arrived too late.
For the next four days the British, Australian and New Zealand mounted brigades attempted to capture the Khuweilfe position. Each night a brigade was relieved in order to return its horses to the water at Beersheba, and another brigade resumed the assault. Finally the infantry of the 53rd Division arrived along with the Imperial Camel Corps Brigade and made another assault with artillery support on 6 November which lasted for two days until the Ottoman forces finally abandoned Khuweilfe on the morning of 8 November because of developments elsewhere on the front. Despite the failure to capture Khuweilfe, the pressure had the desired effect of drawing in the Ottoman reserves, making the success of British attacks at Gaza and Hareira more likely.
The first action at Gaza took place before dawn on 2 November, when the 161st and 162nd Brigades of the 54th Division attacked the Ottoman trench system in the sand dunes between Gaza and the sea. On this occasion it was a night attack by well-prepared troops with overwhelming artillery support and six Mark IV tanks. The British infantry advanced about 2 miles (3.2 km) on a 5,000 yards (4.6 km) front and held their gains against repeated Ottoman counter-attacks. Casualty figures were heavy for both sides but this time favoured the British.
Breaking through
The once-formidable Gaza-Beersheba line was now looking vulnerable. At dawn on 6 November, the next blow was struck by the British when all three divisions of Chetwode's XX Corps attacked on a broad front near Sheria, about the midpoint of the Ottoman line. The initial objectives were reached by 1 pm and, while the 74th Division was held up on the right, the 10th and 60th Divisions were through the Ottoman defences by 2.30 pm, with the 60th Division capturing the railway station at Sheria. It was planned that the 60th Division would capture the Ottoman position on the hill of Tel el Sheria during the night, but the Ottoman forces fired a nearby ammunition dump during their retreat, making the attack unadvisable.
On the morning of 7 November, XXI Corps made their major assault on Gaza itself, attacking from the 54th Division's position in the sand dunes to the east and from the west by the 75th Division against the strongpoint of Ali Muntar that had been the focus of so much fighting and bloodshed during the First Battle of Gaza. On this occasion, all objectives were captured with relative ease and Gaza was entered by the Imperial Service Cavalry Brigade (the attached cavalry of XXI Corps) at 9 am. The 52nd Division maintained pressure on the fleeing Ottoman garrison by advancing through the 54th Division and continuing up the coast.
To the east, the 10th Division captured the Hareira Redoubt and the 60th Division captured Tel el Sheria. The final Ottoman positions in the old defensive line, the Tank Redoubt and Atawineh Redoubt held by the Ottoman 54th Division, were captured with little opposition by the 75th Division on 8 November.
Pursuit

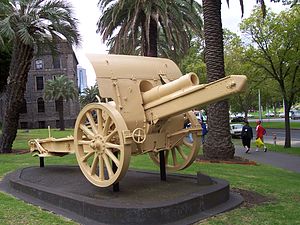
Picture - Turkish Howitzer captured near Huj now on display outside Victoria Barracks, Melbourne.
The Ottoman forces had now been dislodged from their defensive line and were retreating northwards. Allenby's goal from the outset had been the annihilation of the Ottoman army in southern Palestine. To achieve this, the brigades of the Desert Mounted Corps were required to strike north-west from Beersheba, through the villages of al-Jammama and Huj to the coast, cutting off the retreat of the Ottoman forces. The Anzac Mounted Division advanced on the right against al-Jammama and the Australian Mounted Division and 60th Division advanced towards Huj. For the plan to work, Huj had to be reached on 7 November.
Having captured Tel el Sheria, the 60th Division continued their advance northwards but encountered a strong Ottoman rearguard. The Australian 4th Light Horse Brigade was called on to support and on this occasion the 11th and 12th Light Horse Regiments made a mounted charge. However, they were unable to emulate the success of Beersheba and were forced to dismount and seek cover some 500 yards short of the Ottoman forces. It was not until the evening of 7 November that the position was captured by the reserve brigade of the 60th Division.
The advance on Huj resumed the following morning and another strong rearguard of artillery and machine guns was encountered. This time a small contingent from the British 5th Mounted Brigade made a true cavalry charge with sabres. These 200 men from 1/1st Warwickshire Yeomanry and 1/1st Worcestershire Yeomanry suffered heavy casualties but managed to reach the guns and cut down the gunners. In doing so they destroyed the last of the Ottoman strength south of Huj and the village was captured later that day.
The Anzac Mounted Division, advancing to the east against al-Jammama, had less success and did not manage to capture their objective until 9 November when it was reached by the 3rd Light Horse Regiment. A strong counter-attack by between 3,000 and 5,000 Ottoman infantry was then held off by 500 light horsemen of the 5th and 7th Light Horse Regiments.
Aftermath
The Gaza-Beersheba line was completely overrun and 12,000 Ottoman soldiers were captured or surrendered. However, the sacrifice of the Ottoman rearguards delayed the British pursuit and saved the army from encirclement and destruction.
Commemoration
The village of Klemzig, South Australia - seeking to change its name, like other Australian communities with a German name - chose to call itself "Gaza" in commemoration of the battle. Though reverting to its original name in 1935, the local sports team remains under the name "Gaza".
Grainger, John D, The Battle for Palestine, 1917 (Woodbridge: Boydell Press, 2006)
More aircraft.
Source: WikiPedia