


Third Battle of Krithia - Picture
More about World War 1
|
|
Third Battle of Krithia
Date: Date
4 June 1915
Location
Helles, Gallipoli, Ottoman Empire
Result
Ottoman victory
Date: 4 June 1915
Location: Helles, Gallipoli, Ottoman Empire
Result: Ottoman victory
Belligerents:
: United Kingdom
British India
France
Commanders and leaders:
: Aylmer Hunter-Weston
Strength:
: 34,000
Casualties and losses:
: 4,500 British
2,000 French
6,500 Total
British India
France
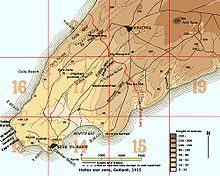
Picture - Map of Helles war zone
The Third Battle of Krithia (Turkish: Kirte), fought on the Gallipoli peninsula during World War I, was the final in a series of Allied attacks against the Ottoman defences aimed at capturing the original objectives of 25 April 1915. The previous failures in the first and second battles resulted in a less ambitious plan being developed for the attack, but the outcome was another costly failure for the Allies. The allied aim was, as always to facilitate the capture of Alx§Ä± Tepe (Achi Baba) which commanded most of the peninsula.
Prelude
By late May, the British contingent on the Cape Helles front at Gallipoli had been expanded to three division and a brigade: the 29th Division (which had made the original landing), the Royal Naval Division (now reinforced to 12 battalions), the 42nd (East Lancashire) Division and the 29th Indian Brigade. On 24 May, the commander of the 29th Division, Major General Aylmer Hunter-Weston, was promoted to lieutenant general and given command of the British VIII Corps containing all British units at Helles. Major General Beauvoir De Lisle took over command of the 29th Division.
The early battles at Helles had been fought over thinly fortified ground, but by late May two lines of trenches had begun to demarcate the battlefield. The British, in readiness for a new offensive, had been advancing their front line by stealth during the night, eventually gaining half a mile in ground while incurring only slight casualties and placing themselves within striking distance of the Ottoman front line.
The French contingent at Helles occupied the right (eastern side) of the line along the Dardanelles shore and astride the Kereves Spur. They were confronted by some of the strongest Ottoman defences, dominated by four redoubts. On 31 May, they managed to capture one of the redoubts but repeated attempts to take Haricot Redoubt failed making any advance on that front without overwhelming artillery support a hazardous proposition.
The artillery situation at Helles, as at Anzac Cove, remained perilous. The British had only 78 guns and howitzers and were still short of ammunition. When the battleship HMS Triumph was sunk on 25 May and another battleship-HMS Majestic-sunk on 27 May, both torpedoed, the situation worsened as the naval gunfire support was reduced. Those ships that remained in support could only fire while steaming at 12 kn (14 mph; 22 km/h), which did nothing to aid their accuracy.
The plan
Hunter-Weston's previous battle plans lacked subtlety or sense, and he had been unerring in his failure. For the latest attempt on Krithia, some elements of refinement had begun to appear in the plans. For one, General Sir Ian Hamilton, the commander of the Mediterranean Expeditionary Force, insisted that the objectives should be limited to an advance of 800 yd (730 m). This was to be made in two steps: the first step was to capture the Turkish trenches; the second was to advance a further 500 yd (460 m) and establish a new trench line.
The preliminary bombardment would also have two phases. The first bombardment would conclude at 11:20, at which point the British troops would feint an advance, hoping to draw the Turks to the firing line so that they would be caught in a second bombardment starting at 11:30.
The other innovation of the third battle was the use of eight armoured cars of the Royal Naval Air Service which were to advance along the main Krithia road in support of the Royal Naval Division's advance.
The disposition of the Allied troops from left to right (west to east) was as follows:
On the left of the line (western side) by the Aegean shore, the 29th Indian Brigade and the 1st Battalion of the Lancashire Fusiliers (from the 29th Division) would attack along Gully Spur and Gully Ravine.
The 29th Division would attack beside Gully Ravine on the left side of Fir Tree Spur.
The 42nd Division would attack on the right side of Fir Tree Spur to Kirte Dere.
The Royal Naval Division would attack up Achi Baba Nullah (also known as Kanli Dere or Bloody Valley), supported by the armoured cars on Krithia Spur.
The French would attack on the right along Kereves Spur.
The battle
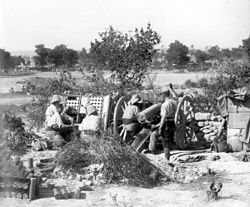
Picture - French Colonial 75-mm gun in action near Sedd el Bahr.
The attack began at noon on 4 June, when the last bombardment ended. There was pause in bombardment to pull Ottomans back into trenches who were further decimated there by the renewal of the bombardment. Ottoman losses were around 6,000 on that first day.
On the left, the attack of the Indian Brigade was quickly halted except along the Aegean shore where the 1/6th Battalion of the Gurkha Rifles managed to advance. The 14th Battalion of King George's Own Ferozepore Sikhs Regiment, advancing along the floor of Gully Ravine, were almost wiped out, losing 380 men out of 514 and 80% of their officers.
The 2nd Battalion of the Hampshire Regiment from the 29th Division, advancing along Fir Tree Spur alongside Gully Ravine, managed to advance but having lost contact with the Sikhs on their left were forced to defend along the bank of the ravine as well as to their front. Elsewhere, the 29th Division advance was held up with heavy casualties by Ottoman strongpoints that had survived the bombardment unscratched.
The advance of the 42nd Division was, by Gallipoli standards, very successful, quickly reaching the first objective of the Ottoman trenches and moving beyond to advance a total of 1,000 yd (910 m). This attack was made by the 127th (Manchester) Brigade which broke through the Ottoman 9th Division's defences and captured 217 prisoners.
The Royal Naval Division's advance was led by the 2nd Naval Brigade which managed to reach and capture the Ottoman trenches. When the second wave-the Collingwood Battalion-attempted to continue the advance, they were caught in enfilade fire from Kereves Dere to the right where the French advance had failed. The battalion, one of the newly arrived reinforcements, was utterly annihilated and was never reformed. Further attempts to reach the second objective were successful, but the position was untenable, so within a couple of hours the RND units had retreated to their starting positions.
With the main attack decided-success for the 42nd Division in the centre, failure everywhere else-Hunter-Weston considered how to deploy his reserves. If he was to exploit the success in the centre, there was the potential to set the Ottoman flanks to flight but also the danger of creating a vulnerable salient. He decided to reinforce the flanks and renew that attack; however, the French insisted they were unable to continue the offensive so any further advances by the Royal Naval Division in Achi Baba Nullah were abandoned. Further attacks along Gully Spur and Gully Ravine failed.
At 16:00, Hunter-Weston ordered for the troops to dig in and consolidate their positions; however, this coincided with the Ottoman reserves counter-attacking against the Manchester Brigade in the centre. Within one hour, the brigade was under attack from three sides so was eventually ordered to withdraw. By the end of the battle, their new front line was a mere 200-250 yd (180-230 m) in front of their start line, passing through a patch of vines that earned the area the name of 'The Vineyard' which was to be the site of heavy fighting in August.
Aftermath
The objectives of the third battle of Krithia had been more realistic than the previous attempts, but it ended in failure all the same with only small gains in ground. Both sides were severely stretched following the battle. If the British had the troops to resume the attack on the following day, the Ottomans believed they would not have been able to hold.
As it was, when the Ottomans launched a counter-attack against the 29th Division at the Vineyard on 6 June, the British came close to breaking. Second Lieutenant G.R.D Moor of the 2nd Battalion, the Hampshire Regiment was awarded the Victoria Cross for stemming the retreat of his battalion by shooting four of his own men.
Gallipoli campaign
First Battle of Krithia
Second Battle of Krithia
Third Battle of Krithia at Firstworldwar.com
More aircraft.
Source: WikiPedia