


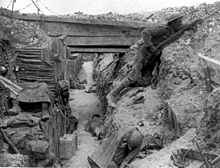
Trench Warfare - Picture
More about World War 1
|
|
Trench Warfare
Military history
Trench warfare is a form of occupied fighting lines, consisting largely of trenches, in which troops are largely immune to the enemy's small arms fire and are substantially sheltered from artillery. It has become a byword for attrition warfare, for stalemate in conflict, with a slow wearing down of opposing forces.
Trench warfare occurred when a military revolution in firepower was not matched by similar advances in mobility, resulting in a grueling form of warfare in which the defense held the advantage. In World War I, both sides constructed elaborate trench and dugout systems opposing each other along a front, protected from assault by barbed wire. The area between opposing trench lines (known as "no man's land") was fully exposed to artillery fire from both sides. Attacks, even if successful, often sustained severe casualties as a matter of course.
Overview
Field works
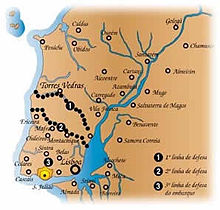
Picture - Lines of Torres Vedras
Field works are as old armies. Roman legions when in the presence of an enemy entrenched camps nightly on the move. Similar measures, from Frederic the Great's camp at Bunzelwitz), to Arthur Wellesley's with his defense lines at Torres Vedras, to the French lines of Weissenburg, were frequently used.:
Nor were fortifications restricted to European powers. Elaborate trench and bunker systems were independently developed by the Maori, who successfully employed by them as early as the 1840s to withstand British cannon, muskets, and an experimental poison-gas mortar, in the New Zealand Wars. British casualty rates of up to 45 per cent, such as at the Battle of Ohaeawai in 1845, proved contemporary firepower was insufficient to dislodge defenders from a trench system.
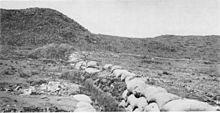
Picture - The Boer trench at the Battle of Magersfontein contributed to the surprise defeat of the Highland Brigade on 11 December 1899 during the Second Boer War.
Field works were later employed on an even larger scale in the American Civil War, the Second Anglo-Boer War, and the Russo-Japanese War. Fundamentally, as the range and rate of fire of rifled small arms increased, a defender shielded from enemy fire (in a trench, house window, behind a large rock, or behind other cover) was often able to kill several approaching foes before they closed with his position. This was only made more lethal by the introduction of rapid-firing artillery, exemplified by the "French 75", and high explosive fragmentation rounds. The increases in firepower had outstripped the ability of infantry to cover the ground between firing lines, and the ability of armor to withstand fire, even for cavalry. It would take a revolution in mobility to change that.
Trench warfare is strongly associated with World War I, when it was employed on the Western Front from September 1914 until the last weeks of the war. By the end of October 1914 the whole front in Belgium and France had solidified into lines of trenches, as it became clear infantry assaults were futile in the face of artillery fire as well as rapid rifle and machine gun fire. Both sides concentrated on breaking up enemy attacks and on protecting their own troops by digging deep into the ground. Trench warfare was also conducted on other fronts, including Italy and Gallipoli.

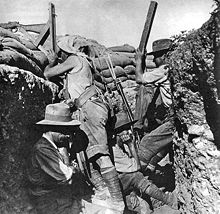
Picture - German western front 1915, German forward detachments guarding the entrance to a trench line in front of Arras
Symbol for the futility of war
Trench warfare has become a powerful symbol of the futility of war. Its image is of young men going "over the top" (over the parapet of the trench, to attack the enemy trench line) into a maelstrom of fire leading to certain death, typified by the first day of the Somme (on which the British suffered 57,000 casualties) or the grinding slaughter in the mud of Passchendaele. To the French, the equivalent is the attrition of the Battle of Verdun in which they suffered 380,000 casualties.
Trench warfare is associated with needless slaughter in appalling conditions, combined with the view that brave men went to their deaths because of incompetent and narrow-minded commanders who failed to adapt to the new conditions of Trench Warfare: class-ridden and backward-looking generals put their faith in the attack, believing superior morale and dash would overcome the weapons and moral inferiority of the defender. The British and Empire troops on the Western Front are commonly referred to as "lions led by donkeys." This view persisted in the Imperial Japanese Army in World War II.
Picture - Trenches of the 11th Cheshire Regiment at Ovillers-la-Boisselle, on the Somme, July 1916. One sentry keeps watch while the others sleep. Photo by Ernest Brooks.
In fact the picture is far more complex. It is easy to find examples of backward and inflexible generals early in World War I. There were failures such as Passchendaele, and Sir Douglas Haig is criticised for allowing his battles to continue long after they had lost any purpose other than attrition. Trench raiding and patrolling led to high casualties. There was an emphasis on seeking breakthroughs, rather than being content with "bite and hold" battles. Yet there were also tactical and technical innovations. The problems of Trench Warfare were recognized, and attempts were made to address them. Solutions included improvements in artillery, better infantry tactics and the development of tanks. The lessons of the first day of the Somme were learned very quickly, and by 1918 attacks were generally more successful and suffered fewer casualties; in the hundred days there was even a return to mobile warfare. The Allies eventually achieved a decisive victory.
In Britain, the reputations of the generals suffered from postwar attacks by prominent politicians deflecting blame from their own conduct of the war, from tactical experts promoting their own reputations and from nationalistic commentators from Empire nations blaming their British commanders for their losses. The Germans fared no better than the Allies.
World War I: Entrenchment
Implementation
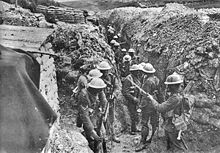
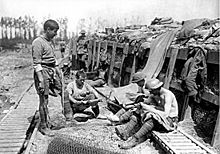
Picture - 1st Lancashire Fusiliers, in communication trench near Beaumont Hamel, Somme, 1916. Photo by Ernest Brooks.
Although technology had dramatically changed the nature of warfare by 1914, the armies of the major combatants had not correctly anticipated the implications. The French and German armies adopted dramatically different tactical doctrines. The French relied on the attack with speed and surprise. The Germans relied on firepower, investing heavily in howitzers and machine guns. The British lacked a coherent tactical doctrine, with an officer corps that rejected theory in favour of pragmatism.
While the armies expected to use entrenchments and cover, they did not allow for the effect of defences in depth. They required a deliberate approach to seizing positions from which fire support could be given for the next phase of the attack, rather than a rapid move to break the enemy's line. Critically, it was assumed that artillery could still destroy entrenched troops, or at least suppress them sufficiently for friendly infantry and cavalry to manoeuvre.
Picture - French Trench in northeastern France
In the face of modern firepower, digging in was standard practice by the start of World War I. To attack frontally was to court crippling losses, so an outflanking operation was the preferred method of attack against an entrenched enemy. After the Battle of the Aisne in September 1914, an extended series of attempted flanking moves, and matching extensions to the fortified defensive lines, soon saw the celebrated "race to the sea"; German and Allied armies produced a matched pair of trench lines from the Swiss border in the south to the North Sea coast of Belgium.
Trench warfare prevailed on the Western Front from 16 September 1914 until the Germans launched their Spring Offensive on 21 March 1918. After the buildup of forces in 1915, the Western Front became a deadlocked struggle between equals, to be decided by attrition. Frontal assaults, and their associated casualties, became inevitable because the continuous trench lines had no open flanks. Casualties of the defenders matched those of the attackers, as vast reserves were expended in costly counter-attacks or exposed to the attacker's massed artillery. There were periods in which rigid Trench Warfare broke down, such as during the battle of the Somme, but the lines never moved very far. The war would be won by the side that was able to commit the last reserves to the Western Front.
Early trenches were simple. They lacked traverses, and according to pre-war doctrine were to be packed with men fighting shoulder to shoulder, leading to heavy casualties from artillery fire. This, and the length of the front to be defended, soon led to front line trenches being held by fewer men. The importance of barbed wire was soon recognised, and wiring parties went out every night to improve the defences.
The small, improvised trenches of the first few months grew deeper and more complex, gradually becoming vast areas of interlocking defensive works. They resisted both artillery bombardments and mass infantry assaults. Shell-proof dugouts became a high priority. The space between the opposing trenches was referred to as no man's land and varied in width depending on the battlefield. On the Western Front it was typically between 100 and 300 yards (90-275 m), though only 30 yards (27 m) on Vimy Ridge.
After the German withdrawal to the Hindenburg line in March 1917, it stretched to over a kilometre in places. At the infamous "Quinn's Post" in the cramped confines of the Anzac battlefield at Gallipoli, the opposing trenches were only 16 yards (15 m) apart and hand grenades were thrown constantly. On the Eastern Front and in the Middle East, the areas to be covered were so vast, and the distances from the factories supplying shells, bullets, concrete and barbed wire so great, Trench Warfare in the West European style often did not occur.
In the Alps, Trench Warfare even stretched onto vertical slopes and deep into the mountains, to heights of 3900 m (12795 ft) above sea level. The Ortler had an artillery position on its summit near the front line. The trench-line management and trench profiles had to be adapted to the rough terrain, hard rock, and harsh weather conditions. Many trench systems were constructed within glaciers like the Adamello-Presanella group or the famous city below the ice on the Marmolada in the Dolomites.
Trench defensive systems
Very early in the war, British defensive doctrine suggested a main trench system of three parallel lines, interconnected by communications trenches. The point at which a communications trench intersected the front trench was of critical importance, and it was usually heavily fortified. The front trench was lightly garrisoned and typically only occupied in force during "stand to" at dawn and dusk. Between 70 and 100 yards (64-91 m) behind the front trench was located the support (or "travel") trench, to which the garrison would retreat when the front trench was bombarded.
Between 300 and 500 yards (275-460 m) further to the rear was located the third reserve trench, where the reserve troops could amass for a counter-attack if the front trenches were captured. This defensive layout was soon rendered obsolete as the power of artillery grew; however, in certain sectors of the front, the support trench was maintained as a decoy to attract the enemy bombardment away from the front and reserve lines. Fires were lit in the support line to make it appear inhabited and any damage done immediately repaired.
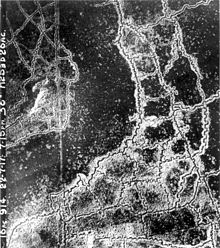
Picture - Aerial view of opposing trench lines between Loos and Hulluch, July 1917. German trenches at the right and bottom, British at the top-left.
Temporary trenches were also built. When a major attack was planned, assembly trenches would be dug near the front trench. These were used to provide a sheltered place for the waves of attacking troops who would follow the first waves leaving from the front trench. "Saps" were temporary, unmanned, often dead-end utility trenches dug out into no-man's land. They fulfilled a variety of purposes, such as connecting the front trench to a listening post close to the enemy wire or providing an advance "jumping-off" line for a surprise attack. When one side's front line bulged towards the opposition, a salient was formed. The concave trench line facing the salient was called a "re-entrant." Large salients were perilous for their occupants because they could be assailed from three sides.
Behind the front system of trenches there were usually at least two more partially prepared trench systems, kilometres to the rear, ready to be occupied in the event of a retreat. The Germans often prepared multiple redundant trench systems; in 1916 their Somme front featured two complete trench systems, one kilometer apart, with a third partially completed system a further kilometer behind. This duplication made a decisive breakthrough virtually impossible. In the event that a section of the first trench system was captured, a "switch" trench would be dug to connect the second trench system to the still-held section of the first.
The Germans, who had based their knowledge on studies of the Russo-Japanese War, made something of a science out of designing and constructing defensive works. They used reinforced concrete to construct deep, shell-proof, ventilated dugouts, as well as strategic strongpoints. They were more willing than their opponents to make a strategic withdrawal to a superior prepared defensive position. They were also the first to apply the concept of "defense in depth", where the front-line zone was hundreds of yards deep and contained a series of redoubts rather than a continuous trench. Each redoubt could provide supporting fire to its neighbours, and while the attackers had freedom of movement between the redoubts, they would be subjected to withering enfilade fire.
The British eventually adopted a similar approach, but it was incompletely implemented when the Germans launched the 1918 Spring Offensive and proved disastrously ineffective. France, by contrast, relied on artillery and reserves, not entrenchment. The characteristic barbed wire placed before trenches, in belts 15 m (50 ft) deep or more, differed, too; the German wire was heavier gauge, and British wire cutters, designed for the thinner native product, were unable to cut it.
Trench construction

Picture - Trench construction diagram from a 1914 British infantry manual
Fighting trenches were usually about 12 feet (3.7 m) deep. Trenches were never straight but were dug in a zigzagging or stepped pattern. Later fighting trenches broke the line into firebays connected by traverses. This meant that a soldier could never see more than 10 yards (9 m) or so along the trench. Consequently, the entire trench could not be enfiladed if the enemy gained access at one point; or if a bomb or shell landed in the trench, the blast could not travel far.
The banked earth on the lip of the trench facing the enemy was called the parapet and had a fire step. The embanked rear lip of the trench was called the parados. The parados protected the soldier's back from shells falling behind the trench. The sides of the trench were often revetted with sandbags, wooden frames and wire mesh. The floor of the trench was usually covered by wooden duckboards. In later designs the floor might be raised on a wooden frame to provide a drainage channel underneath.
Dugouts of varying degrees of luxury would be built in the rear of the support trench. British dugouts were usually 8 to 16 feet (2.4 to 4.9 m) deep, whereas German dugouts were typically much deeper, usually a minimum of 12 feet (3.7 m) deep and sometimes dug three stories down, with concrete staircases to reach the upper levels.
Picture - Australian light horseman using a periscope rifle, Gallipoli 1915
To allow a soldier to see out of the trench without exposing his head, a loophole could be built into the parapet. A loophole might simply be a gap in the sandbags, or it might be fitted with a steel plate. German snipers used armour-piercing bullets that allowed them to penetrate loopholes. Another means to see over the parapet was the trench periscope-in its simplest form, just a stick with two angled pieces of mirror at the top and bottom. In the Anzac trenches at Gallipoli, where the Turks held the high ground, the periscope rifle was developed to enable the Australians and New Zealanders to snipe at the enemy without exposing themselves over the parapet.
There were three standard ways to dig a trench: entrenching, sapping, and tunneling. Entrenching, where a man would stand on the surface and dig downwards, was most efficient, as it allowed a large digging party to dig the full length of the trench simultaneously. However, entrenching left the diggers exposed above ground and hence could only be carried out when free of observation, such as in a rear area or at night. Sapping involved extending the trench by digging away at the end face. The diggers were not exposed, but only one or two men could work on the trench at a time.
Tunneling was like sapping except that a "roof" of soil was left in place while the trench line was established and then removed when the trench was ready to be occupied. The guidelines for British trench construction stated that it would take 450 men 6 hours at night to complete 250 m (275yd) of front-line trench system. Thereafter, the trench would require constant maintenance to prevent deterioration caused by weather or shelling.
Picture - Breastwork "trench", Armentix¨res, 1916
The battlefield of Flanders presented numerous problems for the practice of Trench Warfare, especially for the Allied forces, mainly British and Canadians, who were often compelled to occupy the low ground. Heavy shelling quickly destroyed the network of ditches and water channels which had previously drained this low-lying area of Belgium. In most places, the water table was only a meter or so below the surface, meaning that any trench dug in the ground would quickly flood.
Consequently, many "trenches" in Flanders were actually above ground and constructed from massive breastworks of sandbags filled with clay. Initially, both the parapet and parados of the trench were built in this way, but a later technique was to dispense with the parados for much of the trench line, thus exposing the rear of the trench to fire from the reserve line in case the front was breached.
Trench geography in World War I
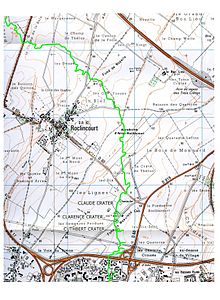
Picture - A modern map with the frontline close to Roclincourt highlighted in green.
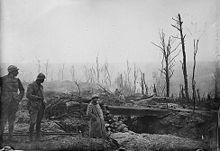
The confined, static, and subterranean nature of Trench Warfare resulted in it developing its own peculiar form of geography. In the forward zone, the conventional transport infrastructure of roads and rail were replaced by the network of trenches and light tramways. The critical advantage that could be gained by holding the high ground meant that minor hills and ridges gained enormous significance. Many slight hills and valleys were so subtle as to have been nameless until the front line encroached upon them. Some hills were named for their height in meters, such as Hill 60. A farmhouse, windmill, quarry, or copse of trees would become the focus of a determined struggle simply because it was the largest identifiable feature. However, it would not take the artillery long to obliterate it, so that thereafter it became just a name on a map.
Battlefield features could be given a descriptive name ("Polygon Wood" near Ypres or "Lone Pine"), a whimsical name ("Sausage Valley" and "Mash Valley" on the Somme), a unit name ("Inniskilling Inch" at Helles named for the Royal Inniskilling Fusiliers) or the name of a soldier ("Monash Valley" at Anzac named after General John Monash). Prefixing a feature with "Dead Man's" was also popular for obvious reasons, such as "Dead Man's Road" leading in to Pozix¨res, or "Dead Man's Ridge" at Anzac.
There were numerous trench networks named "The Chessboard" or "The Gridiron" because of the pattern they described. For the Australians at Mouquet Farm, the advances were so short and the terrain so featureless that they were reduced to naming their objectives as "points" on the map, such as "Point 81" and "Point 55."
Enemy trenches, which would become objectives in an attack, needed to be named as well. Many were named for some observed event such as "German Officers' Trench" at Anzac or "Ration Trench" on the Somme. The British gave an alcoholic flavour to the German trenches in front of Ginchy: "Beer Trench", "Bitter Trench", "Hop Trench", "Ale Alley", and "Pilsen Trench." Other objectives were named according to their role in the trench system, such as the "Switch Trench" and "Intermediate Trench" on the Somme.
Some sections of the British trench system read like a Monopoly board, with names such as "Park Lane" and "Bond Street". British regular divisions habitually named their trenches after units, which resulted in names such as "Munster Alley" (Royal Munster Fusiliers), "Black Watch Alley" (Black Watch Regiment) and "Border Barricade" (Border Regiment). The Anzacs tended to name features after soldiers ("Plugge's Plateau", "Walker's Ridge", "Quinn's Post", "Johnston's Jolly", "Russell's Top", "Brind's Road" and so forth).
World War I: Life in the trenches
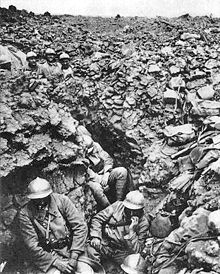
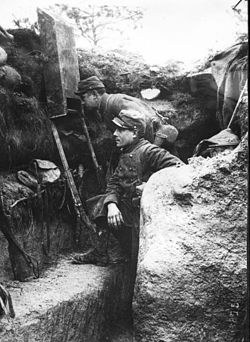
Picture - French trench at Cx´te 304, Verdun, 1916
An individual unit's time in the front-line trench was usually brief; from as little as one day to as much as two weeks at a time before being relieved. The Australian 31st Battalion once spent 53 days in the line at Villers Bretonneux, but such a duration was a rare exception. The 10th Battalion, CEF, averaged front line tours of six days in 1915 and 1916.
On an individual level, a typical British soldier's year could be divided as follows:
15% front line
10% support line
30% reserve line
20% rest
25% other (hospital, travelling, leave, training courses, etc.)
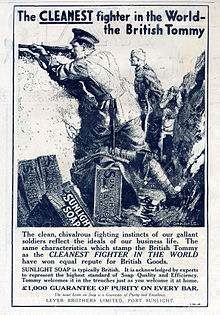
Picture - Advertisment for Sunlight Soap in the trenches (1915)
Even when in the front line, the typical battalion would only be called upon to engage in fighting a handful of times a year-making an attack, defending against an attack or participating in a raid. The frequency of combat would increase for the units of the "elite" fighting divisions-on the Allied side; the British regular divisions, the Canadian Corps, the French XX Corps and the Anzacs.

Picture - "Studying French in the Trenches", The Literary Digest, October 20, 1917.
Some sectors of the front saw little activity throughout the war, making life in the trenches comparatively easy. When the I Anzac Corps first arrived in France in April 1916 after the evacuation of Gallipoli, they were sent to a relatively peaceful sector south of Armentix¨res to "acclimatise". Other sectors were in a perpetual state of violent activity. On the Western Front, Ypres was invariably hellish, especially for the British in the exposed, overlooked salient. However, quiet sectors still amassed daily casualties through sniper fire, artillery, disease, and poison gas. In the first six months of 1916, before the launch of the Somme Offensive, the British did not engage in any significant battles on their sector of the Western Front and yet suffered 107,776 casualties. About 1 in 2 men would return alive and unwounded from the trenches.
A sector of the front would be allocated to an army corps, usually comprising three divisions. Two divisions would occupy adjacent sections of the front and the third would be in rest to the rear. This breakdown of duty would continue down through the army structure, so that within each front-line division, typically comprising three infantry brigades (regiments for the Germans), two brigades would occupy the front and the third would be in reserve. Within each front-line brigade, typically comprising four battalions, two battalions would occupy the front with two in reserve. And so on for companies and platoons. The lower down the structure this division of duty proceeded, the more frequently the units would rotate from front-line duty to support or reserve.
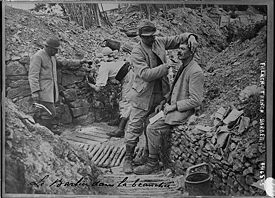
Picture - A barber in a French trench
During the day, snipers and artillery observers in balloons made movement perilous, so the trenches were mostly quiet. Consequently, trenches were busiest at night, when cover of darkness allowed the movement of troops and supplies, the maintenance and expansion of the barbed wire and trench system, and reconnaissance of the enemy's defenses. Sentries in listening posts out in no man's land would try to detect enemy patrols and working parties or indications that an attack was being prepared.
Pioneered by the Princess Patricia's Canadian Light Infantry in February 1915, trench raids were carried out in order to capture prisoners and "booty"-letters and other documents to provide intelligence about the unit occupying the opposing trenches. As the war progressed, raiding became part of the general British policy, the intention being to maintain the fighting spirit of the troops and to deny no man's land to the Germans. As well, they were intended to compel the enemy to reinforce, which exposed his troops to artillery fire.
Such dominance was achieved at a high cost when the enemy replied with his own artillery, and a post-war British analysis concluded the benefits were probably not worth the cost. Early in the war, surprise raids would be mounted, particularly by the Canadians, but increased vigilance made achieving surprise difficult as the war progressed. By 1916, raids were carefully planned exercises in combined arms and involved close co-operation of infantry and artillery.
A raid would begin with an intense artillery bombardment designed to drive off or kill the front-trench garrison and cut the barbed wire. Then the bombardment would shift to form a "box barrage", or cordon, around a section of the front line to prevent a counter-attack intercepting the raid. However, the bombardment also had the effect of notifying the enemy of the location of the planned attack, thus allowing reinforcements to be called in from wider sectors.
World War I: Death in the trenches
The intensity of World War I Trench Warfare meant about 10% of the fighting soldiers were killed. This compared to 5% killed during the Second Boer War and 4.5% killed during World War II. For British and Dominion troops serving on the Western Front, the proportion of troops killed was 12.5%, while the total proportion of troops who became casualties (killed or wounded) was 56%.
Medical services were primitive and antibiotics had not yet been discovered. Relatively minor injuries could prove fatal through onset of infection and gangrene. The Germans recorded that 15% of leg wounds and 25% of arm wounds resulted in death, mainly through infection. The Americans recorded 44% of casualties who developed gangrene died. 50% of those wounded in the head died and 99% of those wounded in the abdomen died. 75% of wounds came from shell fire. A wound resulting from a shell fragment was usually more traumatic than a gunshot wound.
A shell fragment would often introduce debris, making it more likely that the wound would become infected. These factors meant a soldier was three times more likely to die from a shell wound to the chest than from a gunshot wound. The blast from shell explosions could also kill by concussion. In addition to the physical effects of shell fire, there was the psychological damage. Men who had to endure prolonged bombardment would often suffer debilitating shell shock, a condition not well understood at the time.
As in many other wars, World War I's greatest killer was disease. Sanitary conditions in the trenches were quite poor, and common infections included dysentery, typhus, and cholera. Many soldiers suffered from parasites and related infections. Poor hygiene also led to fungal conditions, such as trench mouth and trench foot. Another common killer was exposure, since the temperature within a trench in the winter could easily fall below freezing. Burial of the dead was usually a luxury that neither side could easily afford. The bodies would lie in no man's land until the front line moved, by which time the bodies were often unidentifiable. On some battlefields, such as at the Nek in Gallipoli, the bodies were not buried until after the war. On the Western Front, bodies continue to be found as fields are ploughed and building foundations dug.
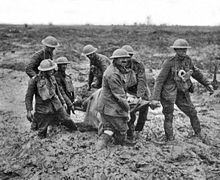
Picture - Stretcher bearers, Passchendaele, August 1917
At various times during the war-particularly early on-official truces were organised so that the wounded could be recovered from no man's land and the dead could be buried. Generally, senior commands disapproved of any slackening of the offensive for humanitarian reasons and so ordered their troops not to permit enemy stretcher-bearers to operate in no man's land. However, this order was almost invariably ignored by the soldiers in the trenches, who knew that it was to the mutual benefit of the fighting men of both sides to allow the wounded to be retrieved. So, as soon as hostilities ceased, parties of stretcher bearers, marked with Red Cross flags, would go out to recover the wounded, sometimes swapping enemy wounded for their own.
There were occasions when this unofficial cease fire was exploited to conduct a reconnaissance or to reinforce or relieve a garrison. One famous truce was the Christmas truce between British and German soldiers in the winter of 1914 on the front near Armentieres. German soldiers began singing Christmas carols and soon soldiers left their trenches. The soldiers exchanged gifts and stories, and played several games of football. As mentioned previously, the commanders of the warring nations disapproved of this cease fire, and the British court-martialed several of their soldiers. The spirit of this truce is portrayed in the 2005 movie Merry Christmas.
Weapons of World War I Trench Warfare
Infantry weapons
The common infantry soldier had four weapons to use in the trenches: the rifle, bayonet, shotgun, and hand grenade. The standard issue British rifle was the .303 Short, Magazine, Lee-Enfield (SMLE), originally developed as a cavalry carbine, with a maximum range of 1400yd (1280 m). The Ross rifle was widely used by the Canadian Corps early in the war and was reputedly more accurate than the British SMLE. However, it proved notoriously unreliable under battlefield conditions, often jamming when dirty or fired rapidly, and was gradually discarded for routine use in favour of the SMLE, except for sniping. Early in the war, the British were able to defeat German attacks at Mons and the First Battle of Ypres with massed rifle fire, but as Trench Warfare developed, opportunities to assemble a line of riflemen disappeared.
The German counterpart to the Lee-Enfield was the 7.92x57mm (.323") Mauser Gewehr 98. It was less suited to rapid fire than the SMLE, due to its smaller magazine and slower rate of fire. The British soldier was equipped with a 21-inch (53 cm) sword bayonet, which was too long and unwieldy to be particularly effective in close-quarters combat. However, bayonet use was safer than firing the rifle which, in a mxªlée, might strike an ally instead of an enemy. British figures recorded only 0.3% of wounds were caused by bayonets. The bayonet was also used to finish off wounded enemy soldiers during an advance, both saving ammunition and reducing the probability of being attacked from the rear. Imperial German soldiers generally carried the S98/05 "Butcher-blade" bayonet, which was an effective weapon in the open, but like the British bayonet, difficult to use in the narrow trenches when attached to a rifle.
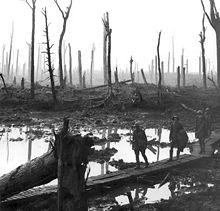
Picture - Chateau Wood, Ypres, 1917
A specialized group of fighters called trench sweepers (Nettoyeurs de Tranchées or Zigouilleurs) evolved to fight within the trenches. They cleared surviving enemy personnel from recently overrun trenches and made clandestine raids into enemy trenches to gather intelligence. Volunteers for this dangerous work were often exempted from participation in frontal assaults over open ground and from routine work like filling sandbags, draining trenches, and repairing barbed wire in no-man's land. When allowed to choose their own weapons, many selected grenades, knives and pistols. FN M1900 pistols were highly regarded for this work, but never available in adequate quantities. Colt Model 1903 Pocket Hammerless, Savage Model 1907, Star Bonifacio Echeverria and Ruby pistols were widely used.
Many soldiers preferred a short-handled spade or entrenching tool over a bayonet. They would sharpen the blade, and the shorter length made them easier to use in the confined quarters of the trenches. These tools could then be used to dig in after they had taken a trench. Since the troops were often not adequately equipped for Trench Warfare, improvised weapons were common in the first encounters, such as short wooden clubs and metal maces, as well as trench knives and brass knuckles. As the war progressed, better equipment was issued, and improvised arms were discarded.
Used by American soldiers in the Western front, the pump action shotgun was a formidable weapon in short range combat, enough so that Germany lodged a formal protest against their use on 14 September 1918, stating "every prisoner found to have in his possession such guns or ammunition belonging thereto forfeits his life", though this threat was apparently never carried out. The U.S. military began to issue models specially modified for combat, called "trench guns", with shorter barrels, higher capacity magazines, no choke, and often heat shields around the barrel, as well as lugs for the M1917 bayonet. Anzac and some British soldiers were also known to use sawn-off shotguns in trench raids, because of their portability, effectiveness at close range, and ease of use in the confines of a trench. This practice was not officially sanctioned, and the shotguns used were invariably modified sporting guns.
The hand grenade came to be the primary infantry weapon of Trench Warfare. Both sides were quick to raise specialist bombing squads. The grenade enabled a soldier to engage the enemy without exposing himself to fire, and it did not require precise accuracy to kill or maim. Another benefit is that if a soldier can get close enough to the trenches, enemies hiding in trenches can be attacked. The Germans and Turks were well equipped with grenades from the start of the war, but the British, who had ceased using grenadiers in the 1870s and did not anticipate a siege war, entered the conflict with virtually none, so soldiers had to improvise bombs with whatever was available (see Jam Tin Grenade). By late 1915, the British Mills bomb had entered wide circulation, and by the end of the war 75 million had been used.
Tanks
Tanks were first introduced by the British as a means to break the deadlock of Trench Warfare. They were first deployed at the Battle of Somme in limited numbers. They proved unreliable and ineffective at first, largely because of poor strategic and tactical planning, being spread too thinly on the ground. In addition, they were originally used over ground torn apart by large amounts of shell fire, which early tanks had trouble traversing. Later on, improved tanks and tactics allowed them to break through enemy lines to become a significant element of warfare.
Machine guns
The Germans embraced the machine gun from the outset-in 1904, sixteen units were equipped with 'Maschinengewehr'-and the machine gun crews were the elite infantry units; these units were attached to Jaeger (light infantry) battalions. By 1914, British infantry units were armed with two Vickers machine guns per battalion, the Germans had six per battalion, the Russians eight. The Americans had to wait until 1917 to see every infantry unit carry at least one machine gun. After 1915, the Maschinengewehr 08 was the standard issue German machine gun; its number "08/15" entered the German language as idiomatic for "dead plain". At Gallipoli and in Palestine the Turks provided the infantry, but it was usually Germans who manned the machine guns.
The British High Command were less enthusiastic about machine guns, supposedly considering the weapon too "unsporting" and encouraging defensive fighting; and they lagged behind the Germans in adopting it. Field Marshal Sir Douglas Haig is quoted as saying in 1915, "The machine gun is a much overrated weapon; two per battalion is more than sufficient", an attitude which resulted in record numbers of British casualties. In 1915 the Machine Gun Corps was formed to train and provide sufficient heavy machine gun teams.
It was the Canadians that made the best practice, pioneering area denial and indirect fire (soon adopted by all Allied armies) under the guidance of former French Army Reserve officer Major General Raymond Brutinel. Minutes before the attack on Vimy Ridge the Canadians thickened the artillery barrage by aiming machine guns at the precise angle to rain down on the Germans. They also significantly increased the amount of machine guns per battalion. To match demand, production of the Vickers machine gun was contracted to firms in the United States. By 1917, every company in the British forces were also equipped with four Lewis light machine guns, which significantly enhanced their firepower.

Picture - Vickers machine gun
The heavy machine gun was a specialist weapon, and in a static trench system was employed in a scientific manner, with carefully calculated fields of fire, so that at a moment's notice an accurate burst could be fired at the enemy's parapet or a break in the wire. Equally it could be used as light artillery in bombarding distant trenches. Heavy machine guns required teams of up to eight men to move them, maintain them, and keep them supplied with ammunition. This made them impractical for offensive maneuvers, contributing to the stalemate on the Western Front.
Mortars
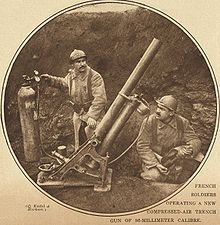
Picture - French soldiers operating a compressed-air trench mortar of 86-millimetre calibre
Mortars, which lobbed a shell in a high arc over a relatively short distance, were widely used in trench fighting for harassing the forward trenches, for cutting wire in preparation for a raid or attack, and for destroying dugouts, saps and other entrenchments. In 1914, the British fired a total of 545 mortar shells; in 1916, they fired over 6,500,000. Similarly, howitzers, which fire on a more direct arc than mortars, raised in number from over 1,000 shells in 1914, to over 4,500,000 in 1916. The smaller numerical difference in mortar rounds, as opposed to howitzer rounds, is presumed to be related to the expanded costs of manufacturing the larger and more resource intensive howitzer rounds.
The main British mortar was the Stokes, a precursor of the modern mortar. It was a light mortar, but was easy to use, and capable of a rapid rate of fire by virtue of the propellant cartridge being attached to the shell. To fire the Stokes mortar, the round was simply dropped into the tube, where the cartridge was ignited automatically when it struck the firing pin at the bottom. The Germans used a range of mortars. The smallest were grenade-throwers ('Granatenwerfer') which fired "pineapple" bombs. Their medium trench-mortars were called mine-throwers ('Minenwerfer'), dubbed "moaning minnies" by British Commonwealth troops. The heavy mortar was called the 'Ladungswerfer', which threw "aerial torpedoes", containing a 200 lb (90 kg) charge to a range of 1000yd (914 m). The flight of the missile was so slow and leisurely men on the receiving end could make some attempt to seek shelter.
Artillery
Artillery dominated the battlefields of Trench Warfare. An infantry attack was rarely successful if it advanced beyond the range of its supporting artillery. In addition to bombarding the enemy infantry in the trenches, the artillery could be used to precede infantry advances with a creeping barrage, or engage in counter-battery duels to try to destroy the enemy's guns. Artillery mainly fired fragmentation, high explosive, or, later in the war, gas shells. The British experimented with firing thermite incendiary shells to set trees and ruins alight. However, all armies had experienced shell shortages during the first year or two of World War I, due to under-estimating their usage under intensive combat. A knowledge that the combatant nations had already learned from the Russo-Japanese War in 1904-1905, but had failed to capitalize on; when daily artillery fire consumed ten times more than daily factory output.

Picture - Loading a 15-inch howitzer
Artillery pieces were of two types: guns and howitzers. Guns fired high-velocity shells over a flat trajectory and were often used to deliver fragmentation and to cut barbed wire. Howitzers lofted the shell over a high trajectory so it plunged into the ground. The largest calibers were usually howitzers. The German 420 mm howitzer weighed 20 tons and could fire a one-ton shell over 10 km. A critical feature of period artillery pieces was the hydraulic recoil mechanism, which meant the gun did not need to be re-aimed after each shot.
Initially each gun would need to register its aim on a known target, in view of an observer, in order to fire with precision during a battle. The process of gun registration would often alert the enemy an attack was being planned. Towards the end of 1917, artillery techniques were developed enabling fire to be delivered accurately without registration on the battlefield - the gun registration was done behind the lines then the pre-registered guns were brought up to the front for a surprise attack.
Gas
Gas was first used against trenches - unsuccessfully - by British troops against Maori warriors in the New Zealand Wars. Early World War I gasses were unreliable, as they could easily be blown back on the troops that deployed them. There were three main types used: mustard gas, chlorine, and phosgene. This prompted the use of gas masks. Early on, improvised gas masks were made by urinating on a handkerchief and putting it over their nose and mouth so the urea would disable the poison.
Tear gas was first employed in August 1914 by the French, but this could only disable the enemy. In April 1915, chlorine was first used by Germany at the Second Battle of Ypres. A large enough dose could kill, but the gas was easy to detect by scent and sight. Those that were not killed on exposure could suffer permanent lung damage. Phosgene, first used in December 1915, was the ultimate killing gas of World War I-it was 18 times more powerful than chlorine and much more difficult to detect.
However, the most effective gas was mustard gas, introduced by Germany in July 1917. Mustard gas was not as fatal as phosgene, but it was hard to detect and lingered on the surface of the battlefield and so could inflict casualties over a long period. The burns it produced were so horrific that a casualty resulting from mustard gas exposure was unlikely to be fit to fight again. Only 2% of mustard gas casualties died, mainly from secondary infections.
The first method of employing gas in World War I was by releasing it from a cylinder when the wind was favourable. Such an approach was obviously prone to miscarry if the direction of the wind was misjudged. Also, the cylinders needed to be positioned in the front trenches where they were likely to be ruptured during a bombardment. Later in the war, gas was delivered by artillery or mortar shell.
Flamethrowers
The Germans employed Flammenwerfern (flamethrowers) during the war for the first time against the French on 25 June 1915, then against the British 30 July in Hooge. The technology was in its infancy, and use was not very common until the end of 1917 when portability and reliability were improved. It was used in more than 300 documented battles. In 1918, it became a weapon of choice for Stoxtruppen (Stormtroopers) with a team of six Pionieren (pioneers, engineers) per squad.
Helmets
During the first year of the First World War, none of the combatant nations equipped their troops with steel helmets. Soldiers went into battle wearing simple cloth or leather caps that offered virtually no protection from the damage caused by modern weapons. German troops were wearing the traditional leather Pickelhaube (spiked helmet), with a covering of cloth to protect the leather from the splattering of mud.
Once the war entered the static phase of Trench Warfare, the number of lethal head wounds that troops were receiving from fragmentation increased dramatically. The French were the first to see a need for greater protection and began to introduce steel helmets in the summer of 1915. The Adrian helmet replaced the traditional French kepi and was later adopted by the Belgian, Italian and many other armies.
At about the same time the British were developing their own helmets. The French design was rejected as not strong enough and too difficult to mass-produce. The design that was eventually approved by the British was the Brodie helmet. This had a wide brim to protect the wearer from falling objects, but offered less protection to the wearer's neck. When the Americans entered the war, this was the helmet they chose, though some units used the French Adrian helmet.
The traditional German 'pickelhaube' was replaced by the Stahlhelm or "steel helmet" in 1916. Some elite Italian units used a helmet derived from ancient Roman designs. None of these standard helmets could protect the face or eyes, however. Special face-covers were designed to be used by machine gunners, and the Belgians tried out goggles made of louvres to protect the eyes.
Wire
The use of barbed wire was decisive in slowing infantry traveling across the battlefield. Slowed down by wire obstacles, they were much more likely to be hit by concentrated rifle and machinegun fire. Liddell Hart identified barbed wire and the machine gun as the elements that had to be broken to regain a mobile battlefield. Wiring was usually done at night, to avoid casualties in no man's land. The screw picket, invented by the Germans and later adopted by the Allies during the war, was quieter than driving stakes, and thus helped decrease the amount of noise working parties would create. Methods to defeat it were rudimentary. British and Commonwealth forces relied on wire cutters, which proved unable to cope with the heavier gauge German wire. The Bangalore torpedo was adopted by many armies, and continued in use past the end of World War II.
Aircraft
The fundamental purpose of the aircraft in Trench Warfare was reconnaissance and artillery observation. Aerial reconnaissance was so significant in exposing movements, it has been said the trench stalemate was a product of it. The role of the fighter was to protect friendly reconnaissance aircraft and destroy those of the enemy, or at least deny them the freedom of friendly airspace. This involved achieving air superiority over the battlefield by destroying the enemy's fighters as well.
Spotter aircraft would monitor the fall of shells during registration of the artillery. Reconnaissance aircraft would map trench lines, first with hand-drawn diagrams, later with photography, monitor enemy troop movements, and locate enemy artillery batteries so that they could be destroyed with counter-battery fire.
New weapons

Picture - German soldier with MP 18, 1918.
In 1917 and 1918, new types of weapons were fielded. They changed the face of warfare tactics and were later employed during World War II.
The French introduced the CSRG 1915 Chauchat during Spring 1916 around the concept of "walking fire", employed in 1918 when 250,000 weapons were fielded. More than 80,000 of the best shooters received the semi-automatic RSC 1917 rifle, allowing them to rapid fire at waves of attacking soldiers. Firing ports were installed in the newly arrived FT 1917 tanks.
The French Army fielded a ground version of the Hotchkiss Canon de 37 mm used by the French Navy. It was primarily used to destroy German machine gun nests and concrete reinforced pillboxes with high explosive rounds, but an armour piercing round was designed to defeat the German tanks, making it the first anti tank gun.
A new type of machine gun was introduced in 1916. Initially an aircraft weapon, the Bergmann LMG 15 was modified for ground use, with the later dedicated ground version being the LMG 15 n. A. It was used as an infantry weapon on all European and Middle Eastern fronts until the end of World War I. It later inspired the MG 30 and the MG 34 as well as the concept of the general purpose machine gun.
What became known as the submachine gun had its genesis in World War I, developed around the concepts of infiltration and fire and movement, specifically to clear trenches of enemy soldiers when engagements were unlikely to occur beyond a range of a few feet. The MP 18 was the first practical submachine gun used in combat. It was fielded in 1918 by the German Army as the primary weapon of the stormtroopers, assault groups that specialized in trench combat.
Mining
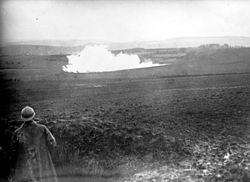
Picture - Explosion of a mine seen from a French position. 1916
The dry chalk of the Somme was especially suited to mining, but with the aid of pumps, it was also possible to mine in the sodden clay of Flanders. Specialist tunneling companies, usually made up of men who had been miners in civilian life, would dig tunnels under no man's land and beneath the enemy's trenches. These mines would then be packed with explosives and detonated, producing a large crater. The crater served two purposes: it could destroy or breach the enemy's trench and, by virtue of the raised lip that they produced, could provide a ready-made "trench" closer to the enemy's line. When a mine was detonated, both sides would race to occupy and fortify the crater.
If the miners detected an enemy tunnel in progress, they would often drive a counter-tunnel, called a counter-mine or camouflet, which would be detonated in an attempt to destroy the other tunnel prematurely. Night raids were also conducted with the sole purpose of destroying the enemy's mine workings. On occasion, mines would cross and fighting would occur underground. The mining skills could also be used to move troops unseen. On one occasion a whole British division was moved through interconnected workings and sewers without German observation. The British detonated a number of mines on July 1, 1916, the first day of the Battle of the Somme. The largest mines-the Y Sap Mine and the Lochnagar Mine-each containing 24 tons of explosives, were blown near La Boiselle, throwing earth 4,000 feet into the air.
At 3.10 AM on June 7, 1917, 19 mines were detonated by the British to launch the Battle of Messines. The average mine contained 21 tons of explosive and the largest, 125 feet beneath Saint-Eloi, was twice the average at 42 tons. The combined force of the explosions was supposedly felt in England. As remarked by General Plumer to his staff the evening before the attack:
"Gentlemen, we may not make history tomorrow, but we shall certainly change the geography."
The craters from these and many other mines on the Western Front are still visible today. Three further mines were laid for Messines but were not detonated as the tactical situation had since changed. One blew during a thunderstorm in 1955; the other two remain to this day.
Trench battles
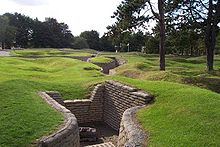
Picture - German trenches in Vimy
While trenches have often been dug as defensive measures, in the pre-firearm era, they were mainly a type of hindrance for an attacker of a fortified location, such as the moat around a castle (this is technically called a ditch). An early example of this can be seen in the Battle of the Trench.
Only with the advent of accurate firearms, did the use of trenches as positions for the defender of a fortification become common. Elaborate trench and bunker systems were employed by the MÄori to withstand British artillery barrages, poison-gas shells and bayonet charges during the New Zealand Wars in the 1840s. Trench systems were also employed in the Russo-Japanese War and American Civil War. The military usage evolved very quickly in the First World War, until whole systems of extensive main trenches, backup trenches (in case the first lines were overrun) and communication trenches had been developed, often stretching dozens of kilometres along a front without interruption, and some kilometres further back from the opponent's lines.
Strategy
The fundamental strategy of Trench Warfare in World War I was to defend one's own position strongly while trying to achieve a breakthrough into the enemy's rear. The effect was to end up in attrition; the process of progressively grinding down the opposition's resources until, ultimately, they are no longer able to wage war. This did not prevent the ambitious commander from pursuing the strategy of annihilation-the ideal of an offensive battle which produces victory in one decisive engagement.
The Commander in Chief of the British forces during most of World War I, General Douglas Haig, was constantly seeking a "breakthrough" which could then be exploited with cavalry divisions. His major trench offensives-the Somme in 1916 and Flanders in 1917-were conceived as breakthrough battles but both degenerated into costly attrition. The Germans actively pursued a strategy of attrition in the Battle of Verdun, the sole purpose of which was to "bleed the French Army white". At the same time the Allies needed to mount offensives in order to draw attention away from other hard-pressed areas of the line.
World War I tactics
Picture - French troopers using periscope, 1915
The popular image of a trench assault is of a wave of soldiers, bayonets fixed, going "over the top" and marching in a line across no man's land into a hail of enemy fire. This was the standard method early in the war and successful examples are few. The more common tactic was to attack at night from an advanced post in no man's land, having cut the barbed wire beforehand. In 1917, the Germans innovated with infiltration tactics where small groups of highly trained and well-equipped troops would attack vulnerable points and bypass strong points, driving deep into the rear areas. The distance they could advance was still limited by their ability to supply and communicate.
The role of artillery in an infantry attack was twofold. The first aim of a bombardment was to prepare the ground for an infantry assault killing or demoralising the enemy garrison and destroying his defences. The duration of these initial bombardments varied, from seconds to days. The problem with artillery bombardments prior to infantry assaults was that they were often ineffective at destroying enemy defences and only served to provide the enemy with advance notice that an attack was imminent. The British bombardment that began the Battle of the Somme lasted eight days but did little damage to either the German barbed wire or their deep dug-outs where the defenders were able to wait out the bombardment in relative safety.
Once the guns stopped the defenders had time to emerge and were usually ready for the attacking infantry. The second aim was to protect the attacking infantry by providing an impenetrable "barrage" or curtain of shells to prevent an enemy counter-attack. The first attempt at sophistication was the "lifting barrage" where the first objective of an attack was intensely bombarded for a period before the entire barrage "lifted" to fall on a second objective farther back. However, this usually expected too much of the infantry, and the usual outcome was that the barrage would outpace the attackers, leaving them without protection.
This resulted in the use of the "creeping barrage" which would lift more frequently but in smaller steps, sweeping the ground ahead and moving so slowly that the attackers could usually follow closely behind it. This became the standard method of attack from late 1916 onward. The main benefit of the barrage was suppression of the enemy rather than to cause casualties or material damage.
Capturing the objective was half the battle, but the battle was only won if the objective was held. The attacking force would have to advance with not only the weapons required to capture a trench but also the tools-sandbags, picks and shovels, barbed wire-to fortify and defend from counter-attack. The Germans placed great emphasis on immediately counter-attacking to regain lost ground. This strategy cost them dearly in 1917 when the British started to limit their advances so as to be able to meet the anticipated counter-attack from a position of strength. Part of the British artillery was positioned close behind the original start line and took no part in the initial bombardment, being saved to support the advancing troops as they moved beyond the range of guns further back.
World War I communications
A major difficulty faced by an attacking force in a trench battle was unreliable communications. Wireless communications were still in their infancy, so the available methods were telephone, telegraph, semaphore, signal lamps, signal flares, homing pigeons and runners. Messages frequently could not get through, or if they did, were out of date. A delay would pass when transferring news to the division, corps and army headquarters.
Consequently, the outcome of many trench battles was decided by the company and platoon commanders in the thick of the fighting. Senior commanders could not influence the battle for lack of information and inability to get orders to the troops. Opportunities were frequently lost because reinforcements could not be committed at the right time or place, and supporting artillery could not react to a changing situation.
World War I - Breaking the deadlock
Throughout World War I, the major combatants slowly groped their way towards the tactics necessary for breaking the deadlock of Trench Warfare, beginning with the French and Germans, with the British Empire forces also contributing to the collective learning experience. The Germans were able to reinforce their western front with additional troops from the east once Russia dropped out of the war in 1917. This allowed them to take units out of the line and train them in new methods and tactics, such as stormtroopers.
The new methods involved men rushing forward in small groups using whatever cover was available and laying down covering fire for other groups in the same unit as they moved forward. The new tactics, intended to achieve surprise by disrupting entrenched enemy positions, were to bypass strongpoints and attack the weakest parts of an enemy's line. Additionally, they acknowledged the futility of managing a grand detailed plan of operations from afar, opting instead for junior officers on the spot to exercise initiative. These infiltration tactics proved very successful during the German 1918 Spring Offensive against Allied forces.
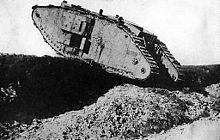
Picture - British Mark IV Female tank crossing a trench (training in England, 1917)
Conceived to provide protection from fire, tanks added mobility as well. As the Allied forces perfected them, they broke the deadlock. While not effectively employed at first, tanks had tremendous effects on the morale of German troops in the closing stages of the war on the Western front. The average infantryman had no anti-tank capability, and there were no specialized anti-tank guns. Once tanks began to be used in concentrations, they easily broke through German lines and could not be dislodged through infantry counterattack.
During the last 100 days of World War I, the British forces broke through the German trench system and harried the Germans back using infantry supported by tanks and close air support. Between the two world wars these techniques were used by J.F.C. Fuller and B.H. Liddell Hart to develop theories about a new type of warfare. The ideas were picked up by the Germans, who developed them further and put them into practice as blitzkrieg.
World War II
The stunning victories by the Germans early in World War II showed that fixed fortifications like the Maginot Line were worthless if there was room to circumvent them. At the Battle of Sevastopol, Red Army forces successfully held trench systems on the narrow peninsula for several months against intense German bombardment. The Western Allies in 1944 broke through the incomplete Atlantic Wall with relative ease through a combination of amphibious landings, naval gunfire, air attack, and airborne landings. Combined arms tactics where infantry, artillery, armour and aircraft cooperate closely made Trench Warfare a thing of the past.
This is not to say entrenchment is redundant. It is still a valuable method for reinforcing natural obstacles to create a line of defence. For example, at the Battle of Stalingrad, soldiers on both sides dug trenches within the ruins. In addition, before the start of the Battle of Kursk, the Soviets constructed a system of defence more elaborate than any other they built during World War II. These defences succeeded in stopping the German armoured pincers from meeting and enveloping the salient.
The Italian Campaign fought from 1943 until the end of the war in Europe largely consisted of the Allies storming strongly fortified German lines which stretched from one coast, over the mountains to the other coast. When the Allies broke through one line, the Germans would retreat up the peninsular to yet another freshly prepared fortified line.
At the start of the Battle of Berlin, the last major assault of World War II, the Russians attacked over the river Oder against German troops dug in on the Seelow Heights, about 50 km (30 mi) east of Berlin. Entrenchment allowed the Germans, who were massively outnumbered, to survive a bombardment from the largest concentration of artillery in history; as the Red Army attempted to cross the marshy riverside terrain, they lost tens of thousands of casualties to the entrenched Germans before breaking through.
Post-1945 Trench Warfare
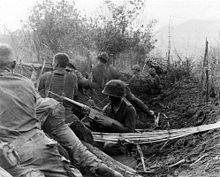
Picture - Men of the 1st Brigade, 101st Airborne Division, fire from old Viet Cong trenches.
Trench warfare has been infrequent since the end of World War I. When two large armoured armies meet, the result has generally been mobile warfare of the type which developed in World War II. However, Trench Warfare reemerged in the latter stages of the Chinese Civil War (Huaihai Campaign), the Korean War, and in some locations and engagements during the Vietnam War. During the Cold War, NATO forces routinely trained to fight through extensive works called "Soviet-style trench systems", named after the Warsaw Pact's complex systems of field fortifications, an extension of Soviet field entrenching practices for which they were famous in their Great Patriotic War.
Another example of Trench Warfare after World War I was the Iran-Iraq War, in which both armies had a large number of infantry with modern small arms, but very little armour, aircraft, or training in combined operations. Tactics used included Trench Warfare, machine gun posts, bayonet charges, use of barbed wire across trenches and on no-man's land, human wave attacks and Iraq's extensive use of chemical weapons such as mustard gas against Iranian troops and civilians as well as Iraqi Kurds. The war lasted eight years.
Although mainly a siege, it was not unusual to find an extensive trench system inside and outside the city of Sarajevo during the siege of 1992-1996. It was used mainly for transportation to the frontline or to avoid snipers inside the city. Any pre-existing structures were used as trenches, the best known example is the bobsleigh course on TrebeviÄ, which was used by both Serb and Bosniak during the siege. Another example of trench stalemate was the Eritrean-Ethiopian War of 1998-2000. The front line in Korea and the front lines between Pakistan and India in Kashmir are two examples of demarcation lines which could become hot at any time. They consist of kilometers of trenches linking fortified strongpoints and in Korea surrounded by millions of land mines.
Sangar (fortification)
Bidwell, Shelford, and Graham, Dominick, Fire-power - The British Army Weapons and Theory of War 1904-1945, Pen & Sword Books, 2004
Ellis, John, Eye-Deep in Hell - Life in the Trenches 1914-1918, Fontana, 1977
Griffith, Paddy (1996). Battle Tactics of the Western Front - The British Army's Art of Attack 1916-18. Yale University Press. ISBN 0 300 06663 5.
Griffith, Paddy (2004). Fortifications of the Western Front 1914-18. Osprey. ISBN 9781841767604.
Keegan, John. The First World War. (1999) Alfred A. Knophf, New York. ISBN 0-375-40052-4.
Further reading
Ashworth, Tony Trench Warfare 1914-1918: The Live and Let Live System (1980). ISBN 0330480685
Ashworth, Tony The Sociology of Trench Warfare, British Journal of Sociology, 21 (1968), 407-20.
Axelrod, Robert. (2006). The Evolution of Cooperation Revised edition Perseus Books Group, ISBN 0465005640 See excerpts from the Chapter The Live-and-Let-Live System in Trench Warfare in World War I
Canfield, Bruce N. "Give Us More Shotguns!" American Rifleman, May 2004.
Cole, James P. (Capt.) and Schoomaker, Oliver (Maj.) (2009). Trench Warfare: World War 1: Military Training, ISBN 1449553141
Dupuy, Trevor N., Colonel, AUS (rtd). Evolution of Weapons and Warfare. Indianapolis, Indiana: Bobbs-Merrill, 1980.
_____. Numbers, Predictions, and War. Indianapolis, Indiana: Bobbs-Merrill, 1979.
Fitzsimmons, Bernard, general editor. (with Gunston, Bill, Hogg, Ian V., & Preston, Anthony). Encyclopedia of 20th Century Weapons and Warfare. London: Phoebus Publishing Co, 1977. 24 volumes.
Gudmundsson, B.I. Stormtroop Tactics: Innovation in the German Army, 1914-1918. (1989)
Haber, L. F. The Poisonous Cloud: Chemical Warfare in the First World War (1986);
Herwig, Holger H. Operation Michael: The "Last Card". German Spring Offensive in 1918 (2001)
Kaye, C.A. "Military Geology in the United States Sector of the European Theater of Operations during World War II". Bulletin of the Geological Society of America, 68(1): 47-54, 1 fig., 1957.
Palazzo, A. Seeking Victory on the Western Front: The British Army and Chemical Warfare in World War I (2000)
Sheffield, G. D. Leadership in the Trenches: Officer-Man Relations, Morale and Discipline in the British Army in the Era of the First World War (2000)
Smith, L.V. Between Mutiny and Obedience. The Case of the French Fifth Infantry Division during World War I (1994)
- Trench Warfare" in Oral Histories of the First World War: Veterans 1914-1918. Library and Archives Canada.
Denis Winter, Death's Men: Soldiers of the Great War. 1978, ISBN 0-14-016822-2
James Belich, The New Zealand Wars (Penguin Books, 1986)
Michael King, The Penguin History of New Zealand Pp 184 et seq, (Penguin, 2003) ISBN 97801433018671
-- (April 1917). "What You See At The Front: A Picture of the Trenches and What Are Behind Them, Made by Detailed Maps, Diagrams, and Photographs". The World's Work: A History of Our Time XXXIII: 602-622. http://books.google.com/?id=lPAMVa7esS4C&pg=PA602. Retrieved 2009-08-04.
More aircraft.
Source: WikiPedia